Author Damien Cauquil
Category Reverse-Engineering
Tags reverse-engineering, firmware, JieLi, smartwatch, hardware, ghidra, 2026
In a blog post published last December, we demonstrated how we managed to extract the firmware from a smartwatch by exploiting an out-of-bounds read vulnerability and spying on its screen interface. Follow us on our long and unexpected journey to figure out how this smartwatch can measure heart rate or blood pressure with no visible sensor, the problems we encountered while analyzing its firmware, and how we solved them to uncover The Truth about this device.
Introduction
This blog post is a follow-up to our previous post describing how we managed to extract the firmware of a smartwatch. It contains many references and details introduced in our previous post, readers are therefore advised to read it first.
Soon after our successful firmware extraction stunt, we started analyzing the recovered binary blob to search for our watch's main application code. It quickly became clear that what initially looked like an easy task would definitely be harder to achieve, to say the least. But we were not expecting to spend weeks to make our way into the extracted data only to prove that this smartwatch's vital measurements cannot be trusted. Follow us deep into the White Rabbit's hole to discover why this watch is just a lie.
Firmware teardown
We managed to extract a 2-MB firmware from the target smartwatch and a quick analysis of its first bytes revealed it may
contain some binary data related to the watch's main application through the presence of an app.bin text string. That was
promising. Grigoryev's documentation describes various flash memory layouts and one of them seemed to particularly fit the
structure of our extracted binary blob, JieLi's new firmware format1:
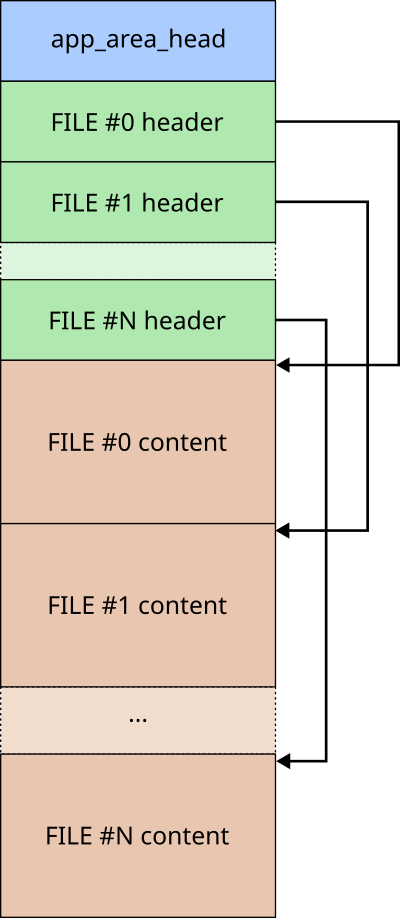
Our binary blob is a bit different but its header matches the documented structure composed of a finite number of file header structures:
| Offset | Size in bytes | Field name |
|---|---|---|
| 0x00 | 2 | Header CRC |
| 0x02 | 2 | Data CRC |
| 0x04 | 4 | Data offset |
| 0x08 | 4 | Data size (in bytes) |
| 0x0C | 1 | File attributes (bits) |
| 0x0D | 1 | RFU |
| 0x0E | 2 | File index |
| 0x10 | 16 | File name |
We wrote a small Python script to parse this series of file headers, check CRC values, and display each file header. The results were as follows:
JLFS.FileHeader(hcrc=0xf869, dcrc=0xb1b6, offset=0x01e00120, size=806828, name='app_area_head')
JLFS.FileHeader(hcrc=0x20c3, dcrc=0x2d89, offset=0x00000120, size=805628, name='app.bin')
JLFS.FileHeader(hcrc=0xb1c7, dcrc=0x16d3, offset=0x000c4c1c, size=912, name='cfg_tool.bin')
JLFS.FileHeader(hcrc=0xf9c9, dcrc=0xff01, offset=0x000d7000, size=73728, name='VM')
JLFS.FileHeader(hcrc=0x6821, dcrc=0xffff, offset=0x00000000, size=880640, name='PRCT')
JLFS.FileHeader(hcrc=0x6e8c, dcrc=0xffff, offset=0x000e9000, size=4096, name='BTIF')
JLFS.FileHeader(hcrc=0x7027, dcrc=0xffff, offset=0x000ea000, size=4096, name='EXIF')
JLFS.FileHeader(hcrc=0xfcfe, dcrc=0xffff, offset=0x000eb000, size=753664, name='FATFSI')
JLFS.FileHeader(hcrc=0x143d, dcrc=0xffff, offset=0x001a3000, size=375068, name='USERIF')
Based on this output, we determined the following firmware image map:
| Offset | Size in bytes | Attributes | File name |
|---|---|---|---|
| 0x01E00120 | 806828 | 0x83 | app_area_head |
| 0x00000120 | 805628 | 0x82 | app.bin |
| 0x000c4c1c | 912 | 0x82 | cfg_tool.bin |
| 0x000d7000 | 73728 | 0x12 | VM |
| 0x00000000 | 880640 | 0x92 | PRCT |
| 0x000e9000 | 4096 | 0x92 | BTIF |
| 0x000ea000 | 4096 | 0x92 | EXIF |
| 0x000eb000 | 753664 | 0x92 | FATFSI |
| 0x001a3000 | 375068 | 0x92 | USERIF |
Splitting our firmware into sections
Based on the recovered information, we only had to extract each file based on its file offset and size
in a dedicated folder for further analysis. We did not extract the app_area_head special file as it
simply defines the memory region where the data is stored, skipping the 0x120 bytes corresponding to
its header (9 files x 32-byte header = 0x120 bytes).
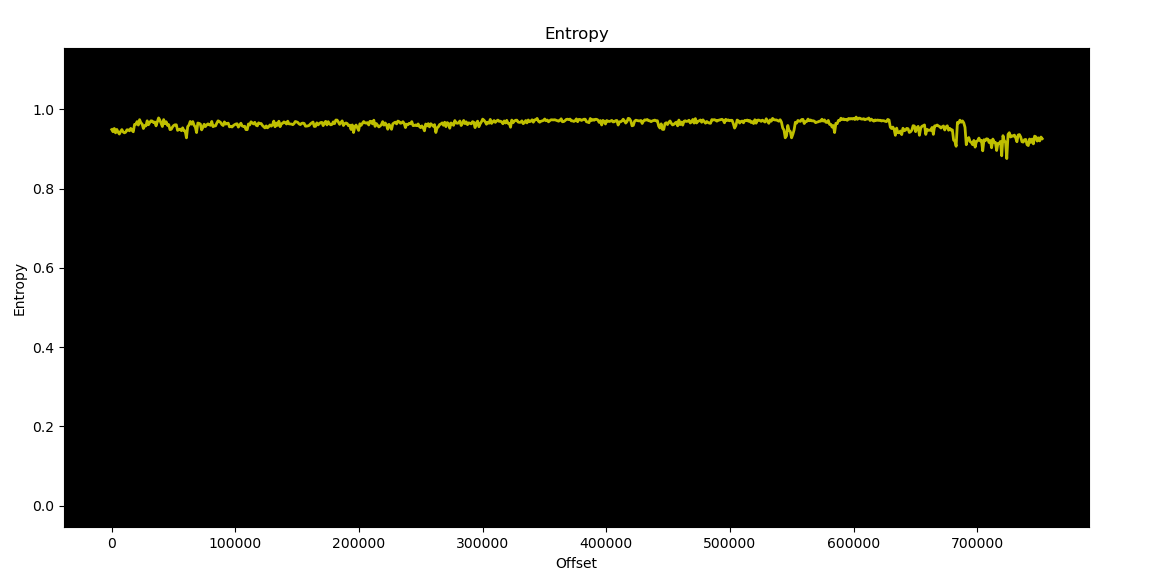
A first look at the app.bin file revealed that it does not seem to be encrypted, based on a Shannon entropy
graph generated with binwalk, as shown below.
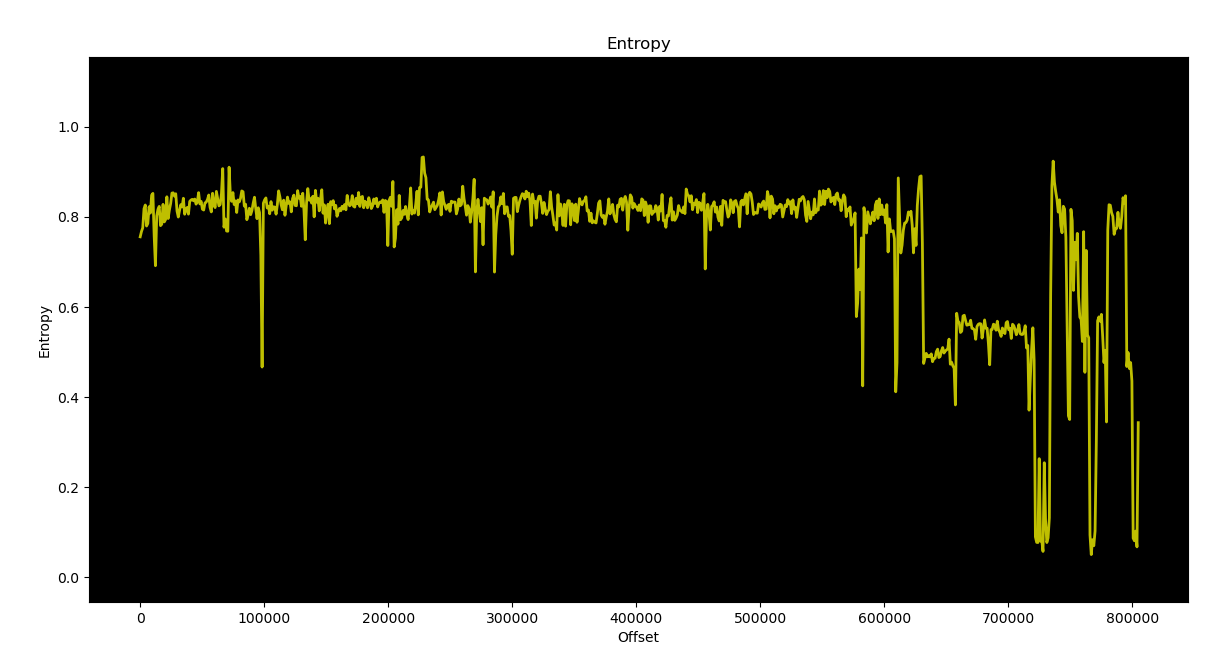
We were able to extract meaningful text strings from the app.bin file, which proved it was
not encrypted. We observed the same behavior for the cfg_tool.bin file, but this was not the case for the remaining
files. They looked compressed or encrypted, but their entropy was oscillating while one could expect
it to stay close to 1 all along, maybe because some weak compression or encryption algorithm was used.
Breaking JieLi's "encryption"
The extracted FATFSI file was very intriguing because its name mentions "FAT", which usually stands for
File Allocation Table. This is a quite old file system originally designed by Microsoft, and as many file systems,
it may contain valuable data. Unfortunately, this file could not be read as-is as it seemed to be encrypted and/or
compressed. Based on the amazing reverse-engineering work previously done by Grigoryev, we were able to figure out how these
files were encrypted or more precisely scrambled using some proprietary algorithm.
JieLi's AC6958 SoC uses a specific hardware peripheral to access its internal flash memory called SFC (that stands for SPI Flash Controller). This peripheral allows the application code to read data from an internal SPI flash memory with an unexpected twist: flash memory is mapped through an icache that drives the SFC peripheral to allow transparent access to the flash data, but there is a scrambler/descrambler between icache and SFC that messes up with the data. Scrambling can be enabled or disabled at will, which explains why some parts of the flash memory are scrambled while others are not.
Scrambling is implemented by a dedicated peripheral named ENC, and its internal algorithm has already been reverse-engineered.
It relies on an LFSR-based stream cipher algorithm similar to CRC16-CCITT, initialized with a 16-bit key that is derived for each
32-byte memory block based on their block index. A 16-bit root key is used as well in this algorithm, and seems to be
specific to each chip family and model. Based on this information, we managed to recover the root key used by
our target AC6958 SoC (0x170f) and to decrypt each encrypted file using the documented stream cipher:
"""JieLi FATFSI file decryption tool
"""
# SFC ENC settings
KEY = 0x170f         # 16-bit "root key"
ADDR = 0x01eeb000    # Memory address where this file is stored

def jl_crypt(data, key=0xffff):
    """Apply JieLi ENC LFSR-based encryption to data using
    the given key.
    """
    out = []
    for i in range(len(data)):
        out.append(data[i] ^ (key & 0xff))
        key = ((key << 1) ^ (0x1021 if key & 0x8000 else 0)) & 0xffff
    return bytes(out)

def sfc_block_key(root_key, addr):
    """
    Derive a 16-bit key based on the provided root key
    and block address.
    """
    return root_key ^ ((addr >> 2)&0xffff)

# Load FATFSI encrypted content.
content = open("FATFSI","rb").read()

# Decrypt content by block of 32 bytes.
output = b""
for i in range(len(content)//32):
    block = content[i*32:(i+1)*32]
    block_ = jl_crypt(block, key=sfc_block_key(KEY, ADDR+i*32))
    output += block_

# Save decrypted data into "FATFSI.dev.bin".
open("FATFSI.dec.bin","wb").write(output)
You cannot get rid of Rick so easily
Once the FATFSI file decrypted, we tried to figure out what type of file system
it uses, as FAT heavily relates to the File Allocation Table file system.
Unfortunately, it does not follow the well-known FAT12/16/32 format but relies on
a rather specific implementation similar to the one used by Espressif in its
esp-idf SDK, but not exactly the same.
However, using some data visualization software like binocle2, we were able to turn our decrypted FAT partition content into a colourful image. We were expecting to find some images used by the application, but we got rick-rolled instead!
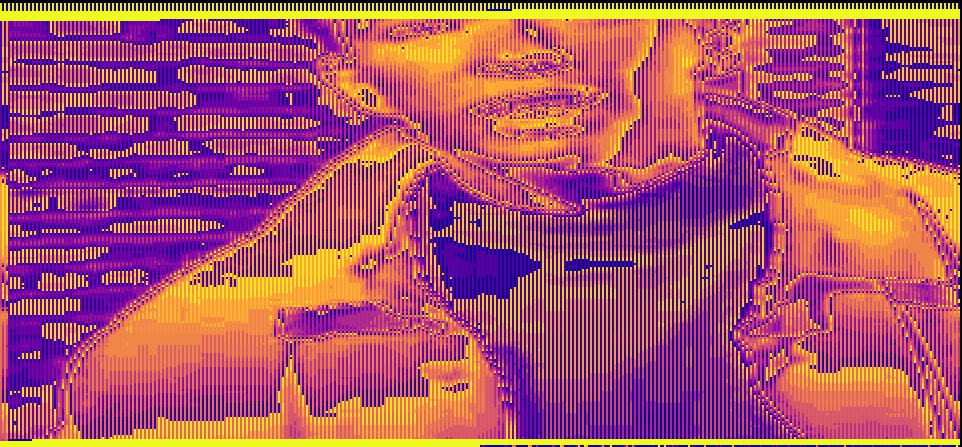
It turned out this photo has been used in one of our previous attempts, when we were trying to extract this smartwatch's firmware in an unconventional way. The picture had been stored in a FAT cluster that later may have been deallocated, but as usual (and for performance reasons), the file system simply marked this cluster as free and did not erase its data.
Well, we figured out how JieLi's scrambling mechanism works so those scrambled files
were no longer an issue. We then decided to analyze the main application we extracted
from the recovered firmware, with the hope to discover how this watch is able to get
our blood pressure or heart rate. And maybe how it gets its data from the discovered
Flash FAT partition? It was time to dig into this extracted app.bin file.
JieLi's Pi32v2 architecture
The watch's "brain" had been identified as a AC6958 system-on-chip from JieLi, and every piece of documentation we found mentions that it does not use a standard CPU architecture, but some kind of custom CPU derived from Analog Devices' Blackfin architecture named Pi32. Luckily for us, Grigoryev had already reverse-engineered this Pi32's instruction set for different variants of this CPU, based on Blackfin's instruction set. However, we quickly discovered that our CPU variant was a Pi32v2, and this specific CPU instruction set has only been partly recovered.
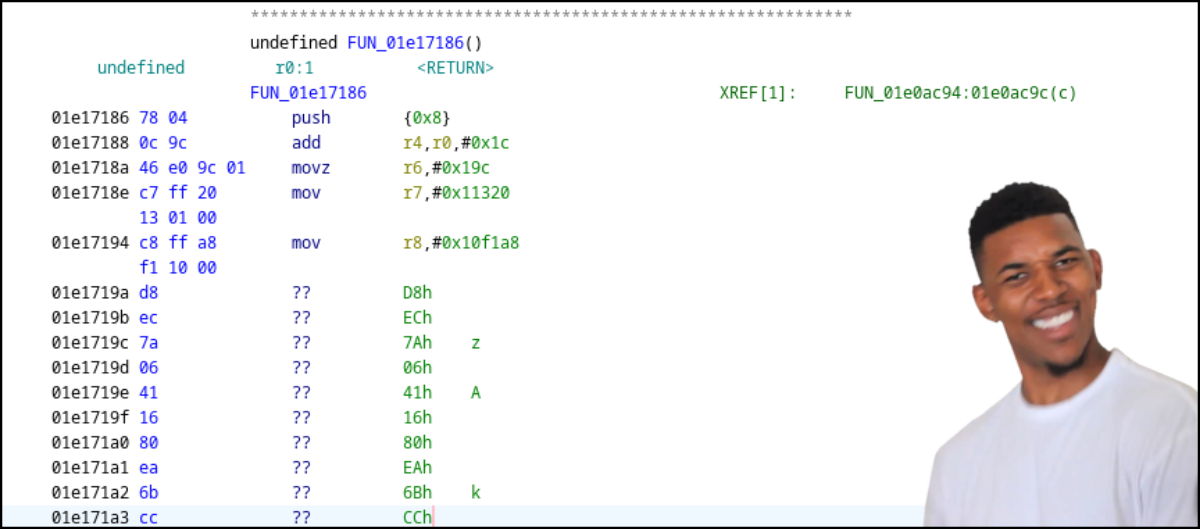
We ended up with only a few instructions correctly disassembled and the remaining bytes considered as data. No analysis could be performed on this firmware and it was clear that Grigoryev's Pi32 processor needed some improvements to support every missing instruction. It was the only way for us to get Ghidra correctly turning bytes into valid assembly code, and then assembly code into readable C code that would speed up our analysis. That was quite unexpected but we thought it would also be a good opportunity to improve our skills in SLEIGH, Ghidra's custom language used to define a CPU architecture and its related instruction set.
CPU architecture and specificities
JieLi's Pi32v2 CPU is a 32-bit little endian CPU with 16 general purpose registers
(r0 to r15) that can be combined in pairs to form 8 64-bit general purpose registers
(r1-r0 to r15-r14). Its instruction set is derived from Analog Devices's Blackfin
architecture and has been extended with additional features taken from other architectures
like ARM. Grigoryev's documentation about this Pi32v2 CPU was really helpful to
understand how instructions are encoded, but seemed quite incomplete in regards
to our application's code.
In order to help us understanding all these unknown instructions, we found a GitHub repository published by "JieLi Tech" that provides a Software Development Kit (SDK)3 for its AC630N family SoCs and a sample application that can be built with a dedicated toolchain. The provided SDK documentation states it is able to generate firmware files for both AC630N and AC69XX SoCs.
This is a public SDK available for download, so we grabbed a copy and extracted it in a dedicated folder. We also downloaded the toolchain mentioned in the SDK's documentation and installed it on our host.
This toolchain is very interesting as it provides its own objdump utility.
objdump is a well-known command-line utility to disassemble executable files,
displaying a series of bytes in hexadecimal and the associated mnemonic and operands
for each instruction of the processed executable file. We used their SDK and tried to
compile the sample application it contains, but something failed during the build process
and it seemed that no application file or binary file had been generated. Well, not exactly.
We found a file named sdk.elf, generated during our build attempt, that seemed to
contain all the required SDK functions compiled for the target Pi32v2 CPU!
It was all we needed to give the toolchain's objdump utility a try:
$ objdump -d sdk.elf
sdk.elf:    file format ELF32-pi32v2

Disassembly of section .text:
text_code_begin:
 1e00100:    81 ea 29 bd        call 227922 <boot_info_init : 1e37b56 >
 1e00104:    ee ff 10 a0 00 00  sp = 40976
 1e0010a:    ed ff 10 a0 00 00  ssp = 40976
 1e00110:    d8 e8 07 00        [--sp] = {r2-r0}
 1e00114:    c0 ff f0 cb eb 01  r0 = 32230384 <psram_laddr : 1ebcbf0 >
Wait, that's not mnemonics but algebraic instructions! And that's normal as Grigoryev noticed this notation comes from Blackfin's DSP instruction set. Anyway, we now had a series of bytes in hexadecimal and an algebraic description for each disassembled instruction and this information was priceless: we had everything needed to guess how those instructions are encoded!
We spent weeks on this disassembly listing to identify any possible instruction and guess how operands were encoded in the corresponding bytes. We could have used an LLM to speed up this process, but chances were high it would have produced some garbage or gave us some false understanding and led us to more time spent on fixing AI hallucinations rather than analyzing more instructions.
Instruction encoding
It took some time to correctly understand how Pi32v2 instructions are formatted, but we managed to identify three different encodings:
- Type I: 16-bit instructions inherited from original Pi32 CPU architecture
- Type II: 32-bit instructions (extended instructions?)
- Type III: 48-bit instructions
For each encoding type, the first 3 most significant bits of the first word of an encoded instruction specify its group and its category. The encoding type is determined from this first word. Instructions belonging to groups 0 to 6 are encoded using Type I, those belonging to group 7 may use different encodings based on the size of their operands and instruction type. Therefore, only instructions belonging to group 7 are expected to use Type II and Type III encodings.
Parallelized and conditional execution
The Pi32v2 CPU also supports some specific features inherited from Blackfin,
and one of them is parallel execution of two instructions. Parallelized instructions
belong to group 6 and are mostly parallelized versions of existing instructions
from other lower groups. It appears like the following in the disassembly listing
produced by JieLi's objdump:
1e0036c:  01 d6    r1 = r0 #
1e0036e:  42 60         r2 = [r4+0]
These two instructions assign different values to two separate 32-bit registers
(r1 and r2) and only the first instruction's most significant bits indicate
that it has to be executed in parallel with the next instruction. Luckily, the
SLEIGH language provides a powerful feature to handle such situation: the
delayslot4 directive. This specific directive instructs Ghidra to
parse an instruction and build its own intermediate representation after having
processed the next instruction. This way, it can produce the correct intermediate
representation of both of them, following the target architecture execution order
and replicating the various consequences on the CPU's registers and flags.
JieLi also added some specific instructions implementing if ... then ... else conditional blocks, using a cursed instruction format:
1e041c2:    90 ec 00 11        if (r0 <= r1) {
1e041c6:    d8 19                  r0 = ~r5
                               } else {
1e041c8:    e8 19                  r0 = ~r6
                               }
Conditional blocks gave us some headaches as we didn't really know how to
handle them in SLEIGH. Eventually, we decided to use a context register
to let the disassembly process know how to handle the next instructions for
the then and else blocks. SLEIGH's context register may seem quite odd, but is
actually very powerful once you fully understand how it works and how the disassembler
uses it.
We won't cover in this blogpost all the cursed and strange design decisions taken by JieLi when designing their Pi32v2 CPU architecture, like their custom binary mask optimized encoding and other weird tricks to save memory space. Unfortunately, we had to dive deep into these encodings to get them supported by Ghidra and had some hard times figuring out the logic behind some instructions (algebraic notation has its own limits, apparently).
Improving support for Pi32v2 instruction set in Ghidra
At least, we did not start from a white page as Grigoryev already implemented a custom Ghidra processor for JieLi's Pi32 and Pi32v2 CPU architecture. It provided us with a basic template to work on, and we patiently reverse-engineered every missing instruction from our application code and slowly improved this processor to support them, one after another.
Two major issues slowed us down:
- Pi32v2 algebraic notation was often difficult to understand, especially the order in which multiple operations are processed by the CPU,
- Finding the correct bits used by the CPU to discriminate a specific instruction from all the others of the same group was sometimes pretty difficult because we did not know all the instructions and their corresponding encodings.
Slowly, we got Ghidra successfully disassembling a series of instructions and then complete functions, producing what looked like meaningful decompiled functions in C code, stopped by unknown instructions from time to time. After many weeks of slow progress, we ended up with most of the application code disassembled. We knew we may have gotten the intermediate representation of some weird instructions wrong, which could cause some issues in the decompiled code produced by Ghidra.
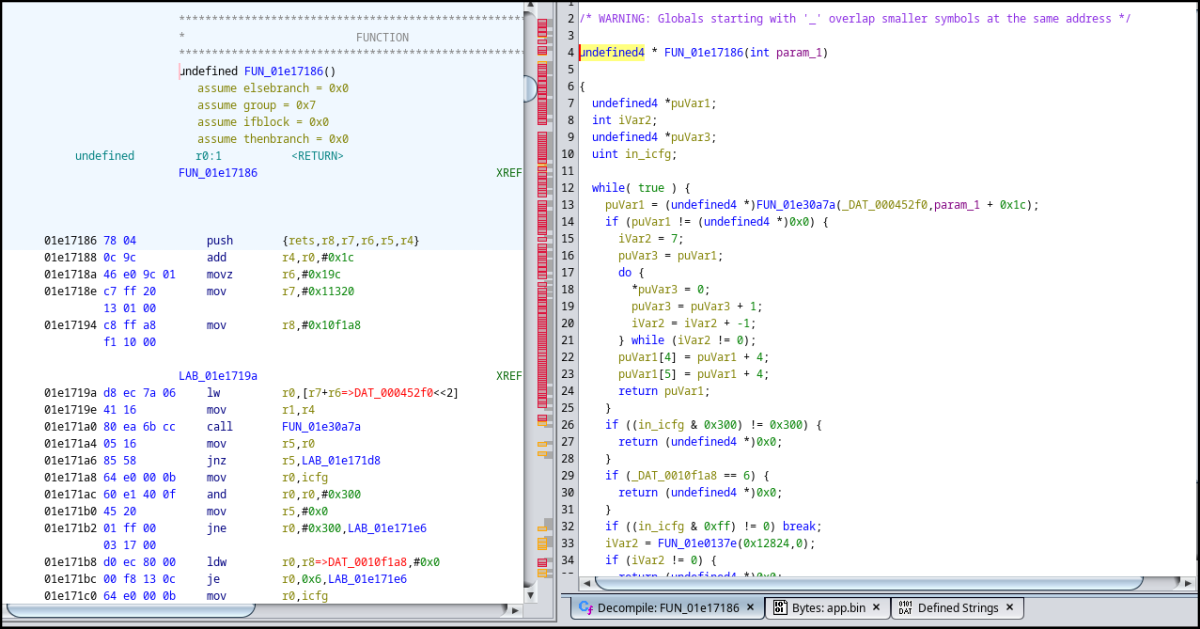
It was pretty satisfying to see all that unknown bytecode turned into assembly instructions with their mnemonics and operands, then turned into readable C code. And yes, we followed Grigoryev's decision to use mnemonics rather than this weird algebraic notation because it is what we are used to read and analyze. Our improved version is available on GitHub5, derived from Grigoryev's original implementation6. It was then time to move on and analyze our watch's main application code.
Main application reverse-engineering
Now that we had a working disassembler and decompiler, it was time to dig into this application code and to answer the most critical question we had about this smartwatch: how can this watch measure a person's heart rate or blood pressure with apparently no sensor?
This time we didn't have any ELF file but some raw binary code instead, so we mapped the content of
the app.bin file at the expected address in memory, 0x01e00120, and it seemed to do the trick. We ended up
with many valid cross-references as well as pointers to meaningful text strings. Since we did not exactly
know the entry point, we used Ghidra's FIDB feature to create our own signature database and populated it with
function signatures computed from the sdk.elf file we previously built, as it contains a lot of symbols.
We quickly discovered that many functions from this SDK were present in our extracted application code,
and the automatic renaming applied by Ghidra made our work easier. First, we knew the entry point calls
the boot_info_init function (as seen in the sdk.elf file). It was indeed pretty obvious to notice,
as the first instruction located at 0x01e00120 is a call to this function:
01e00120 80 ff 06        call       boot_info_init
         0e 03 00
01e00126 ee ff b0        mov        sp,#0x53b0
         53 00 00
01e0012c ed ff b0        mov        ssp,#0x53b0
         53 00 00
01e00132 d8 e8 07 00     push       {r2,r1,r0=>DAT_000053ac}
01e00136 c0 ff f4        mov        r0,#0x1ec4bf4
         4b ec 01
01e0013c c1 ff 00        mov        r1,#0x800000
         00 80 00
01e00142 c2 ff 00        mov        r2,#0x0
         00 00 00
01e00148 a2 a2           lsr        r2,r2,0x2
Honesty is the best policy
As usual when we fiddle with an unknown firmware, we had a look at its text strings and identified various functions referencing them. This is when we noticed this small text string:
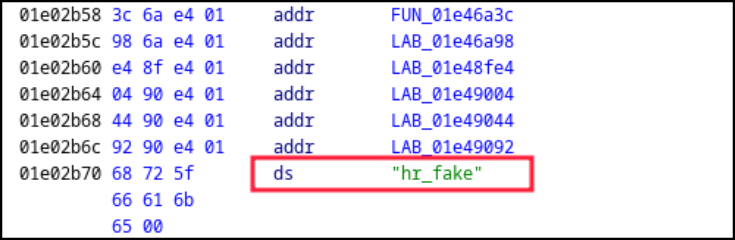
Wait, was this exactly what we thought it was? In the current context, "HR" could mean Heart Rate and "fake" could say it all. This acronym "HR" is often used in documents dealing with human vitals, so it really meant something in our current investigation. Did the developer knew they were working on some code used to generate fake heart rate measurements? We certainly did not expect that, but it looked like we were onto something.
But this clue alone was not totally convincing. It could be a tiny sarcastic message left in the firmware by a developer who was not really happy of their employer's human resources department, maybe. We needed something strong, a first-hand evidence proving all these measured values were made up and that this watch cannot be trusted.
Locating where vital signs are acquired in the codebase
We knew the smartwatch shows some numbers corresponding to the owner's blood pressure or heart rate, so we searched for specific format strings. Blood pressure is usually composed of two values: the systolic pressure (maximum pressure during one heartbeat) and the diastolic pressure (minimum pressure between two heartbeats). These measures are expressed in millimetres of mercury (mmHg) above the surrounding atmospheric pressure.
Normal resting blood pressure for an adult is approximately 120 mmHg (systolic pressure) and 80 mmHg (diastolic pressure),
so these values are expected to be formatted as a 3-digit number for systolic pressure and 2-digit number for diastolic
pressure, leading to some sort of %03d / %02d format string. And we were lucky because there is a single format string
that matches this pattern in the whole firmware, located at address 0x01eb8740. We checked the cross-references and
ended up with the following code (variables and functions have been renamed):
void blood_pressure_related4(void *param_1)
{
  undefined4 *puVar1;
  undefined1 local_2c [12];

  puVar1 = (undefined4 *)local_2c;
  if (param_1 != (void *)0x0) {
    _s_bp_systolic = 0;
    _s_bp_diastolic = 0;
    FUN_01e6d1b2((uint32_t)param_1,9,0x9bd2);
    *puVar1 = 0x13;
    FUN_01e688b6(0x8b,0x53);
    *puVar1 = 0x13;
    FUN_01e688b6(0xd,0x7b);
    if ((DAT_00015a0d == '\x01') || (DAT_00015a0e == '\x01')) {
      /* Format systolic pressure text string and draw text */
      _sprintf(&s_bp_systolic,s_%03d/%02d_01eb8740,(uint)blood_pressure_systolic,
               (uint)blood_pressure_diastolic);
      puVar1[2] = 0xffff;
      puVar1[1] = (uint32_t)&s_bp_systolic;
      *puVar1 = 0x23;
      draw_text(param_1,0x193,0x30,0x31,*puVar1,puVar1[1],puVar1[2]);

      /* Format diastolic pressure text string and draw text */
      _sprintf(&s_bp_diastolic,s_%03d/%02d_01eb8740,(uint)blood_pressure_systolic,
               (uint)blood_pressure_diastolic_);
      puVar1[1] = &s_bp_diastolic;
      puVar1[2] = 0xffff;
      *puVar1 = 0x23;
      draw_text(param_1,0x1b9,0x42,0xe4,*puVar1,puVar1[1],puVar1[2]);

      if (DAT_000117c8 == '\0') {
        DAT_000117c8 = '\x01';
        FUN_01e6b6f6(1);
        FUN_01e6ced2();
      }
    }

    /* ... */
}
This function is pretty weird as it calls twice _snprintf with the same
parameters to format two different text string buffers with the same content,
and then displays these two text strings separately. However, drawing text on
screen is really fast given the configured transfer speed and therefore no one
would notice.
The most interesting part here is that we identified two variables used to
store the current blood pressure measures: blood_pressure_systolic and
blood_pressure_diastolic. Based on this, we found many references to them
including a function that seems to compute some interesting values:
uVar2 = unknown_function();
blood_pressure_systolic = ((char)uVar2 - (char)(((int)uVar2 / 0x10 & 0xffU) << 4)) + 110;
uVar2 = unknown_function();
blood_pressure_diastolic = (char)uVar2 + (char)((int)uVar2 / 0x14) * -0x14 + 70;
These instructions update the values of both variables with some computed values,
so let's see what is really happening here. uVar2 is a 32-bit unsigned variable
set to a value returned by a function called unknown_function(). We assume this
value could be anything between 0x00000000 and 0xffffffff. First, it is divided by
0x10 and only the first 8 low significant bits of the resulting value are kept.
The resulting 8-bit value is then shifted left by 4 bits and subtracted from
uVar2. 110 is then added to the result of this subtraction and saved into
the previously identified blood_pressure_systolic variable. For those who
are not quite familiar with bit shifting and mathematics, here is a simplified
expression of such computation in C:
uint32_t a = unknown_function();
uint8_t blood_pressure_systolic = (a - ((a / 16) * 16) + 110;
And it is quite the same computation for blood_pressure_diastolic:
uint32_t a = unknown_function();
uint8_t blood_pressure_diastolic = (a - ((a / 20) * 20)) + 70;
Based on these computations, we can definitely say that the application takes a pair of 32-bit values and generate two values from them:
- a first value that cannot be lower than 110 and greater than 125, corresponding to a systolic pressure,
- a second value that cannot be lower than 70 and greater than 90, corresponding to a diastolic pressure.
These ranges could be considered normal given the fact a normal resting person's blood pressure
is expected to be around 120 mmHg systolic and 80 mmHg diastolic, maybe in an attempt not to
raise suspicion of the watch's owner? These computed values are no way what we could expect from
values coming from real sensors and are designed to produce normal looking values from 32-bit
values returned by unknown_function(). It's time to see what this function is about.
Knuth's legacy is everywhere
This unknown_function() is quite small and does some weird maths:
uint32_t unknown_function(void)
{
  int A;
  longlong B;
  uint uVar2;

  A = (int)*(undefined8 *)(gp_unknown_struct + 0xa04);
  B = (longlong)A * 0x4c957f2d;
  C = A * 0x5851f42d + (int)((ulonglong)B >> 0x20) +
          (int)((ulonglong)*(undefined8 *)(gp_unknown_struct + 0xa04) >> 0x20) * 0x4c957f2d;
  *(ulonglong *)(gp_unknown_struct + 0xa4) = CONCAT44(C,(int)B + 1);
  return uVar2 & 0x7fffffff;
}
This function rang a bell because of the constants used. Newlib's default implementation
of rand() uses one of Donald Knuth's The Art of Computer Programming, Volume 27 multipliers
mentioned in a chapter dedicated to linear congruential random number generators testing,
considered as an "excellent multiplier" by Knuth (found by C.E. Haynes and used in the Cray
X-MP library, for the record). This multiplier (6364136223846793005) once encoded in hexadecimal
gives a value of 0x5851f42d4c957f2d that indeed matches the constants of the unknown function
we identified (this 64-bit value is split into two 32-bit halves).
Newlib's default C implementation is provided below for reference:
int
rand (void)
{
  struct _reent *reent = _REENT;

  /* This multiplier was obtained from Knuth, D.E., "The Art of
     Computer Programming," Vol 2, Seminumerical Algorithms, Third
     Edition, Addison-Wesley, 1998, p. 106 (line 26) & p. 108 */
  _REENT_CHECK_RAND48(reent);
  _REENT_RAND_NEXT(reent) =
     _REENT_RAND_NEXT(reent) * __extension__ 6364136223846793005LL + 1;
  return (int)((_REENT_RAND_NEXT(reent) >> 32) & RAND_MAX);
}
Everything is clear now: this smartwatch's application generates 32-bit random values by calling
rand(), that are then used to compute some fake measurements for blood pressure, heart rate
and more. The application takes care to generate values that won't raise any suspicion, as they
are designed to fit in a range of values considered as normal for an healthy
human being. And yes, the same mechanism is used to generate random heart rate measurements:
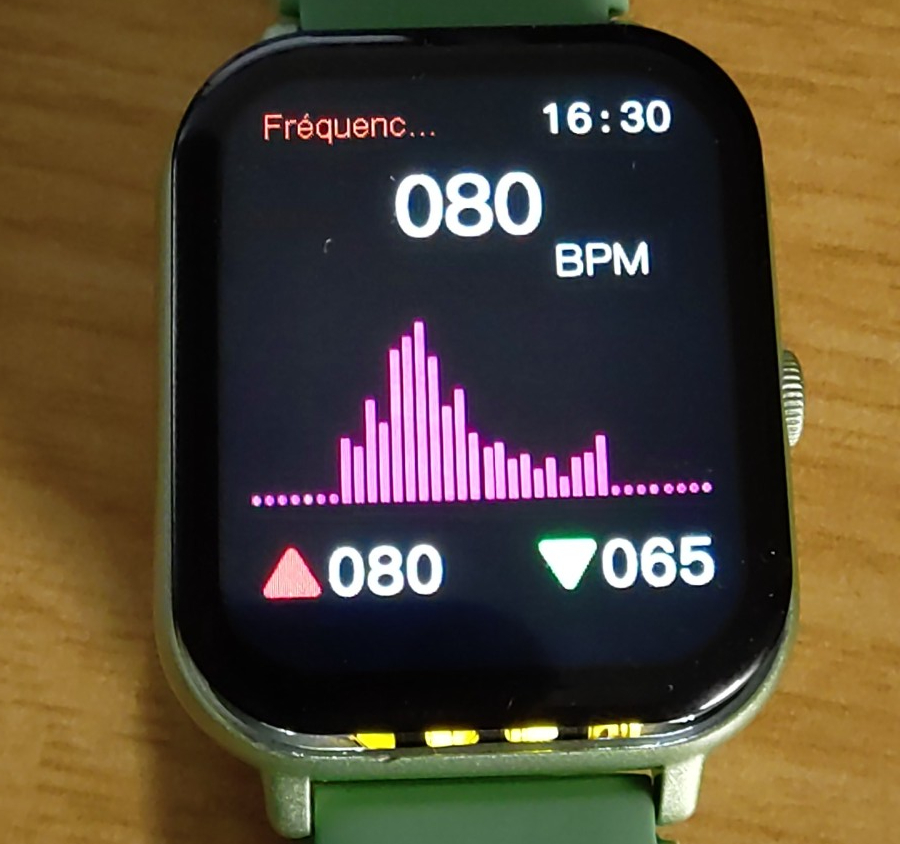
uVar2 = rand();
heart_rate_current = ((char)uVar2 - (char)(((int)uVar2 / 0x10 & 0xffU) << 4)) + 0x41;
Based on this formula, the measured heart rate value is expected to be greater than or equal to 65 and no more than 80. And that's exactly these two values that show up on the watch's screen as the lowest and highest value measured when in heart rate mode:
Eventually, we had to admit the hr_fake text string found when we began this analysis
was absolutely not a lie, but instead a feature's name used by a conscientious and honest developer.
Bonus: unpacking JieLi's firmware tools
During our analysis of JieLi's toolchain, we noticed some command-line tools used to package a compiled application
and additional data into a binary firmware package. We couldn't help having a look at these utilities and quickly
realized they were compressed using the good old Ultimate Packer for eXecutable (a.k.a UPX) compressor.
We tried to decompress it using the correct UPX command-line tool, specifying the -d option to make it decompress
the provided executable file, but it failed miserably:
$ upx -d fw_add
                       Ultimate Packer for eXecutables
                          Copyright (C) 1996 - 2026
UPX 5.1.1       Markus Oberhumer, Laszlo Molnar & John Reiser    Mar 5th 2026

        File size         Ratio      Format      Name
   --------------------   ------   -----------   -----------
upx: fw_add: NotPackedException: not packed by UPX

Unpacked 0 files.
These executables have been modified to avoid easy decompression, some kind of obfuscation known as UPX scrambling. Basically, it is a set of modifications applied on a compressed executable generated by UPX to make it unable to decompress it while keeping the executable valid. Let's find out why UPX struggles to unpack this executable.
UPX uses some specific metadata structures inside an ELF executable that can easily be identified by the UPX! text marker
placed in the first field of this structure. This marker appears multiple times in the executable file: at the very beginning
and at the end of the file. This redundancy is used by UPX as a backup if one of the structures is altered, but there is something
quite interesting in the way UPX locates its last structure: its offset is computed from the end of the file, since its size
is known. The following code taken from UPX's source shows exactly how this backup structure offset is searched:
/*************************************************************************
// Generic Unix canUnpack().
**************************************************************************/

// The prize is the value of overlay_offset: the offset of compressed data
tribool PackUnix::canUnpack()
{
    int const small = 32 + sizeof(overlay_offset);
    // Allow zero-filled last page, for Mac OS X code signing.
    int bufsize = 2*4096 + 2*small +1;
    if (bufsize > fi->st_size())
        bufsize = fi->st_size();
    MemBuffer buf(bufsize);

    fi->seek(-(off_t)bufsize, SEEK_END);
    fi->readx(buf, bufsize);
    return find_overlay_offset(buf);
}
Search starts from the end of the file, and UPX is looking for a specific signature
expected at the very beginning of the metadata structure (the overlay mentioned in
the code above). Let's compare the end of a compressed 64-bit ELF file with the end of
our scrambled file:
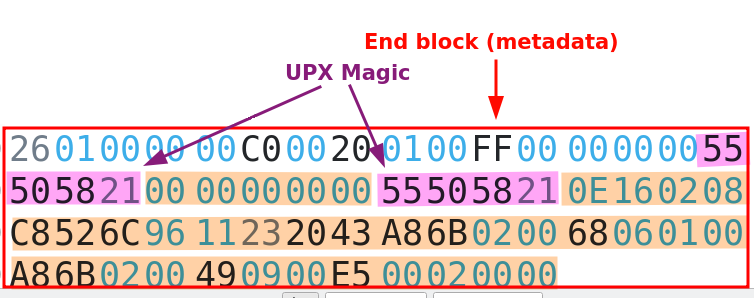
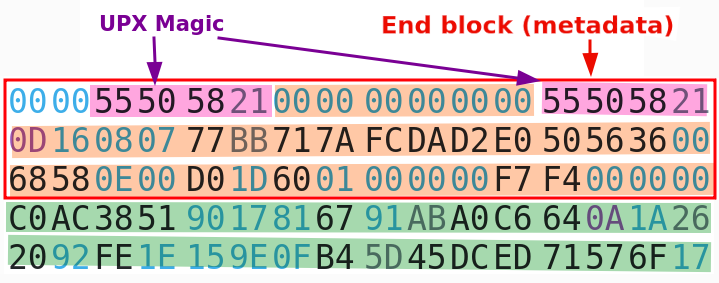
It appears our scrambled file has 32 extra bytes after this structure, and this could explain why UPX cannot locate it. Let's remove these 32 extra bytes and try to decompress this file again:
$ truncate -s -32 fw_add
$ upx -d fw_add
                       Ultimate Packer for eXecutables
                          Copyright (C) 1996 - 2026
UPX 5.1.1       Markus Oberhumer, Laszlo Molnar & John Reiser    Mar 5th 2026

        File size         Ratio      Format      Name
   --------------------   ------   -----------   -----------
  23076304 <-   8709648   37.74%   linux/amd64   fw_add

Unpacked 1 file.
This scrambling technique is dead simple and effective but won't fool a seasoned reverse-engineer. UPX is a rather old open-source compressor for executable that is still maintained in 2026, and it was not designed to be some kind of protector one could use to make a reverse-engineer's life a nightmare, far from it. However, it seems JieLi used it anyway in an attempt to slow down curious people who want to dig into their firmware tools.
Conclusion
It all started with a cheap smartwatch found in a French store and some suspicion about the health measurements displayed on screen, and it turned into a technical challenge pretty fast. We thought the hard work was over after having successfully extracted its firmware in an unconventional manner, but we could not be more wrong about it.
The whole JieLi's ecosystem is a technical challenge, from its custom proprietary algorithms to its weird CPU architectures. But it turned to be one of these technical puzzles we love to solve: a good opportunity to learn new tricks, practice reverse-engineering and eventually finding the answer we were looking for. In the end, we spent many weeks to tear this firmware apart, to make Ghidra able to disassemble most of the JieLi's Pi32v2 instructions, eventually figuring out how this watch gets these values shown on screen.
We can now say with certainty that this smartwatch has no sensor of any sort able to measure its owner's heart rate or blood characteristics. The hard (and predictable) truth: this watch simply cannot produce accurate measurements of your blood pressure, heart rate or other vitals you may want to monitor. Worse, all of these values are just randomly generated, and we proved it by finding and revealing the code generating them. They are fake and cannot be trusted.
Is it a scam? Well, that's something we need to discuss. Technically, the vendor states this watch is able to measure your vitals and it is obviously a lie. But the devil lies in the details, and in the very small characters to be precise: this smartwatch comes with a user manual that clearly states the measured values cannot be trusted in any way, thus avoiding any liability issues and potential complaints customers may want to file against the company making this watch or the one selling it in France.
-
JieLi New Firmware Format, Andrey Grigoryev, https://kagaimiq.github.io/jielie/datafmt/newfw.html ↩
-
Binocle GitHub repository, David Peter, https://github.com/sharkdp/binocle ↩
-
fw-AC630N_BT_SDK GitHub repository, JieLiTech, https://github.com/JieLiTech/fw-AC630N_BT_SDK ↩
-
SLEIGH documentation, section 7.11, Delay Slot Directives, Ghidra, https://ghidra.re/ghidra_docs/languages/html/sleigh_constructors.html#sleigh_delayslot_directives ↩
-
Improved ghidra-jieli Ghidra processor, Quarkslab, https://github.com/quarkslab/ghidra-jieli ↩
-
Original ghidra-jieli repository, Andrey Grigoryev, https://github.com/kagaimiq/ghidra-jieli ↩
-
The art of computer programming, volume 2 (3rd edition, Nov. 1997), Donald E. Knuth, https://dl.acm.org/doi/abs/10.5555/270146 ↩