Author Mihail Kirov
Category Containers
Tags Linux, container, kernel, Docker, 2021
Process isolation is a key component for containers. One of the key underlying mechanisms are namespaces. In this second (and last) part of the series we examine the USER, MNT, UTS, IPC and CGROUP namespaces, and finally we combine everything to build a fully isolated environment for a process.
In the previous episode, we introduced what are namespaces, and why they are so useful nowadays. Then we looked at the PID and NET namespaces. Let's explore the rest of the namespaces now, before we leverage them to build a fully isolated process.
USER namespace
All processes in the Linux world have their owner. There are privileged and unprivileged processes depending on their effective user ID (UID) attribute. Depending on this UID processes have different privileges over the OS. The user namespace is a kernel feature allowing per-process virtualization of this attribute. In the Linux documentation, a user namespace is defined in the following manner:
User namespaces isolate security-related identifiers and attributes, in particular, user IDs and group IDs, the root directory, keys, and capabilities. A process’s user and group IDs can be different inside and outside a user namespace. In particular, a process can have a normal unprivileged user ID outside a user namespace while at the same time having a user ID of 0 inside the namespace.
Basically this means that a process has full privileges for operations inside its current user namespace, but is unprivileged outside of it.
Starting with Linux 3.8 (and unlike the flags used for creating other types of namespaces), on some Linux distributions, no privilege is required to create a user namespace. Let’s try it out!
cryptonite@cryptonite:~ $uname -a
Linux qb 5.11.0-25-generic #27~20.04.1-Ubuntu SMP Tue Jul 13 17:41:23 UTC 2021 x86_64 x86_64 x86_64 GNU/Linux

# root user namespace
cryptonite@cryptonite:~ $id
uid=1000(cryptonite) gid=1000(cryptonite) groups=1000(cryptonite) ...
cryptonite@cryptonite:~ $unshare -U /bin/bash
nobody@cryptonite:~$ id
uid=65534(nobody) gid=65534(nogroup) groups=65534(nogroup)
In the new user namespace our process belongs to user nobody with effective UID=65334, which is not present in the system. Okay, but where does it come from and how does the OS resolve it when it comes to system wide operations (modifying files, interacting with programs)? According to the Linux documentation it’s predefined in a file:
If a user ID has no mapping inside the namespace, then system calls that return user IDs return the value defined in the file /proc/sys/kernel/overflowuid, which on a standard system defaults to the value 65534. Initially, a user namespace has no user ID mapping, so all user IDs inside the namespace map to this value.
To answer the second part of the question - there is dynamic user id mapping when a process needs to perform system-wide operations.
#inside the USER namespace we create a file
nobody@cryptonite:~$ touch hello
nobody@cryptonite:~ $ls -l hello
-rw-rw-r-- 1 nobody nogroup 0 Jun 29 17:06 hello
We can see that the new created file belongs to user nobody which actually is not existing on the current system. Let’s check the ownership of this file from the point of view of a process in the root USER namespace.
cryptonite@cryptonite:~ $ls -al hello
-rw-rw-r-- 1 cryptonite cryptonite 0 Jun 29 17:09 hello
# under what UID runs the process who has created this file?
cryptonite@cryptonite:~ $ps l | grep /bin/bash
F S   UID     PID    PPID  C PRI  NI ADDR SZ WCHAN       TTY         TIME CMD
0  1000   18609    3135  20   0  19648  5268 poll_s S+   pts/0      0:00 /bin/bash
As it can be seen from the above code snippet, the shell process in the root user namespace sees that the process inside the USER namespace has the same UID. This also explains why the file which was created by nobody and seen as belonging to nobody in the new USER namespace, actually belongs to the user with ID=1000.
As mentioned, user namespaces can also be nested - a process can have a parent user namespace (except processes in the root user namespace) and zero or more child user namespaces. Let’s now see how the process sees the file system whose contents ownership is defined in the root user namespace.
cryptonite@cryptonite:~ $unshare -U /bin/bash
nobody@cryptonite:/$ ls -al
drwxr-xr-x  20 nobody nogroup  4096 Jun 12 17:25 .
drwxr-xr-x  20 nobody nogroup  4096 Jun 12 17:25 ..
lrwxrwxrwx   1 nobody nogroup     7 Jun 12 17:21 bin -> usr/bin
drwxr-xr-x   5 nobody nogroup  4096 Jun 25 10:23 boot
...

nobody@cryptonite:~$ id
uid=65534(nobody) gid=65534(nogroup) groups=65534(nogroup)
nobody@cryptonite:~$ touch /heloo.txt
touch: cannot touch '/heloo.txt': Permission denied
Okay, that is weird - the root directory contents seen from the new user namespace are owned by the user owning the process inside the USER namespace but the process can’t modify the directory contents? In the new user namespace the user (root) who owns these files is not being remapped, thus it doesn’t exist. That’s why the process see nobody and nogroup. But when it tries to modify the contents of the directory it does that by using it’s UID in the root user namespace which is different then the UID of the files. Okay, but how can a process interact with the filesystem in this case? We’ll have to use a mapping.
Mapping UIDs and GIDs
Some processes need to run under effective UID 0 in order to provide their services and be able to interact with the OS file system. One of the most common things when using user namespaces is to define mappings. This is done using the /proc/<PID>/uid_map and /proc/<PID>/gid_map files. The format is the following:
ID-inside-ns ID-outside-ns length
ID-inside-ns (resp.ID-outside-ns) defines the starting point of UID mapping inside the user namespace (resp. outside of the user namespace) and length defines the number of subsequent UID (resp. GID) mappings. The mappings are applied when a process within a USER namespace tries to manipulate system resources belonging to another USER namespace.
Some important rules according the Linux documentation:
If the two processes are in the same namespace, then ID-outside-ns is interpreted as a user ID (group ID) in the parent user namespace of the process PID. The common case here is that a process is writing to its own mapping file (/proc/self/uid_map or /proc/self/gid_map).
If the two processes are in different namespaces, then ID-outside-ns is interpreted as a user ID (group ID) in the user namespace of the process opening /proc/PID/uid_map (/proc/PID/gid_map). The writing process is then defining the mapping relative to its own user namespace.
Okay, let’s try this out:
# adding a mapping for a shell process with PID=18609 in a user namespace
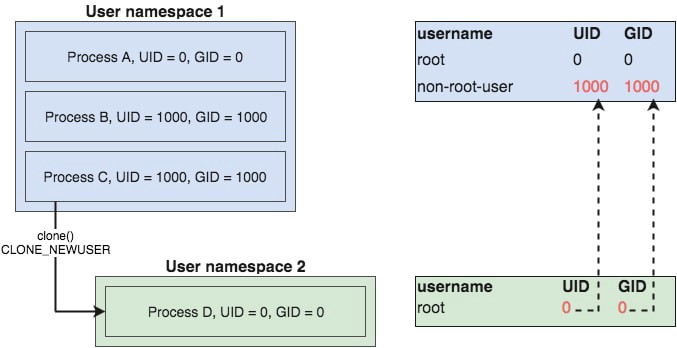
cryptonite@cryptonite:~ $echo "0 1000 65335" | sudo tee /proc/18609/uid_map
0 1000 65335
cryptonite@cryptonite:~ $echo "0 1000 65335" | sudo tee /proc/18609/gid_map
0 1000 65335
# back to the user namespaced shell
nobody@cryptonite:~$ id
uid=0(root) gid=0(root) groups=0(root)
# create a file
nobody@cryptonite:~$ touch hello
# back to the root namespace
cryptonite@cryptonite:~ $ls -l hello
-rw-rw-r-- 1 cryptonite cryptonite 0 Jun 29 17:50 hello
The process inside the user namespace thinks his effective UID is root but in the upper (root) namespace his UID is the same as the process that created it (zsh with UID=1000). Here is an illustration of the above snippet.
A more general view of the remapping process can be seen on this picture:
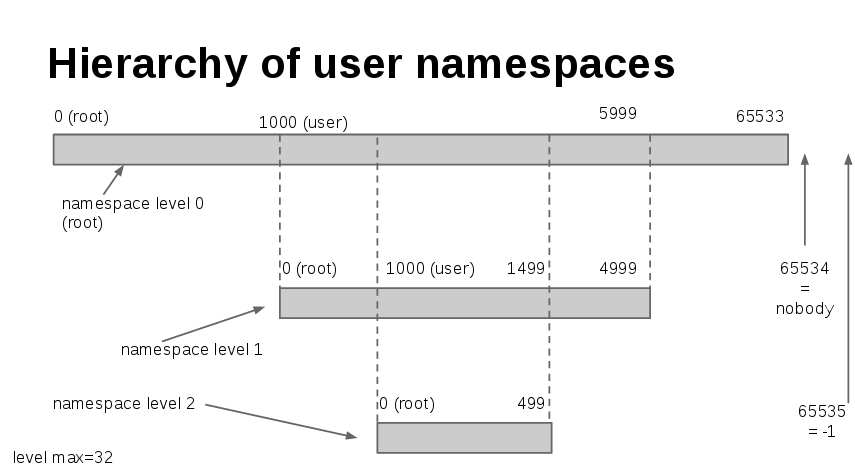
Another important thing to note is that in the defined USER namespace the process has effective UID=0 and all capabilities set in the permitted set.
Let’s see what is the view of the filesystem for the process within the remapped user namespace.
# in the root user namespace
cryptonite@cryptonite:~ $ls -l
total 0
-rw-rw-r-- 1 cryptonite cryptonite 0 Jul  2 11:07 hello
# in the sub user namespace
nobody@cryptonite:~/test$ ls -l
-rw-rw-r-- 1 root root 0 Jul  2 11:07 hello
As it can be seen, the remapped user perceives the ownership of the files with respect to the current user namespace mapping. As the file is owned by UID=1000 which is mapped to UID=0 (root), the process see’s the file as owned by the root user in the current namespace.
Inspect the current mappings of a process
The /proc/<PID>/uid_map and /proc/<PID>/gid_map files can also be used for inspecting the mapping of a given process. This inspection is relative to the user namespace a process is within. There are two rules:
If a process within the same namespace inspects the mapping of another one in the same namespace, it’s going to see the mapping to the parent user namespace.
If a process from another namespace inspects the mapping of a process, it’s going to see a mapping relative to its own mapping.
Okay, it’s a little bit confusing but let’s try it out:
# in shell number 1
cryptonite@cryptonite:~ $unshare -U /bin/bash
nobody@cryptonite:~$

# in shell number 2 define the user remapping
cryptonite@cryptonite:~ $echo "0 1000 65335" | sudo tee  /proc/6638/uid_map
0 1000 65335

# perception from inside the remapped namespace
nobody@cryptonite:~ $cat /proc/self/uid_map
         0       1000      65335
nobody@cryptonite:~ $id
uid=0(root) gid=65534(nogroup) groups=65534(nogroup)

# now in a 3rd shell we create a new user namespace
cryptonite@cryptonite:~ $unshare -U /bin/sh
$

# in the 2nd shell we define a new mapping of the sh shell
cryptonite@cryptonite:~ $echo "200 1000 65335" | sudo tee /proc/7061/uid_map

# back to the sh shell
# perception of the own remapping
$ cat /proc/self/uid_map
       200       1000      65335
# perception of the bash shell remapping
$ cat /proc/6638/uid_map
         0        200      65335
Okay, we can see that the remapped sh shell process perceives the user remapping based on its own user namespace. The results can be interpreted in the following way: Process UID=0 in the user namespace for process 6638 corresponds to UID=200 in the current namespace. It’s all relative! According to the Linux documentation:
If the process opening the file is in the same user namespace as the process PID, then ID-outside-ns is defined with respect to the parent user namespace. If the process opening the file is in a different user namespace, then ID-outside-ns is defined with respect to the user namespace of the process opening the file.
There are some important rules on the definition of the remapping inside the file.
Defining a mapping is a one-time operation per namespace: we can perform only a single write (that may contain multiple newline-delimited records) to a uid_map file of exactly one of the processes in the user namespace. Furthermore, the number of lines that may be written to the file is currently limited to five.
The /proc/PID/uid_map file is owned by the user ID that created the namespace, and is writable only by that user (or a privileged user). In addition, all of the following requirements must be met: - The writing process must have the CAP_SETUID (CAP_SETGID for gid_map) capability in the user namespace of the process PID. - Regardless of capabilities, the writing process must be in either the user namespace of the process PID or inside the (immediate) parent user namespace of the process PID.
User namespace and capabilities
As we mentioned earlier, the first process inside a new user namespace has the full set of capabilities inside the current user namespace. According to the Linux documentation:
When a user namespace is created, the first process in the namespace is granted a full set of capabilities in the namespace. This allows that process to perform any initializations that are necessary in the namespace before other processes are created in the namespace. Although the new process has a full set of capabilities in the new user namespace, it has no capabilities in the parent namespace. This is true regardless of the credentials and capabilities of the process that calls clone(). In particular, even if root employs a clone(CLONE_NEWUSER), the resulting child process will have no capabilities in the parent namespace.
So even the capabilities of a process are initialised and interpreted relatively to the user namespace. Let’s take a look at how things are by using this small program, which spawns a new process inside a user namespace and shows its capabilities from the point of view of the parent user namespace and the child namespace.
cryptonite@cryptonite:~ $ ./main
Capabilities of child process viewed from parent namespace =
Capabilities of child process viewed from child namespace =ep
Namespaced process eUID = 65534;  eGID = 65534;
As we can see, the process inside the new namespace has the full sets of permitted and effective capabilities within the user name, even though the program was run from an unprivileged user. However, in the parent user namespace it doesn’t have any capabilities. That’s because every time a new user namespace is created, the first process receives all the capabilities in order to be able to properly initialize the namespaced environment before any other processes are created inside it. That’s really important for the last chapter of this article when we are going to combine almost every namespace in order to isolate a given process.
MNT namespace
Mount (MNT) namespaces are a powerful tool for creating per-process file system trees, thus per-process root filesystem views. Linux maintains a data structure for all the different filesystems mounted on the system. This structure is a per-process attribute and also per-namespace. It includes information like what disk partitions are mounted, where they are mounted and the type of mounting (RO/RW).
cryptonite@cryptonite:~ $cat /proc/$$/mounts
sysfs /sys sysfs rw,nosuid,nodev,noexec,relatime 0 0
proc /proc proc rw,nosuid,nodev,noexec,relatime 0 0
...
Linux namespaces give the possibility to copy this data structure and give the copy to different processes. In that way these processes can alter this structure (mount and unmount) without affecting the mounting points of each other. By providing different copies of the file system structure, the kernel isolates the list of mount points seen by the processes in a namespace. Defining a mount namespace also can allow a process to change its root - a behavior similar to the chroot syscall. The difference is that chroot is bound to the current file system structure and all changes (mounting, unmounting) in the re-rooted environment will affect the entire file system. With the mount namespaces this is not possible as the whole structure is virtualized, thus providing full isolation of the original file system in terms of mount and unmount events.
# find the ID of the namespace of the current shell process
cryptonite@cryptonite:~ $readlink /proc/$$/ns/mnt
mnt:[4026531840]
Here is a general overview of the mount namespace concept.
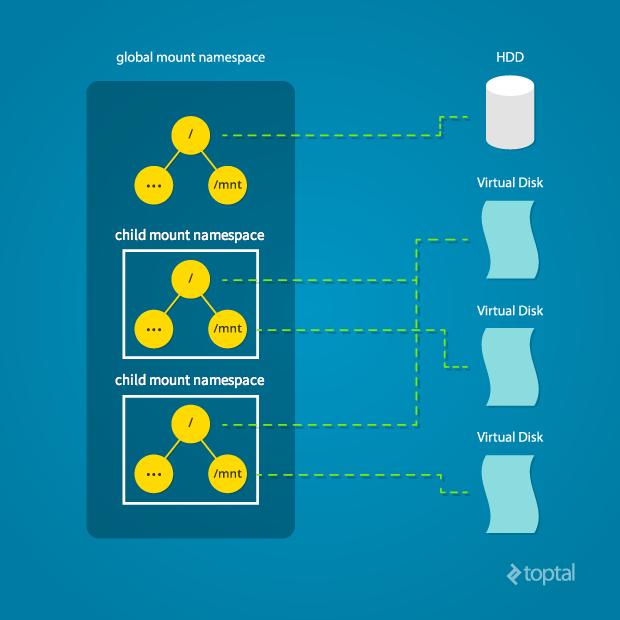
Diagram by Mahmud Ridwan from Toptal
Let’s try it out!
# create and enter a new mount namespace
cryptonite@cryptonite:~ $sudo unshare -m /bin/bash
root@cryptonite:/home/cryptonite# mount -t tmpfs tmpfs /mnt
root@cryptonite:/home/cryptonite# touch  /mnt/hello
# in a second terminal <=> in a separate mount namespace
cryptonite@cryptonite:~ $ls -al /mnt
total 8
drwxr-xr-x  2 root root 4096 Feb  9 19:47 .
drwxr-xr-x 20 root root 4096 Jun  8 23:24 .
# changes didn't reflect the other mount namespace
We can see from the snippet that processes in the isolated mount namespace can create different mount points and files under them without reflecting the parent mount namespace.
UTS namespace
UTS namespace isolates the system hostname for a given process.
Most communication to and from a host is done via the IP address and port number. However, it makes life a lot easier for us humans when we have some sort of name attached to a process. Searching through log files, for instance, is much easier when identifying a hostname. Not the least of which because, in a dynamic environment, IPs can change.
In our building analogy, the hostname is similar to the name of the apartment building. Telling the taxi driver I live in City Place apartments is usually more effective than providing the actual address. Having multiple hostnames on a single physical host is a great help in large containerized environments.
So the UTS namespace provides hostname segregation for processes. In that way, it’s easier to communicate with services on a private network, and to inspect their logs on the host.
cryptonite@cryptonite:~ $sudo unshare -u /bin/bash
root@cryptonite:/home/cryptonite# hostname
cryptonite
root@cryptonite:/home/cryptonite# hostname test
root@cryptonite:/home/cryptonite# hostname
test

# meanwhile in a second terminal
cryptonite@cryptonite:~ $hostname
cryptonite
IPC namespace
The IPC namespace provides isolation for process communication mechanisms such as semaphores, message queues, shared memory segments, etc. Normally when a process is forked it inherits all the IPC’s which were opened by its parent. The processes inside an IPC namespace can’t see or interact with the IPC resources of the upper namespace. Here is a brief example using shared memory segments.
cryptonite@cryptonite:~ $ipcs -m

------ Shared Memory Segments --------
key        shmid      owner      perms      bytes      nattch     status
0x00000000 32769      cryptonite 600        4194304    2          dest
0x00000000 6          cryptonite 600        524288     2          dest
0x00000000 13         cryptonite 600        393216     2          dest
0x00000000 16         cryptonite 600        524288     2          dest
0x00000000 32785      cryptonite 600        32768      2          dest

cryptonite@cryptonite:~ $sudo unshare -i /bin/bash
root@cryptonite:/home/cryptonite#
------ Shared Memory Segments --------
key        shmid      owner      perms      bytes      nattch     status
CGROUP namespace
Cgroups is a technology which controls the amount of hardware resources (RAM, HDD, block I/O) consumed by a process.
By default, CGroups are created in the virtual filesystem /sys/fs/cgroup. Creating a different CGroup namespace essentially moves the root directory of the CGroup. If the CGroup was, for example, /sys/fs/cgroup/mycgroup, a new namespace CGroup could use this as a root directory. The host might see /sys/fs/cgroup/mycgroup/{group1,group2,group3} but creating a new CGroup namespace would mean that the new namespace would only see {group1,group2,group3}.
So the Cgroup namespaces virtualize another virtual filesystem as the PID namespace. But what’s the purpose of providing isolation for this system? According to the man page:
It prevents information leaks whereby cgroup directory paths outside of a container would otherwise be visible to processes in the container. Such leakages could, for example, reveal information about the container framework to containerized applications.
In a traditional CGroup hierarchy, there is a possibility that a nested CGroup could gain access to its ancestor. This means that a process in /sys/fs/cgroup/mycgroup/group1 has the potential to read and/or manipulate anything nested under mycgroup.
Combining almost everything
Let’s use everything we discussed to build a fully isolated environment for a given process, step by step, using the unshare wrapper! A POC of this article written in C and using the clone() syscall is also available here.
# First let's download a minimal filesystem image
# which is going to be the new root fs of the isolated process
cryptonite@cryptonite:~ $wget http://dl-cdn.alpinelinux.org/alpine/v3.10/releases/x86_64/alpine-minirootfs-3.10.1-x86_64.tar.gz
cryptonite@cryptonite:~ $mkdir rootfs_alpine; tar -xzf alpine-minirootfs-3.10.1-x86_64.tar.gz -C rootfs_alpine
cryptonite@cryptonite:~ $ls rootfs_alpine
bin  etc   hostfs_root  media  opt   root  sbin  sys  usr
dev  home  lib          mnt    proc  run   srv   tmp  var
Okay, now we have a directory whose contents are the same as a classical Linux root directory. It’s important to note the order of the namespace wrapping procedure as some operations (such as PID, UTC, IPC namespace creation) need extended privileges in the current namespace. The following algorithm illustrates an order which would do the job.
1.Create USER namespace
2.Remap the UID of the process in the new USER namespace
3.Create UTC namespace
4.Change hostname in the new UTC namespace
5.Create IPC/CGROUP namespaces
6.Create NET namespace
7.Create and configure the veth pair
9.Create PID namespace
10.Create MNT namespace
11.Change the root of the process
12.Mount /proc inside under the new root
13.Unmount old root
14.Place the process under its new root directory
Let’s now give it a shot!
# create a privileged user namespace in order
# to be able to create namespaces needing administrative privileges
cryptonite@cryptonite:~ $unshare -U --kill-child  /bin/bash
nobody@cryptonite:~$ id
uid=65534(nobody) gid=65534(nogroup) groups=65534(nogroup)
# let's try to create new namespaces
nobody@cryptonite:~$ unshare -iu /bin/bash
unshare: unshare failed: Operation not permitted
nobody@cryptonite:~$ id
uid=65534(nobody) gid=65534(nogroup) groups=65534(nogroup)
The user in the user namespace can’t create new namespaces as it doesn’t have eUID=0. In order to fix that we have to grant root privileges by using a remapping procedure. As mentioned above, this remapping has to be done from a process in the direct upper user namespace. However, for security reasons, we will remap it to an unprivileged user outside of the namespace (eUID=0 -> eUID!=0).
# in another terminal; get the PID of user namespaced process
# then remap the root user inside of the namespace to an unprivileged one
# in the upper user namespace
cryptonite@cryptonite:~ $ps aux | grep /bin/bash
crypton+   26739  0.2  0.0  19516  5040 pts/0    S+   18:04   0:00 /bin/bash
cryptonite@cryptonite:~ $echo "0 1000 65335" | sudo tee /proc/26739/uid_map
0 1000 65335
cryptonite@cryptonite:~ $echo "0 1000 65335" | sudo tee /proc/26739/gid_map
0 1000 65335

# back to the user namespaced process
nobody@cryptonite:~/test$ id
uid=0(root) gid=0(root) groups=0(root),65534(nogroup)
Now we can continue by creating the IPC and UTS namespaces!
#create IPC and UTC namespaces
nobody@cryptonite:~$ unshare --ipc --uts --kill-child /bin/bash
root@cryptonite:~/test# ipcs

------ Message Queues --------
key        msqid      owner      perms      used-bytes   messages

------ Shared Memory Segments --------
key        shmid      owner      perms      bytes      nattch     status

------ Semaphore Arrays --------
key        semid      owner      perms      nsems
root@cryptonite:~# hostname isolated
root@cryptonite:~# hostname
isolated
Next, we are going to create the net namespace using the virtual interfaces.
# back to the first terminal
# in order to create a pair of virtual interfaces
cryptonite@cryptonite:~ $sudo ip link add veth0 type veth peer name ceth0
# turn on one of the virtual edges and assign it an IP address
cryptonite@cryptonite:~ $sudo ip link set veth0 up
cryptonite@cryptonite:~ $sudo ip addr add 172.12.0.11/24 dev veth0

# create the network namespace
root@cryptonite:~# unshare --net --kill-child /bin/bash
root@isolated:~# sleep 30

# find the PID of the isolated process
cryptonite@cryptonite:~ $ps -fC sleep
UID          PID    PPID  C STIME TTY          TIME CMD
crypton+   78625   78467  0 11:44 pts/0    00:00:00 sleep 30
# put the other end inside of the net space of the process
cryptonite@cryptonite:~ $sudo ip link set ceth0 netns /proc/78467/ns/net

# Let's go back to the namespaced process
# and turn the other pair of veth up and assign it an IP address
root@isolated:~# ip link
1: lo: <LOOPBACK> mtu 65536 qdisc noop state DOWN mode DEFAULT group default qlen 1000
    link/loopback 00:00:00:00:00:00 brd 00:00:00:00:00:00
9: ceth0@if10: <BROADCAST,MULTICAST> mtu 1500 qdisc noop state DOWN mode DEFAULT group default qlen 1000
    link/ether 76:8d:bb:61:1b:f5 brd ff:ff:ff:ff:ff:ff link-netnsid 0
root@isolated:~# ip link set lo up
root@isolated:~# ip link set ceth0 up
root@isolated:~# ip addr add 172.12.0.12/24 dev ceth0

# check the connectivity
root@isolated:~# ping -c 1 172.12.0.11
PING 172.12.0.11 (172.12.0.11) 56(84) bytes of data.
64 bytes from 172.12.0.11: icmp_seq=1 ttl=64 time=0.079 ms
...
Let’s now create a separate PID and mount namespaces and detach the root file system.
// create a new PID and MNT namespaces
root@cryptonite:~/test# unshare --pid --mount --fork --kill-child /bin/sh
#
# mount | grep ext4
/dev/mapper/vgcryponite-lvcryptoniteroot on / type ext4 (rw,relatime,errors=remount-ro)
// we have a copy of the rootfs mount in the mount namespace
// make the alpine root fs mountable
# mount --bind rootfs_alpine rootfs_alpine
# cd rootfs_alpine
# pwd
/home/cryptonite/test/rootfs_alpine
# mkdir hostfs_root
# ls
bin  dev  etc  home  hostfs_root  lib  media  mnt  opt  proc  root  run  sbin  srv  sys  tmp  usr  var

// change the current root fs mount
# pivot_root . hostfs_root
# ls hostfs_root
bin         dev         lib         libx32      mnt         root        snap        tmp
boot        etc         lib32       lost+found  opt         run         srv         usr
cdrom       home        lib64       media       proc        sbin        sys         var
// at the current state we have a bind mount of the host file system in the new mount namespace
# touch hostfs_root/home/cryptonite/test/hello
cryptonite@cryptonite:~ $ls hello -l
-rw-rw-r-- 1 cryptonite cryptonite 0 Jul  6 13:45 hello

# ps
PID   USER     TIME  COMMAND
// okay no output - the new procfs is searched at proc directory of the alpine image
// and there is nothing - let's mount the relative procfs in the alpine /proc directory
# mount -t proc proc /proc
# ps
PID   USER     TIME  COMMAND
    1 root      0:00 /bin/sh
   12 root      0:00 ps
Now we want to completely isolate the process inside the current alpine directory.
// unmount the old root in the mount namespace process
# umount -l hostfs_root
# mount | wc -l
2
// we have three mount points - let's check the upper mount namespace
cryptonite@cryptonite:~ $mount | wc -l
59
# cd /
# pwd
/
# whoami
root
# ps
PID   USER     TIME  COMMAND
    1 root      0:00 /bin/sh
   20 root      0:00 ps
# ipcs

------ Message Queues --------
key        msqid      owner      perms      used-bytes   messages

------ Shared Memory Segments --------
key        shmid      owner      perms      bytes      nattch     status

------ Semaphore Arrays --------
key        semid      owner      perms      nsems

# hostname
isolated
# ls hostfs_root/
// empty directory
# rmdir hostfs_root
# ls
bin    etc    lib    mnt    proc   run    srv    tmp    var
dev    home   media  opt    root   sbin   sys    usr
We isolated a process using almost all of the namespaces. In other words we made a really primitive container (for those familiar with this). However, there is no hardware resource usage limitation which is imposed by the cgroups.
Conclusion
Namespaces are a really powerful Linux kernel technology providing isolation of system resources. It’s one of the core features behind containers, like the famous Docker or LXC. It provides orthogonality - all of the features provided by namespaces can be used independently. However, they don’t limit hardware usage of a process. This is done by the cgroups. Combining namespaces, cgroups and capabilities allows us to create a fully isolated environment.
Greetings (same as in part 1, because they deserve it)
I would like to thank some key members of the team for discussions (erynian, mahé, Lo and pappy), proofreading (Francisco), and last but not least, pappy for pushing me beyond my comfort zone and helping me to grow.
References
https://www.toptal.com/linux/separation-anxiety-isolating-your-system-with-linux-namespaces
https://byteplumbing.net/2018/01/inspecting-docker-container-network-traffic/
https://opensource.com/article/19/10/namespaces-and-containers-linux
https://iximiuz.com/en/posts/container-networking-is-simple/
https://ops.tips/blog/using-network-namespaces-and-bridge-to-isolate-servers/
https://www.cloudsavvyit.com/742/what-are-linux-namespaces-and-what-are-they-used-for/