This article is about greybox fuzzing of userland targets that can be encountered in Android using AFL++ and its Frida mode. We also discuss how to target JNI functions, to test the native features invoked by Java code.
Introduction
We detail here a convenient way to do greybox1 fuzzing on native Android binaries. Several approaches exist, mainly:
- fuzz directly on the Android system;
- fuzz by emulating all or part of the Android system.
The method discussed here allows to fuzz directly on the Android device. To do so, the AFL++2 fuzzer is chosen. Greybox fuzzing requires binary instrumentation to use coverage and improve the fuzzer's effectiveness. AFL++ offers a Frida mode, which makes that possible. It is this mode used/tested in the article.
Android & native libraries
On Android, there are many native binaries and notably many shared libraries. These libraries can be embedded in applications, in the framework, or in other low-level parts of the system.
The selected target is an Android application designed for the purpose of the article in order to evaluate in a basic way the functioning of the fuzzing solution, the coverage, and the different harnessing strategies to face several situations frequently encountered on Android.
The target application evaluates three cases:
- the target function is a standard native function with no particular link to Android-specific elements;
- the target function is a JNI function that does not have a specific dependency on the application's bytecode. In the following, this type of function is called Weakly linked JNI function;
- the target function is a JNI function that interacts with the application bytecode. In the following, this kind of function is called Strongly linked JNI function.
The APK of the application is available on the repository associated with the article. The bytecode is not obfuscated, so the decompiled code of the application should be human friendly. For the native part, the code is detailed in the following article.
To download all the code associated with the article:
$ git clone git@github.com:quarkslab/android-fuzzing.git
First, we will see how to set up a fuzzing solution in the simple case of a standard native function, then, we detail a methodology to fuzz JNI functions in a second time.
The FuzzMe app
The qb.blogfuzz application used to evaluate the fuzzing solution has a native library whose main function is fuzzMe:
void fuzzMe(const jbyte *buffer, jsize length) {
  void (*crashMe)() = nullptr;

  if (length < 16)
    return;

    /* Quarksl4bfuzzMe! */
  if (buffer[0] == 'Q')
    if (buffer[1] == 'u')
      if (buffer[2] == 'a')
        if (buffer[3] == 'r')
          if (buffer[4] == 'k')
            if (buffer[5] == 's')
              if (buffer[6] == 'l')
                if (buffer[7] == '4')
                  if (buffer[8] == 'b')
                    if (buffer[9] == 'f')
                      if (buffer[10] == 'u')
                        if (buffer[11] == 'z')
                          if (buffer[12] == 'z')
                            if (buffer[13] == 'M')
                              if (buffer[14] == 'e')
                                if (buffer[15] == '!')
                                  crashMe();
}
This function simply evaluates the first 16 bytes of the buffer passed as parameter by using a nested conditional structure, which allows to evaluate if our fuzzer benefits from the coverage feedback:
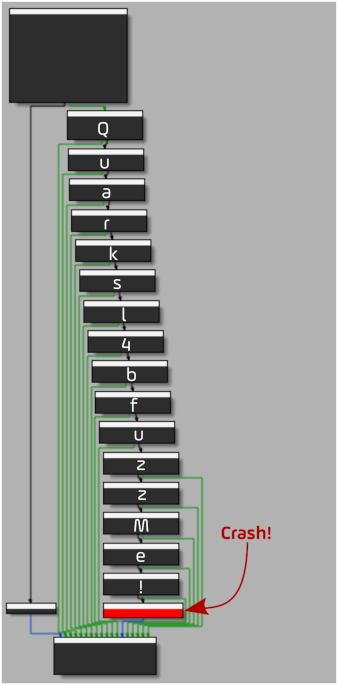
If the first 16 bytes of the buffer match Quarksl4bfuzzMe!, then a crash is intentionally caused by the call to the crashMe function. The crashMe function pointer is initialized to 0, raising a SIGSEGV when dereferenced.
The fuzzMe function is our standard native function case. With it, there are two JNI calling functions:
Java_qb_blogfuzz_NativeHelper_fuzzMeArraylinked to theqb.blogfuzz.NativeHelper.fuzzMeArray(byte[] bArr)Java method;Java_qb_blogfuzz_NativeHelper_fuzzMeWrapperlinked to theqb.blogfuzz.NativeHelper.fuzzMeWrapper(Wrapper wrapper)Java method.
Java_qb_blogfuzz_NativeHelper_fuzzMeArray is a function that we qualify as a weakly linked JNI function insofar as it does not manipulate Java objects specific to the qb.blogfuzz application.
Java_qb_blogfuzz_NativeHelper_fuzzMeWrapper is a function that we call a strongly linked JNI function because it manipulates a Java object of type Wrapper specific to the application qb.blogfuzz.
Building AFL++ & Frida Mode for Android
Compilation/execution context
We performed the following on Ubuntu:22.04 x86_64 with the following software versions:
The target platform is: Android 12 (API 31) - aarch64 on a Samsung Galaxy A32 (SM-A325F) device.
Building procedure
In this section, we see how to compile the minimum required to use the fuzzing solution on an aarch64 device with an Android 12 stock ROM. The device is rooted to have the necessary permissions when running the fuzzer, especially for the shared memory management.
Building AFL++ for Android is not a walk in the park. If you want to compile AFL++ with AOSP, we invite you to refer to the fpicker-aflpp-android project.
For the purpose of the study, we use a CMakeLists.txt, which allows to build the essential binaries for the used platform with minimum requirements.
Requirements
# System requirements
$ apt update
$ apt install cmake curl unzip xxd

# Working directory will be /opt
$ cd /opt

# Download AFL++ release
$ curl https://codeload.github.com/AFLplusplus/AFLplusplus/zip/refs/tags/4.06c --output 4.06c.zip
$ unzip 4.06c.zip

# Download the standalone Android NDK
$ curl https://dl.google.com/android/repository/android-ndk-r25c-linux.zip --output ndk.zip
$ unzip ndk.zip

# Getting our AFL++ Android CMakeLists.txt
$ cd AFLplusplus-4.06c
$ curl https://raw.githubusercontent.com/quarkslab/android-fuzzing/main/AFLplusplus/CMakeLists.txt --output CMakeLists.txt
Build
$ mkdir build && cd build
$ cmake -DANDROID_PLATFORM=31 \
        -DCMAKE_TOOLCHAIN_FILE=/opt/android-ndk-r25c/build/cmake/android.toolchain.cmake \
        -DANDROID_ABI=arm64-v8a ..
$ make
After compilation, the afl-fuzz (fuzzer) and afl-frida-trace.so (Frida mode) binaries are available in the current directory and can be uploaded to the device:
$ adb push afl-fuzz afl-frida-trace.so /data/local/tmp
Feel free to adapt the CMakeLists.txt file to your own needs (add other AFL++ binaries like afl-cmin, custom mutators, ...).
Our fuzzer is now ready to be used on the Android device and we can move on to developing the harnesses.
Standard Harness
Developing a harness on a standard native function is not unusual, however Frida mode brings some specificity. The code of the harness is available on our GitHub repo.
First we need to get the target native library from the qb.blogfuzz APK:
$ unzip -j qb.blogfuzz.apk lib/arm64-v8a/libblogfuzz.so
We also need the target function symbol fuzzMe:
$ objdump -T libblogfuzz.so

libblogfuzz.so:     file format elf64-little

DYNAMIC SYMBOL TABLE:
0000000000000000      DF *UND*  0000000000000000 (LIBC)       __cxa_atexit
0000000000000000      DF *UND*  0000000000000000 (LIBC)       __cxa_finalize
0000000000000000      DF *UND*  0000000000000000 (LIBC)       __register_atfork
0000000000000000      DF *UND*  0000000000000000 (LIBC)       __stack_chk_fail
0000000000000a10 g    DF .text  0000000000000088  Base        Java_qb_blogfuzz_NativeHelper_fuzzMeArray
0000000000000c44 g    DF .text  00000000000000cc  Base        Java_qb_blogfuzz_NativeHelper_fuzzMeWrapper
0000000000000b08 g    DF .text  000000000000013c  Base        _Z6fuzzMePKai  <<< HERE
0000000000000d44  w   DF .text  0000000000000044  Base        _ZN7_JNIEnv11GetMethodIDEP7_jclassPKcS3_
0000000000000a98  w   DF .text  0000000000000034  Base        _ZN7_JNIEnv14GetArrayLengthEP7_jarray
0000000000000d88  w   DF .text  00000000000000fc  Base        _ZN7_JNIEnv16CallObjectMethodEP8_jobjectP10_jmethodIDz
0000000000000d10  w   DF .text  0000000000000034  Base        _ZN7_JNIEnv14GetObjectClassEP8_jobject
0000000000000acc  w   DF .text  000000000000003c  Base        _ZN7_JNIEnv20GetByteArrayElementsEP11_jbyteArrayPh
We can use this mangled symbol as an external function in our harness:
#include <errno.h>
#include <stdint.h>
#include <stdio.h>

#define BUFFER_SIZE 256

/* Target function */
extern void _Z6fuzzMePKai(const uint8_t*, uint64_t);


/* Persistent loop */
void fuzz_one_input(const uint8_t *buf, int len) {
  _Z6fuzzMePKai(buf, len);
}

int main(void) {
  const uint8_t buffer[BUFFER_SIZE];

  ssize_t rlength = fread((void*) buffer, 1, BUFFER_SIZE, stdin);
  if (rlength == -1)
    return errno;

  fuzz_one_input(buffer, rlength);

  return 0;
}
The harness code is relatively concise. The important function here is fuzz_one_input, which takes a buffer and a size as parameters and calls the fuzzMe function of libblogfuzz.so.
The Frida mode of AFL++ is relatively similar to the QEMU mode for the configuration of the fuzzer because there is a certain symmetry of the environment variables. However, Frida mode brings the possibility to do a large part of the configuration in JavaScript3 while benefiting from part of the GumJS API, which offers a certain flexibility compared to the configuration through environment variables. It is usually quite convenient to use both environment variables for some parameters and the JavaScript API for what is more convenient to configure dynamically.
Here, the configuration of the fuzzer is essentially done in the afl.js script, which allows us to dynamically configure the entry point of the fuzzer and the elements necessary for the persistence loop:
const pStartAddr = DebugSymbol.fromName("fuzz_one_input").address;

// [...]

Afl.setPersistentAddress(pStartAddr);
Afl.setEntryPoint(pStartAddr);
It is not necessary to configure explicitly the end address of the persistence loop because by default it corresponds to the return of the fuzz_one_input function. Anyway, being able to retrieve elements dynamically is one of the really valuable advantages of the mode.
Another interesting feature of the configuration script is the implementation of the persistence hook, which allows a correct initialization of the execution context at each iteration:
const cm = new CModule(`
  #include <string.h>
  #include <gum/gumdefs.h>

  #define BUF_LEN 256

  void afl_persistent_hook(GumCpuContext *regs, uint8_t *input_buf,
    uint32_t input_buf_len) {

    uint32_t length = (input_buf_len > BUF_LEN) ? BUF_LEN : input_buf_len;
    memcpy((void *)regs->x[0], input_buf, length);
    regs->x[1] = length;
  }
  `,
  {
    memcpy: Module.getExportByName(null, "memcpy")
  }
);

// [...]

Afl.setPersistentHook(cm.afl_persistent_hook);
Here we exploit Frida's ability to compile C code leveraging CModule4. The hook afl_persistent_hook is executed before each iteration of the persistence loop. It takes three parameters.
The first one (GumCpuContext *regs) is a pointer to the aarch64 version of the GumCpuContext struct. This structure allows us to access the CPU registers.
The second (uint8_t *input_buf) and the third (uint32_t input_buf_len) are respectively the fuzzer's input and its size. The context is restored at the beginning of each iteration of the persistence loop, however, we need to update the input parameters as if the fuzz_one_input function was called in a standard way so that the next iteration of the persistence loop will execute correctly. The input buffer input_buf generated by the fuzzer must be set as if it had been passed to the function as first parameter and the size input_buf_len as second. Based on the aarch64 calling convention5, the buffer address must be in x0 and the size in x1.
The compilation procedure is similar to the one we used to compile AFL++:
$ mkdir build && cd build
$ cmake -DANDROID_PLATFORM=31
        -DCMAKE_TOOLCHAIN_FILE=${ANDROID_NDK}/build/cmake/$android.toolchain.cmake
        -DANDROID_ABI=arm64-v8a ..
$ make
All that remains is to upload the files we need on the device:
$ adb push fuzz ../afl.js ../lib/libblogfuzz.so /data/local/tmp
Then prepare the environment on the device for our first fuzzing campaign (in root):
# cd /sys/devices/system/cpu
# echo performance | tee cpu*/cpufreq/scaling_governor
or just use the afl-system-config script provided with AFL++.
$ cd /data/local/tmp
$ mkdir in out
$ dd if=/dev/urandom of=in/sample.bin bs=1 count=16 # our dummy corpus
We are ready to fuzz:
# ./afl-fuzz -O -G 256 -i in -o out ./fuzz
We start the fuzzer with minimal options, the goal is not to tweak the fuzzing campaign, but simply to check the proper functioning of the fuzzer with the coverage via Frida.
As we have defined in the harness a buffer size of 256 bytes, it is not necessary to generate larger entries, so we limit the maximum size of entries with the -G flag. Here the -O flag is used to specify that we want to use the Frida mode.
By default, the fuzzer uses the afl.js file in the current directory as the configuration file. It is possible to specify another JS file with the environment variable AFL_FRIDA_JS_SCRIPT.
We can see that there is coverage feedback:
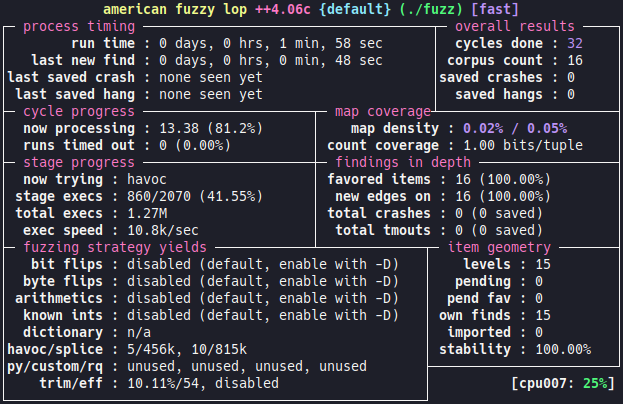
After a few moments, the fuzzer find the crash:
# xxd out/default/crashes/id*
00000000: 5175 6172 6b73 6c34 6266 757a 7a4d 6521  Quarksl4bfuzzMe!
JNI
Introduction
Quite early in Java history, a mechanism to bridge the gap between the Java world and the native world was proposed: Java Native Interface (JNI). Today this mechanism is heavily used in Android, notably by the applications and also the Android framework.
This interface works in a bilateral way, that is to say that it allows to call native code from Java, but also to interact with the Java world from the native part.
The first parameter of JNI functions is of type JNIEnv*, a pointer to a structure defined in jni.h. JNIEnv allows to interact with the Java world from the native function by providing a complete API that allows the manipulation of Java objects. So, to target this type of function we need to provide a JNI environment. This brings us to the invocation API.
JNI Invocation API
The invocation API6 allows to create a JVM thanks to a particular function: JNI_CreateJavaVM. It is this function that allows to initialize correctly a JNIEnv to use it thereafter in a call to a JNI function. On Android this API is provided by the runtime.
In order to factorize this part of the code for use in different harnesses, we implement it as a library:
#include <dlfcn.h>
#include <stdbool.h>
#include "jenv.h"

#define LOG_TAG "jenv"
#define ANDROID_RUNTIME_DSO "libandroid_runtime.so"

typedef jint(*JNI_CreateJavaVM_t)(JavaVM **p_vm, JNIEnv **p_env, void *vm_args);

int init_java_env(JavaCTX *ctx, char **jvm_options, uint8_t jvm_nb_options) {
  JNI_CreateJavaVM_t JNI_CreateJVM;
  JniInvocationImpl* (*JniInvocationCreate)();
  bool (*JniInvocationInit)(JniInvocationImpl*, const char*);
  jint (*registerFrameworkNatives)(JNIEnv*);
  void* runtime_dso;

  ALOGV("[+] Initialize Java environment");

  if ((runtime_dso = dlopen(ANDROID_RUNTIME_DSO, RTLD_NOW)) == NULL) {
    ALOGE("[!] %s\n", dlerror());
    return JNI_ERR;
  }

  if ((JniInvocationCreate = dlsym(runtime_dso, "JniInvocationCreate")) == NULL) {
    ALOGE("[!] %s\n", dlerror());
    return JNI_ERR;
  }

  if ((JniInvocationInit = dlsym(runtime_dso, "JniInvocationInit")) == NULL) {
    ALOGE("[!] %s\n", dlerror());
    return JNI_ERR;
  }

  if ((JNI_CreateJVM = (JNI_CreateJavaVM_t) dlsym(runtime_dso, "JNI_CreateJavaVM")) == NULL) {
    ALOGE("[!] %s\n", dlerror());
    return JNI_ERR;
  }

  if ((registerFrameworkNatives = dlsym(runtime_dso, "registerFrameworkNatives")) == NULL) {
    ALOGE("[!] %s\n", dlerror());
    return JNI_ERR;
  }

  ctx->invoc = JniInvocationCreate();
  JniInvocationInit(ctx->invoc, ANDROID_RUNTIME_DSO);

  JavaVMOption options[jvm_nb_options];

  for (int i = 0; i < jvm_nb_options; ++i)
    options[i].optionString = jvm_options[i];

  JavaVMInitArgs args;
  args.version = JNI_VERSION_1_6;
  args.nOptions = jvm_nb_options;
  args.options = options;
  args.ignoreUnrecognized = JNI_TRUE;

  jint status = JNI_CreateJVM(&ctx->vm, &ctx->env, &args);
  if (status == JNI_ERR) return JNI_ERR;

  ALOGD("[d] vm: %p, env: %p\n", ctx->vm, ctx->env);

  status = registerFrameworkNatives(ctx->env);
  if (status == JNI_ERR) return JNI_ERR;

  return JNI_OK;
}

// [...]
The init_java_env function allows to initialize a JavaCTX structure that contains both a pointer to the Java VM and another to the JNIEnv:
/* CTX */
typedef struct JavaContext {
  JavaVM *vm;
  JNIEnv *env;
  struct JniInvocationImpl *invoc;
} JavaCTX;
A pointer to the structure that defines the implementation of the API invocation JniInvocationImpl is also stored in order to be able to the cleanup environment later. This part is not used in the harnesses.
To use the JNI_CreateJavaVM function we must first initialize the runtime to tell it where to find the implementation of the invocation API. This step is done thanks to the functions JniInvocationCreate and JniInvocationInit. The JniInvocationInit function takes as second parameter a string that defines the name of the library that contains the API implementation. Here we provide it with the name of the Android runtime library so that its own implementation can be used:
JniInvocationInit(ctx->invoc, ANDROID_RUNTIME_DSO);
The function JNI_CreateJavaVM takes three parameters:
- A pointer to pointer (double indirection) to the Java VM that will be created;
- A pointer to pointer to
JNIEnv, which will also be created during the call; - And finally, a pointer to the
JavaVMInitArgsstructure, which allows to pass a number of arguments for the initialization of the Java environment.
The options field of the JavaVMInitArgs structure allows to pass particularly useful arguments in the form of an array of structures of type JavaVMOption:
typedef struct JavaVMOption {
    char *optionString;
    void *extraInfo;
} JavaVMOption;
The optionString field can be used (among other things) to specify a classpath or a loading path for native libraries. For more flexibility, these options can be passed when calling init_java_env via the jvm_options (array of C strings) and jvm_nb_options (number of elements in the array) parameters so we can configure the environment from the harness.
Examples of the use of the invocation API are available in the AOSP source code7 and in the article Creating a Java VM from Android Native Code8.
Finally, we call the registerFrameworkNatives function, which allows to link some native parts of the framework with the Java parts. Not necessarily mandatory, it depends on the features used by the target function. It is better to do it anyway to avoid raising an UnsatisfiedLinkError if native parts of the framework are used. You can refer to AndroidRuntime.cpp to see exactly what is registered.
The code of the jenv library is available here.
Anyway, now that we have the ability to create an environment for calling JNI functions, we can move on to developing the harnesses. First, we consider the simplest case of a weakly linked JNI function.
Weakly linked JNI function harnessing
Here is the source code of the targeted function, Java_qb_blogfuzz_NativeHelper_fuzzMeArray:
extern "C" JNIEXPORT void JNICALL
Java_qb_blogfuzz_NativeHelper_fuzzMeArray(
        JNIEnv* env,
        jobject /* this */,
        jbyteArray array) {
    jboolean isCopy = false;
    jsize length = env->GetArrayLength(array);
    jbyte *buffer = env->GetByteArrayElements(array, &isCopy);

    fuzzMe(buffer, length);
}
We can see that the function is in fact a simple wrapper that calls the previous targeted function (fuzzMe). The buffer is first retrieved as a Java byte array represented here by the JNI type jbyteArray. The elements of the array are extracted with GetByteArrayElements in the form of an array of jbyte elements that we can then pass to the fuzzMe function.
Obviously, here we could fuzz the fuzzMe function directly, but that is not the purpose of the example. Because JNI functions are high-level functions, fuzzing is generally slower. However, fuzzing JNI functions does offer some advantages:
- You have the ability to fuzz a relatively simple Java interface which has multiple complex interactions with a native library, so you don't have to reverse the binary to find out how to produce a harness on a function further down in the execution flow;
- It is more likely that crashes found by the fuzzer can be reproduced from the Java part.
In order to plug into this function with the harness, we need to generate an object of type jbyteArray:
/* Persistent loop */
void fuzz_one_input(const uint8_t *buffer, size_t length) {
  jbyteArray jBuffer = (*ctx.env)->NewByteArray(ctx.env, length);
  (*ctx.env)->SetByteArrayRegion(ctx.env, jBuffer, 0, length,
                                 (const jbyte *)buffer);

  Java_qb_blogfuzz_NativeHelper_fuzzMeArray(ctx.env, NULL, jBuffer);

  (*ctx.env)->DeleteLocalRef(ctx.env, jBuffer);
}
The creation of the object is done thanks to the NewByteArray function, then we initialize the jbyteArray with the buffer generated by the fuzzer thanks to the SetByteArrayRegion function. We can then call the target JNI function and finally clean the reference with DeleteLocalRef.
The Java environment does not need any particular parameters in this case. So we initialize it this way:
init_java_env(&ctx, NULL, 0)
The configuration of the fuzzer is almost the same as for the first harness, we simply add an exclusion mechanism to avoid instrumenting large modules like the Android runtime:
/* Modules to be instrumented by Frida */
const MODULE_WHITELIST = [
  "fuzz",
  "libblogfuzz.so",
];

/* Exclude from instrumentation */
Module.load("libandroid_runtime.so");
new ModuleMap().values().forEach(m => {
  if (!MODULE_WHITELIST.includes(m.name)) {
    Afl.print(`Exclude: ${m.base}-${m.base.add(m.size)} ${m.name}`);
    Afl.addExcludedRange(m.base, m.size);
  }
});

// [...]
The libandroid_runtime.so module is loaded with Module.load so that it can be excluded when iterating through the list of all loaded modules (thanks @WorksButNotTested for the tip).
We also specify the number of iterations of the persistence loop:
Afl.setPersistentCount(10000);
Then we just start the fuzzer like the first campaign :
# ./afl-fuzz -O -G 256 -i in -o out ./fuzz
Here again we get the coverage feedback:
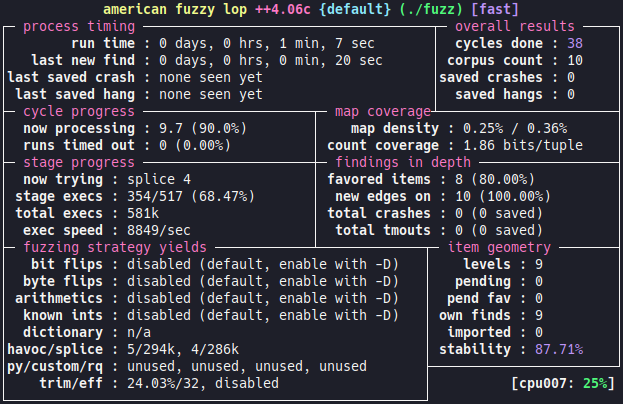
And after a few minutes:
# xxd out/default/crashes/id*
00000000: 5175 6172 6b73 6c34 6266 757a 7a4d 6521  Quarksl4bfuzzMe!
00000010: 9d21 2121 2121 2121 2121 2121 2121 2164  .!!!!!!!!!!!!!!d
Strongly linked JNI function harnessing
Here is the source code of the targeted function Java_qb_blogfuzz_NativeHelper_fuzzMeWrapper:
extern "C" JNIEXPORT void JNICALL
Java_qb_blogfuzz_NativeHelper_fuzzMeWrapper(
        JNIEnv* env,
        jobject /* this */,
        jobject wrapper
        ) {
    jclass wrapperClass = env->GetObjectClass(wrapper);
    jmethodID getBufferMethod = env->GetMethodID(wrapperClass, "getBuffer", "()[B");
    auto array = (jbyteArray) env->CallObjectMethod(wrapper, getBufferMethod);
    jboolean isCopy = false;
    jsize length = env->GetArrayLength(array);
    jbyte *buffer = env->GetByteArrayElements(array, &isCopy);

    fuzzMe(buffer, length);
}
In this case too, the function is a simple wrapper of the native fuzzMe function. But this time, it takes as parameter an object of type Wrapper. The Wrapper class is specific to the qb.blogfuzz application, so we add the APK of the application to the classpath with char* options = "-Djava.class.path=/data/local/tmp/qb.blogfuzz.apk"; when initializing the Java environment:
int main(void) {
  int status;
  const uint8_t buffer[BUFFER_SIZE];
  char* options = "-Djava.class.path=/data/local/tmp/qb.blogfuzz.apk";

  ssize_t rlength = fread((void*)buffer, 1, BUFFER_SIZE, stdin);
  if (rlength == -1) return errno;

  if ((status = init_java_env(&ctx, &options, 1)) != 0) {
    return status;
  }

  fuzz_one_input(buffer, rlength);

  return 0;
}
The code of the harness is available here. We adapt the fuzz_one_input function in order to create the necessary wrapper object:
void fuzz_one_input(const uint8_t* buffer, size_t length) {
  jbyteArray jBuffer = (*ctx.env)->NewByteArray(ctx.env, length);
  (*ctx.env)->SetByteArrayRegion(ctx.env, jBuffer, 0, length,
                                 (const jbyte*)buffer);

  jclass wrapperClass = (*ctx.env)->FindClass(ctx.env, "qb/blogfuzz/Wrapper");
  jmethodID wrapperCtor =
      (*ctx.env)->GetMethodID(ctx.env, wrapperClass, "<init>", "([B)V");
  jobject objWrapper =
      (*ctx.env)->NewObject(ctx.env, wrapperClass, wrapperCtor, jBuffer);

  Java_qb_blogfuzz_NativeHelper_fuzzMeWrapper(ctx.env, NULL, objWrapper);

  (*ctx.env)->DeleteLocalRef(ctx.env, objWrapper);
  (*ctx.env)->DeleteLocalRef(ctx.env, jBuffer);
}
We start the fuzzer as before and add a slightly longer timeout with the -t flag because the harness takes a little longer to start:
# ./afl-fuzz -O -G 256 -t 3000 -i in -o out ./fuzz
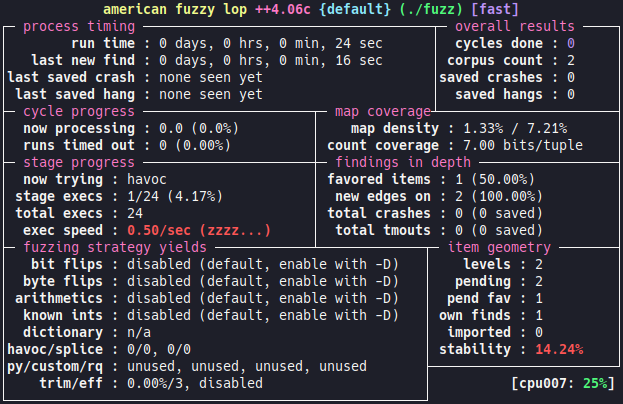
It seems that there is some kind of performance issue... But why? Let's look at the implementation of the Wrapper class from the decompiled bytecode:
/* loaded from: classes3.dex */
public class Wrapper {
    public static final long TIME_TO_WAIT = 2000;
    private final byte[] mBuffer;

    public Wrapper(byte[] buffer) throws InterruptedException {
        Thread.sleep(TIME_TO_WAIT);
        byte[] bArr = new byte[buffer.length];
        this.mBuffer = bArr;
        System.arraycopy(buffer, 0, bArr, 0, bArr.length);
    }

    public byte[] getBuffer() {
        byte[] bArr = this.mBuffer;
        return Arrays.copyOf(bArr, bArr.length);
    }
}
We notice that a Thread.sleep(TIME_TO_WAIT) has been added (for the purposes of this article) in order to simulate a time-consuming treatment during the instantiation of a Wrapper object. This allows us to confront an interesting case. What can we do when the Java implementation of an application does not suit fuzzing?
When creating the Java environment, we passed the APK path of the qb.blogfuzz application to access the Wrapper class. Apart from this class, the harness does not need any other element of the APK. The idea is to use our own implementation (mock) of the Wrapper class. To do this we create a Wrapper.java file by taking the decompiled code of the original class and lightening it:
package qb.blogfuzz;

import java.util.Arrays;

public class Wrapper {
    private final byte[] mBuffer;

    public Wrapper(byte[] buffer) {
        this.mBuffer = buffer;
    }

    public byte[] getBuffer() {
        byte[] bArr = this.mBuffer;
        return Arrays.copyOf(bArr, bArr.length);
    }
}
Then compile the Wrapper.java file into Dalvik bytecode:
$ javac Wrapper.java
$ d8 Wrapper.class
$ mv classes.dex mock.dex
We use the produced file instead of the APK with char* options = "-Djava.class.path=/data/local/tmp/mock.dex"; :
int main(void) {
  int status;
  const uint8_t buffer[BUFFER_SIZE];
  char* options = "-Djava.class.path=/data/local/tmp/mock.dex";

  // [...]
}
Then restart the fuzzer:
# ./afl-fuzz -O -G 256 -i in -o out ./fuzz

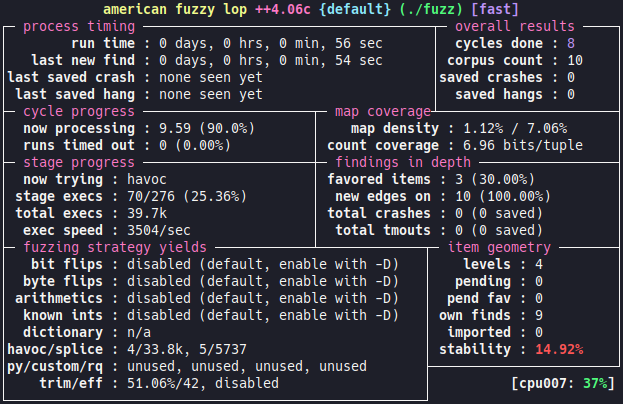
We do have feedback from the coverage. There is a slight performance and stability problem. We are currently working on a fix and we hope that it can be integrated into AFL++ soon.
The fuzzer takes a little longer than for the previous functions, but it manages to find the crash after a few dozen of minutes:
# xxd out/default/crashes/id*
00000000: 5175 6172 6b73 6c34 6266 757a 7a4d 6521  Quarksl4bfuzzMe!
There is another more convenient way to bypass the Thread.sleep(TIME_TO_WAIT) using the afl.js configuration script (thanks @WorksButNotTested for pointing this out):
// [...]

const pInitJenv = Module.getExportByName("libjenv.so", "init_java_env");
const interceptor = Interceptor.attach(pInitJenv, {
  onLeave: function(retval) {
    Java.perform(function() {
      Java.use("java.lang.Thread").sleep
        .overload("long")
        .implementation = function() { /* Bypass me */ }
      interceptor.detach();
    });
  }
});

// [...]
The JavaScript configuration allows us to exploit the Frida Java API.
Here we put a hook (Interceptor) on the initialization function of the Java environment init_java_env of the libjenv.so library. To be able to leverage the Java API, the Java environment must be initialized, so we use Java.perform at the end of the execution of the init_java_env function (with the onLeave callback). We can then hook the sleep method of the Thread class to bypass its implementation.
The hook seems to have a negative impact on performance, however it is much more practical to set up than the mock.
Conclusion
This study shows that AFL++ is perfectly suited for greybox fuzzing in Android and that the Frida mode offers a valuable configuration flexibility. This solution allows to fuzz especially JNI functions with relatively little effort.
We also see that the more the target is linked to Java elements, the worse the performance:
| Target | Execution speed |
|---|---|
| Standard native function | ~10k/sec |
| Weakly linked JNI function | ~9k/sec |
| Strongly linked JNI function | ~5k/sec |
| Strongly linked JNI function (with Java hook) | ~3.5k/sec |
Other greybox fuzzing solutions for Android using AFL++ exist, for example the fpicker-aflpp-android9 project, which allows to fuzz in the context of an application and brings some facilities for the creation of harnesses. The AFL++ on Android with QEMU support10 article proposes an alternate solution using the QEMU mode.
Anyway, we hope that this article will bring you the necessary elements and give you ideas to start fuzzing on Android following our approach.
Changelog
- 2023-05-02: Add another methodology to bypass
Thread.sleepin the case of the strongly linked JNI function.
References
-
As only the compiled binary is available, we have to instrument it to get the coverage feedback. ↩
-
Frida CModule on Frida documentation ↩
-
The aarch64 calling convention in ARM documentation ↩
-
The JNI invocation API on the Oracle documentation ↩
-
Usage of JNI invocation API in AOSP sources ↩
-
Creating a Java VM from Android Native Code article by @Caleb Fenton ↩
-
The AFL++ on Android with QEMU support article by @Gr33nh4t ↩