Author Lucas Di Martino
Category Containers
Tags reverse-engineering, Windows, 2023
This article presents the internals of Windows Container.
Introduction
This article is the first one of a series about Silos and Server Silos, the underlying Windows technology for Windows Containers. In this article, we'll look at the mechanisms involved in creating a Silo, mainly from a user-land point of view.
The main objective of this study is to better understand how Windows Containers are created. Indeed, containers are used to easily deploy applications, or to isolate processes. For instance, Docker on Windows, when creating a container, actually creates a Server Silo. A clear understanding of how they are created, what objects they are composed of, is a good starting point for analyzing the attack surface. Moreover, throughout this article, we'll be presenting code snippets of the various steps involved in creating a Silo. This code was written with the aim of reproducing the creation of a Silo using only Windows APIs, and can be found in the annexes.
Before diving deeper into this analysis, let's try to define what they are.
First, let's see the difference between a Virtual Machine (VM) and a Container.
- A Virtual Machine emulates the hardware components of a computer. An Operating System (OS) must be installed in the VM in order to use it. This OS is called the guest Operating System. The VM provides a full isolation from the host Operating System.

- A Container is a way to isolate processes in the same OS. The applications inside and outside a Container share the same Kernel.

The table Containers vs. virtual machines show the differences and similarities between Containers and VMs.
There are two types of Silos: Application Silo and Server Silo.
-
An Application Silo is not a true Windows Container, it is mainly used with Desktop Bridge technology.
-
A Server Silo is a Windows Container, and this is the main target of our analysis.
To create a Server Silo, it's necessary to first create a Silo and then to convert it into a Server Silo. That's why this first article will only present the creation of a Silo.
In Exploring Windows Containers, Thomas Van Laere talks about Windows Containers including Server Silo. In his article, he shows that in order to create a Server Silo, Docker has to use the HCS (Host Compute Service). At the end of his article, he managed to create a Windows Container by using the HCS interface. But this service remains a black box which hides the true creation of the Silo.
The Host Compute Service is based on vmcompute.exe and is in charge of providing support for virtual machines and containers.
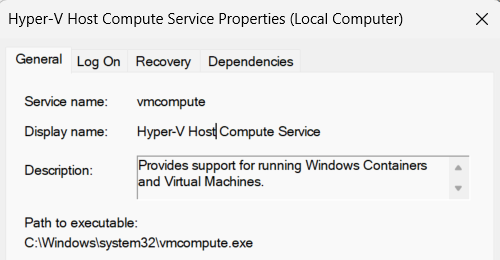
The sections below aim to answer the following question: What HCS does to create a Silo?
As we'll see later, Silos are based on Job Objects in order to set up the process isolation. So first, let's take a moment to introduce them.
Job Objects
Windows' Job Objects are simply a way to manage groups of processes as a single unit. For instance, it's possible to manage processor affinity for each process inside a Job Object.
Later in this article we'll use two functions of the Job Objects API.
NTSTATUS NtCreateJobObject(
    HANDLE* hJobHandle,
    ACCESS_MASK        DesiredAccess,
    OBJECT_ATTRIBUTES* pObjectAttributes
);
This function simply creates a Job Object and returns an HANDLE on it. The parameter pObjectAttributes allows setting attributes to the job such as its name in order to refer to it. The DesiredAccess defines the requested access to the object.
NTSTATUS NtSetInformationJobObject(
    HANDLE hJobHandle,
    JOBOBJECTINFOCLASS InfoClass,
    void* pInfo,
    ULONG InfoLen
);
NtSetInformationJobObject can be used to interact with a Job Object. The InfoClass parameter is an enumeration that defines the type of the operation and the
pInfo parameter is the value or object used by the operation.
These two functions are part of the Windows private API. To use them, it is necessary to find their addresses inside the NTDLL.dll library.
Docker
In the introduction, we discussed that our objective is to understand how Windows creates a Server Silo. Docker allows us to easily create a container. Depending on the isolation level, the container could eventually be a Server Silo.
While running Docker on Windows, containers will be Linux Containers by default. A Linux Container is a Virtual Machine, and we will see the difference between a VM isolation and process isolation right after.
It's possible to ask Docker to run Windows Containers with the Switch to Windows containers... option, as shown in the image below.
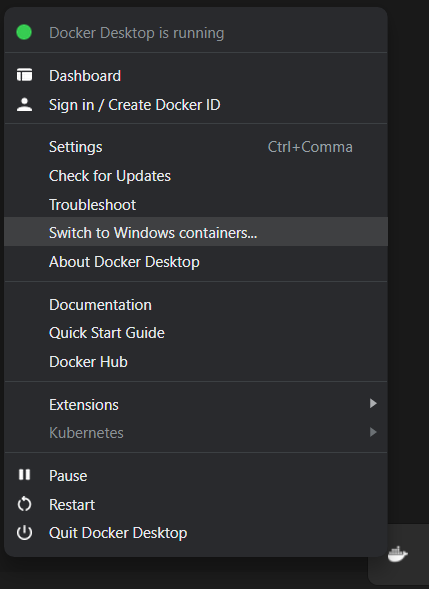
Once done, when asking Docker to create a container, the technology used by default will depend on the version of Windows:
Windows containers running on Windows Server default to running with process isolation. Windows containers running on Windows 10 Pro and Enterprise default to running with Hyper-V isolation.
Nevertheless, it's possible to choose the technology thanks to the --isolation=(process|hyperv) switch.
When using Hyper-V isolation, the container runs inside a Virtual Machine with its own Operating System and Kernel.

If process isolation is used, the container runs directly on the host Operating System, and they share the same Kernel.

In the next part of this article, we'll use Docker to easily create Windows Containers to dynamically analyze what's happening on the system. The Docker image used is not particularly important. But to keep the container relatively small, we decided to use the Powershell container.
Docker and RPC
Before we are able to reverse the Server Silos, we need to find a good starting point.
As explained in various articles such as Exploring Windows Containers, by Thomas Van Laere or Understanding Windows Containers Communications, by Eviatar Gerzi, Docker asks Windows to create a container by communicating with the Host Compute Service.
The communications between Docker and the Host Compute Service are done by using Remote Procedure Call (RPC).
RPC is a way to call a remote procedure in another process in the local or remote computer. This is done as a client/server communication. Calling an RPC function is as easy as calling a function in the way that developers don't need to manage the network part.
We can use RPCMon in order to monitor RPC and get an idea of the functions executed by the Host Compute Service when Docker asks it to create a container.
In order to identify a possible starting point for our research, we are going to monitor the creation of a container and the execution of a PowerShell inside.
Host:
docker run -it --rm --isolation=process mcr.microsoft.com/windows/servercore:ltsc2022 powershell
Inside the container:
Windows PowerShell
Copyright (C) Microsoft Corporation. All rights reserved.

Install the latest PowerShell for new features and improvements! https://aka.ms/PSWindows

PS C:\> ls


    Directory: C:\


Mode                 LastWriteTime         Length Name
----                 -------------         ------ ----
d-r---         3/10/2023   3:38 PM                Program Files
d-----         3/10/2023   7:24 AM                Program Files (x86)
d-r---         3/10/2023   7:45 AM                Users
d-----         7/21/2023  12:33 AM                Windows
-a----          1/7/2023  12:40 AM           5647 License.txt


PS C:\> exit
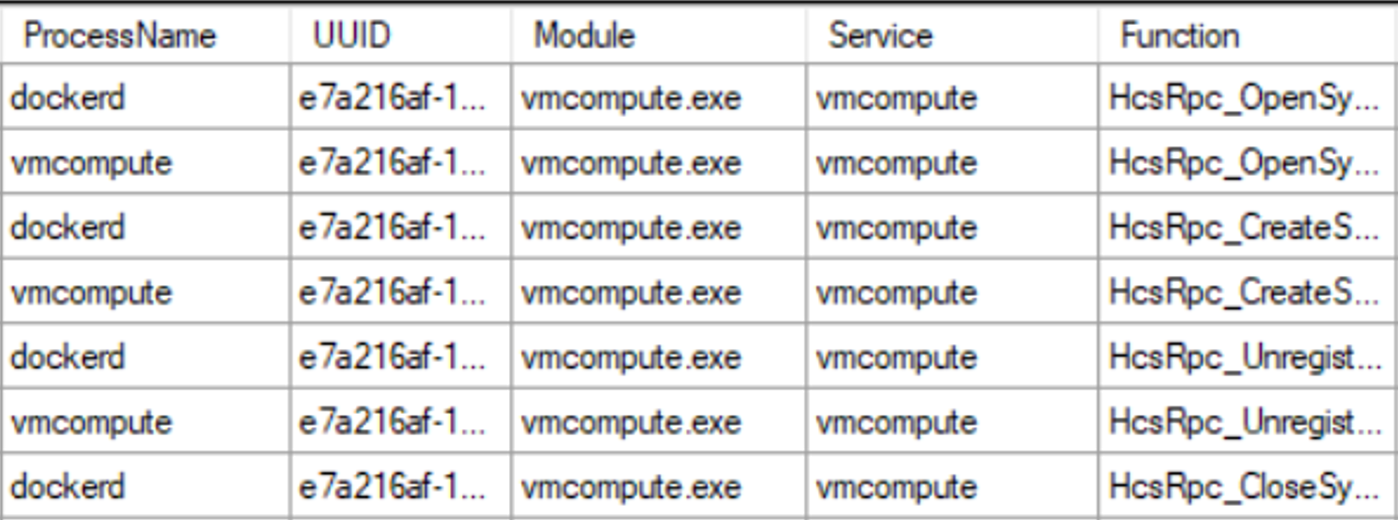
The drawing below summarizes the capture.
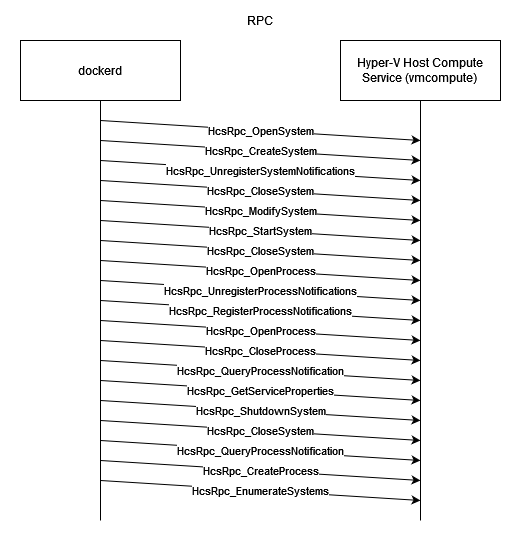
The RPC function names are quite self-explanatory and the second one, "HcsRpc_CreateSystem", seems to be the one in charge of creating the Windows Container.
This function will therefore be our entry point in vmcompute.exe.
Silo Creation
Now that we have an idea of where to start digging, we can focus on the Host Compute Service.
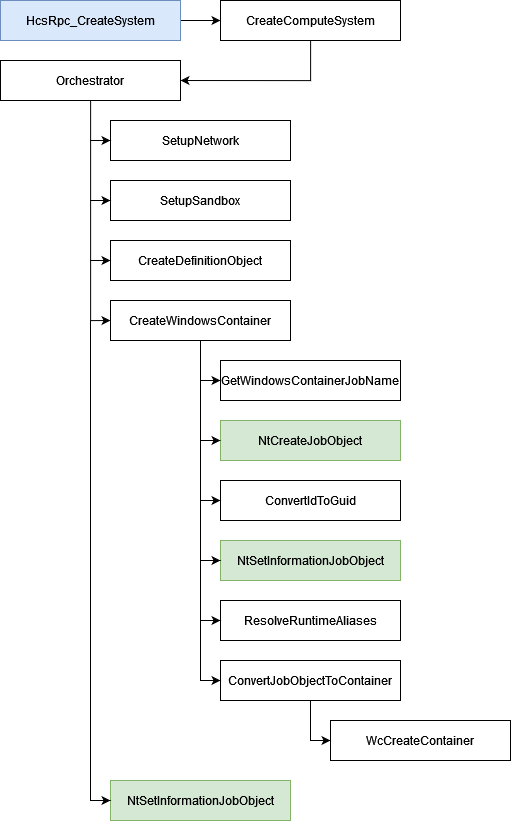
HcsRpc_CreateSystem
When this function is called, it receives 2 arguments.
The first one is the name of the container as a hex-string. For example:
"30a261e2546330f6572686b3a1197367671197fb6369b68c97344c07c6d22a2a"
The second argument is a JSON-formatted string that contains information about the object the Host Compute Service should create. For instance, the following definition will be used to craft a Container having the same name as the previous argument.
{
  "SystemType": "Container",
  "Name": "30a261e2546330f6572686b3a1197367671197fb6369b68c97344c07c6d22a2a",
  "Owner": "docker",
  "VolumePath": "\\\\?\\Volume{4ab00c57-bbea-4895-b745-ee8d4847a963}",
  "IgnoreFlushesDuringBoot": true,
  "LayerFolderPath": "C:\\ProgramData\\Docker\\windowsfilter\\30a261e2546330f6572686b3a1197367671197fb6369b68c97344c07c6d22a2a",
  "Layers": [
    {
      "ID": "6ac038c1-a261-55ce-9fd9-95c017f02e6a",
      "Path": "C:\\ProgramData\\Docker\\windowsfilter\\d69a5485fa6c6f3b10905855bad15a0ff9787a3c25d08d675064442db268154e"
    },
    {
      "ID": "d6b78a6b-5e25-51d2-acf2-6c44310cd6ee",
      "Path": "C:\\ProgramData\\Docker\\windowsfilter\\b7267716533544c86c859ca4105d0e29bc7e6a495e131f89d9aa5a0303585b78"
    }
  ],
  "HostName": "30a261e25463",
  "HvPartition": false,
  "EndpointList": [
    "8d036da9-bbfd-4cd8-9f3f-c6d7db125dc3"
  ],
  "AllowUnqualifiedDNSQuery": true
}
HcsRpc_CreateSystem performs actions, such as checking RPC access, retrieving the client process ID or logging events, that are not relevant to this blog post. Therefore, we won't spend much time on it.
At some point, HcsRpc_CreateSystem calls CreateComputeSystem.
CreateComputeSystem
ComputeService::Management::ComputeSystemManager::CreateComputeSystem(
    std::wstring const &,
    std::wstring const &,
    IVmHandleBrokerManager *,
    void *,
    ComputeService::Management::ServerOperationProperties
);
- The first argument is an empty string ;
- The second argument is a string containing the name of the container ;
- Even if we haven't found a relevant definition of the third parameter, it seems to handle information like the JSON string we saw earlier ;
- The fourth and fifth arguments could not be identified for now.
Like in the previous function, CreateComputeSystem continues to log events, but the most interesting thing in our context, is that it also selects the Orchestrator that will be in charge of creating and configuring the container.
std::array<std::shared_ptr<ComputeService::Management::IComputeSystemOrchestrator>,10> ComputeService::Management::OrchestratorRegistrar<ComputeService::Management::IComputeSystemOrchestrator>::Orchestrators
This Orchestrator is a C++ object whose constructor set the container's environment.
WindowsContainerOrchestrator::Construct
During its initialization, the Orchestrator sets up the network and the sandbox for the container. Although we won't go into detail about these parts in this article, we're going to give them a brief introduction. The 2 functions used are SetupNetworking and SetupSandbox.
ComputeService::Management::Details::SetupNetworking(
    ComputeService::Management::WindowsContainerConfiguration const *,ComputeService::Management::WindowsContainerState *
);
ComputeService::Management::WindowsContainer::SetupSandbox(
    ComputeService::Management::WindowsContainerConfiguration const *,ComputeService::Management::WindowsContainerState *
);
The sandbox part is related to the creation of the virtual disk sandbox.vhdx which will be used as the file system of the container. You can find more information about vhdx file in the following blog-post Playing in the windows sandbox, by Alex Ilgayev.
The network part seems to be linked with the creation of the virtual network adapter(vNIC).
After that, vmcompute.exe will prepare the schema of the container based on the following template files by calling the CreateDefinitionObject function:
C:\Windows\system32\containers\devices.defC:\Windows\system32\containers\devices.Windows.Desktop.defC:\Windows\system32\containers\wsc.def
Finally, the ComputeService::ContainerUtilities::CreateWindowsContainer is called.
CreateWindowsContainer
CreateWindowContainer is in charge of creating the Job Object. As a reminder, Job Object is the base for Silos. The name of the Job Object is generated with the GetWindowsContainerJobName function.
ComputeService::ContainerUtilities::GetWindowsContainerJobName(
    std::wstring const &
);
GetWindowsContainerJobName simply concatenates the string "\Container_" with the name of the container passed by Docker.
For instance, in our previous example, Docker gave our future container the name:
"30a261e2546330f6572686b3a1197367671197fb6369b68c97344c07c6d22a2a"
It will result into:
"\Container_30a261e2546330f6572686b3a1197367671197fb6369b68c97344c07c6d22a2a"
The code snippet below shows the creation of the Job Object with all its parameters.
#define JOB_OBJECT_NAME L"\\Container_30A261E2546330F6572686B3A1197367671197FB6369B68C97344C07C6D22A2A"

UNICODE_STRING jobName = { 0 };
RtlInitUnicodeString(&jobName, JOB_OBJECT_NAME);

OBJECT_ATTRIBUTES jobAttributes = { 0 };
jobAttributes.Length = 0x30;
jobAttributes.RootDirectory = 0;
jobAttributes.ObjectName = &jobName;
jobAttributes.Attributes = OBJ_PERMANENT;
jobAttributes.SecurityDescriptor = 0;
jobAttributes.SecurityQualityOfService = 0;

ACCESS_MASK accessMask = 0x1f003f;

HANDLE hJob;
NTSTATUS status = NtCreateJobObject(&hJob, accessMask, &jobAttributes);
So, after getting a valid Job Object HANDLE, it becomes possible to interact with it thanks to the NtSetInformationJobObject function and this is how vmcompute.exe is able to convert the Job Object in a Silo.
The first thing it does is setting the value of the ContainerTelemetryId field inside the Job Object (in the Kernel).
The ContainerTelemetryId is calculated by calling ComputeService::Management::ConvertIdToGuid.
ComputeService::Management::ConvertIdToGuid(
    ushort const *,
    _GUID const &
);
This function takes 2 parameters:
- The system seed ID, which is a constant ;
- The name (in uppercase) of the container.
UINT64 ComputeSystemSeedId[] = {
    0x41e4facbcab70344,
    0x6e3e289265abe5b5
};
ComputeService::Management::ConvertIdToGuid can be split in 3 steps.
First, it transforms the ComputeSystemSeedId through a series of 16 and 32 bit swaps, as illustrated with the following code:
UINT32 swap_uint32(UINT32 val)
{
    val = ((val << 8) & 0xFF00FF00) | ((val >> 8) & 0xFF00FF);
    return (val << 16) | (val >> 16);
}

UINT16 swap_uint16(UINT16 val)
{
    return (val << 8) | (val >> 8);
}

UINT32* tmp32 = (UINT32*)&(ComputeSystemSeedId[0]);
UINT16* tmp16 = (UINT16*)&(ComputeSystemSeedId[0]);
*tmp32 = swap_uint32(*tmp32); // bswap
*(tmp16 + 2) = swap_uint16(*(tmp16 + 2)); // ror 8
*(tmp16 + 3) = swap_uint16(*(tmp16 + 3)); // ror 8
Then, it computes the SHA-1 hash of both the transformed ComputeSystemSeedId and the name of the container.
BCRYPT_ALG_HANDLE hAlgo;
BCRYPT_HASH_HANDLE hHash;

(void)BCryptOpenAlgorithmProvider(&hAlgo, L"SHA1", L"Microsoft Primitive Provider", 0);
(void)BCryptCreateHash(hAlgo, &hHash, NULL, NULL, 0, 0, 0);
(void)BCryptHashData(hHash, (PUCHAR)ComputeSystemSeedId, sizeof(ComputeSystemSeedId), 0);
(void)BCryptHashData(hHash, (PUCHAR)containerId, wcslen(containerId) * 2, 0);

UCHAR hashed[0x14] = { 0 };
(void)BCryptFinishHash(hHash, hashed, 0x14, 0);
BCryptDestroyHash(hHash);
BCryptCloseAlgorithmProvider(hAlgo, 0);
Finally, some additional transformations are applied to the hashed value.
tmp32 = (UINT32*)hashed;
*tmp32 = swap_uint32(*tmp32);
tmp16 = (UINT16*)hashed;
*(tmp16 + 2) = swap_uint16(*(tmp16 + 2));
*(tmp16 + 3) = (swap_uint16(*(tmp16 + 3)) & 0x0FFF) | 0x5000;
hashed[8] = (hashed[8] & 0x3F) | 0x80;
This sums up how the ContainerTelemetryId is calculated.
To set this value inside the Job Object, the Host Compute Service is using an undocumented JOBOBJECTINFOCLASS with the value 0x2C.
UINT64 ObjectInformation1[2] = { 0 };
for (size_t i = 0; i < wcslen(ContainerId); ++i) {
    ContainerId[i] = towupper(ContainerId[i]);
}
ConvertIdToGuid(ContainerId, ObjectInformation1);
NtSetInformationJobObject(
    hJob,
    (JOBOBJECTINFOCLASS)0x2C,
    ObjectInformation1,
    sizeof(ObjectInformation1)
);
Before converting the Job Object into a Silo, vmcompute.exe will call the ResolveRuntimeAliases function.
ComputeService::ContainerDefinition::ResolveRuntimeAliases(Schema::Containers::Definition::Container &,void *,std::wstring const &)
This function is used to personalize the template according to the future Silo. Indeed, inside the template file (C:\Windows\System32\containers\wsc.def), it's possible to find this string: "$SiloHivesRoot$\Silo_$SiloName$_". This is a placeholder that the ResolveRuntimeAliases function is in charge to replace with the actual value. For example the string:
"$SiloHivesRoot$\Silo_$SiloName$_Machine"
Will become:
"\Registry\WC\Silo8cc2d900-274d-11ee-9647-d2e71108c566Machine"
In this way, the various registry paths will be adapted according to the container.
Then the execution continues by calling ComputeService::JobUtilities::ConvertJobObjectToContainer.
ConvertJobObjectToContainer
ComputeService::JobUtilities::ConvertJobObjectToContainer(
    void *,
    Schema::Containers::Definition::Container const &,
    bool
);
The ConvertJobObjectToContainer function will first convert the container schema object into XML format and then convert the XML into a container description object by calling the functions Marshal::ToXmlString and __imp_WcCreateDescriptionFromXml.
<container>
    <namespace>
        <job>
            <systemroot path="C:\Windows" />
        </job>
        <mountmgr>
            <mount_point name="C" path="\Device\VhdHardDisk{d40a8aa1-df66-4002-9a1f-cbdfb037b4b7}" />
        </mountmgr>
        <namedpipe />
        <ob>
            <symlink name="FileSystem" path="\FileSystem" scope="Global" />
            <symlink name="PdcPort" path="\PdcPort" scope="Global" />
            <!-- .. .-->
</container>
To see the full XML description: Annex - XML Description.
Finally, once the description of the container is ready, ConvertJobObjectToContainer calls WcCreateContainer which can be found in the container.dll library.
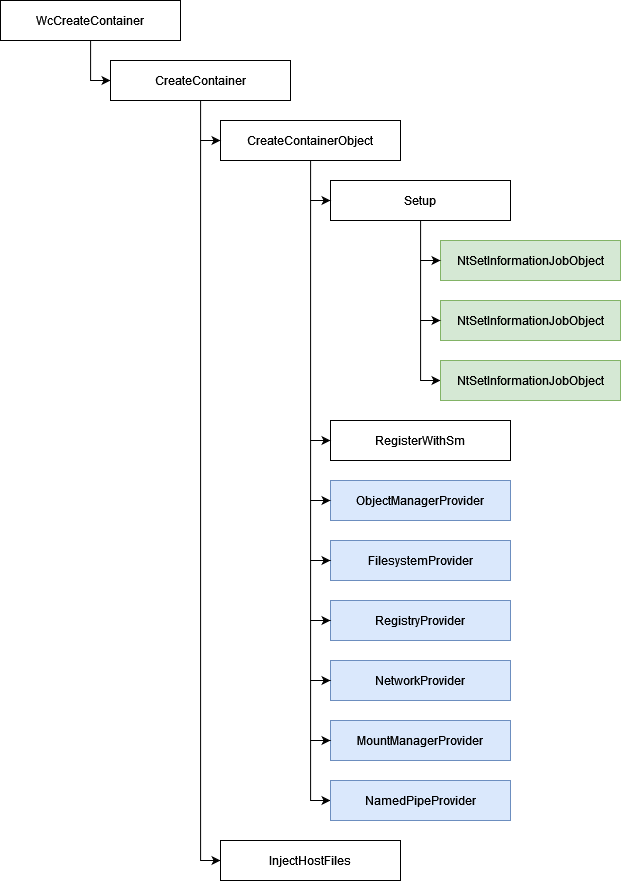
This function is quite straightforward and simply transfers the execution to container::CreateContainer.
CreateContainer
container::CreateContainer basically performs 2 things:
- Creates the container with
container_runtime::CreateContainerObject; - Calls
container::DownlevelProvider::InjectHostFiles.
We'll look at the container creation just right after, but let start with the second function for now.
Once the container has been created, InjectHostFiles simply gets the list of files to inject inside the Silo from the container schema. For examples:
ntdll.dllwow64.dllverifier.dll
CreateContainerObject
The CreateContainerObject function is the Holy Grail of container creation.
Firstly, this function calls the container::JobProvider::Setup function, which is responsible for completely transforming the Job Object into a Silo.
To be able to transform our Job Object into a Silo, vmcompute.exe uses the NtSetInformationJobObject API function 3 times.
First, it defines limits about the Job Object with the JobObjectExtendedLimitInformation JOBOBJECTINFOCLASS.
Limits for Job Objects are used to set certain behaviors. For instance, it's possible to set the processor affinity mask, limit the amount of memory used, etc.
UINT64 ObjectInformation2[] = {
    0, 0, 0x00400000, 0, 0, 0, 0, 0, 0,
    0, 0, 0, 0, 0, 0, 0, 0, 0, 0
};

NtSetInformationJobObject(
    hJob,
    JobObjectExtendedLimitInformation,
    ObjectInformation2,
    sizeof(ObjectInformation2)
);
In the code snippet above, the LimitFlags field is set with the value 0x00400000 which is undocumented, but according to the systeminformer tool this limit is about setting the Silo ready: #define JOB_OBJECT_LIMIT_SILO_READY 0x00400000.
Then, the second call actually converts the Job Object into Silo!
This call uses the undocumented JOBOBJECTINFOCLASS 0x23.
NtSetInformationJobObject(
    hJob,
    (JOBOBJECTINFOCLASS)0x23,
    NULL,
    0
);
Finally, it assigns the system root path to the Silo by also using yet another undocumented JOBOBJECTINFOCLASS whose value is 0x2d.
PUNICODE_STRING ObjectInformation4 = { 0 };
ObjectInformation4 = (PUNICODE_STRING)malloc(sizeof(UNICODE_STRING));
RtlCreateUnicodeString(ObjectInformation4, L"C:\\Windows");

NtSetInformationJobObject(
    hJob,
    (JOBOBJECTINFOCLASS)0x2d,
    ObjectInformation4,
    0x10
);
The next step is to prepare the processes that are needed to run the Silo. Indeed, Windows needs several processes to work properly. To do so, vmcompute.exe tries to register the Silo with Session Manager Subsystem (SMSS) by calling container_runtime::RegisterWithSm. This function simply connects to SMSS and sends it a message using ALPC (Advanced Local Procedure Calls) which is an inter-process communication facility.
NTSYSAPI
NTSTATUS
NTAPI
RtlConnectToSm(
    _In_ PUNICODE_STRING ApiPortName,
    _In_ HANDLE ApiPortHandle,
    _In_ DWORD ProcessImageType,
    _Out_ PHANDLE SmssConnection
);
NTSYSAPI
NTSTATUS
NTAPI
RtlSendMsgToSm(
    _In_ HANDLE ApiPortHandle,
    _In_ PPORT_MESSAGE MessageData
);
When creating a container with Docker, here are the processes that are automatically added:
smss.execonhost.exewininit.exelsass.exe
At the moment, this is not the solution used in the annex. There are 2 other solutions. One is to use DAM and the other is to directly assign a process into the Silo. Currently, our code implements the last one.
NtAssignProcessToJobObject(hJob, (HANDLE)0x0FFFFFFFFFFFFFFF9);
Finally, the Silo is fully created and can now be personalized with the functions below:
container::ObjectManagerProvider::Setupcontainer::FilesystemProvider::Setupcontainer::RegistryProvider::Setupcontainer::NetworkProvider::SetupCompartmentcontainer::MountManagerProvider::Setupcontainer::NamedPipeProvider::Setup
We won't enter into the details of each function for now, however let's just add a small word about container::ObjectManagerProvider::Setup. ObjectManagerProvider registers the freshly created Silo in the Object Manager. To do so, it also uses an undocumented JOBOBJECTINFOCLASS: 0x25.
UINT64 ObjectInformation5[2] = { 2, 0 };

NtSetInformationJobObject(
    hJob,
    (JOBOBJECTINFOCLASS)0x25,
    ObjectInformation5,
    sizeof(ObjectInformation5)
);
Silo
Here it is. The Silo is created and visible with Winobj.exe. This tool is present in Sysinternals and can be used to display various Windows Objects present in the system.

Finally, when the execution flow returns to the Orchestrator, after creating and setting up the Silo, it does a last modification of the Job Object with the NtSetInformationJobObject function. Once again it is using an undocumented JOBOBJECTINFOCLASS: 0x2a.
UINT64 ObjectInformation6[9] = { 1, 0, 0, 0, 0, 0, 0, 0, 0 };

NtSetInformationJobObject(
    hJob,
    (JOBOBJECTINFOCLASS)0x2a,
    ObjectInformation6,
    sizeof(ObjectInformation6)
);
This last call is done inside the SetVolumeResourceControls function and reaches the PspSetJobIoAttribution kernel function.
Conclusion
In this first introductory article to the creation of Windows Containers, we covered the various steps involved in creating a Job Object and converting it into a Silo. During this analysis, we've mentioned the various functions used to configure the Silo.
Of course, there are still many parts to analyze:
container::ObjectManagerProvider::Setupcontainer::FilesystemProvider::Setupcontainer::RegistryProvider::Setupcontainer::NetworkProvider::SetupCompartmentcontainer::MountManagerProvider::Setupcontainer::NamedPipeProvider::Setup
In the next article, we'll look at how to convert a Silo into a Server Silo in order to create a complete Windows Container. In addition, we'll try to dig a little deeper into the undocumented JOBOBJECTINFOCLASS used.
I'd like to thank a lot Gwaby for her time and advice.
Annexes
XML Description
Example of XML Windows Container Description
<container>
    <namespace>
        <job>
            <systemroot path="C:\Windows" />
        </job>
        <mountmgr>
            <mount_point name="C" path="\Device\VhdHardDisk{d40a8aa1-df66-4002-9a1f-cbdfb037b4b7}" />
        </mountmgr>
        <namedpipe />
        <ob>
            <symlink name="FileSystem" path="\FileSystem" scope="Global" />
            <symlink name="PdcPort" path="\PdcPort" scope="Global" />
            <symlink name="SeRmCommandPort" path="\SeRmCommandPort" scope="Global" />
            <symlink name="Win32kCrossSessionGlobals" path="\Win32kCrossSessionGlobals" scope="Global" />
            <symlink name="Registry" path="\Registry" scope="Global" />
            <symlink name="Driver" path="\Driver" scope="Global" />
            <symlink name="DriverData" path="\SystemRoot\System32\Drivers\DriverData" scope="Local" />
            <symlink name="DriverStores" path="\DriverStore\Nodes" scope="Global" />
            <objdir name="BaseNamedObjects" clonesd="\BaseNamedObjects" />
            <objdir name="GLOBAL??" clonesd="\GLOBAL??">
                <symlink name="WMIDataDevice" path="\Device\WMIDataDevice" scope="Local" />
                <symlink name="UNC" path="\Device\Mup" scope="Local" />
                <symlink name="Tcp" path="\Device\Tcp" scope="Local" />
                <symlink name="MountPointManager" path="\Device\MountPointManager" scope="Local" />
                <symlink name="Nsi" path="\Device\Nsi" scope="Local" />
                <symlink name="fsWrap" path="\Device\FsWrap" scope="Local" />
                <symlink name="NDIS" path="\Device\Ndis" scope="Local" />
                <symlink name="TermInptCDO" path="\Device\TermInptCDO" scope="Local" />
            </objdir>
            <objdir name="Device" clonesd="\Device">
                <symlink name="Afd" path="\Device\Afd" scope="Global" />
                <symlink name="ahcache" path="\Device\ahcache" scope="Global" />
                <symlink name="CNG" path="\Device\CNG" scope="Global" />
                <symlink name="ConDrv" path="\Device\ConDrv" scope="Global" />
                <symlink name="DeviceApi" path="\Device\DeviceApi" scope="Global" />
                <symlink name="DfsClient" path="\Device\DfsClient" scope="Global" />
                <symlink name="DxgKrnl" path="\Device\DxgKrnl" scope="Global" />
                <symlink name="FsWrap" path="\Device\FsWrap" scope="Global" />
                <symlink name="Ip" path="\Device\Ip" scope="Global" />
                <symlink name="Ip6" path="\Device\Ip6" scope="Global" />
                <symlink name="KsecDD" path="\Device\KsecDD" scope="Global" />
                <symlink name="LanmanDatagramReceiver" path="\Device\LanmanDatagramReceiver" scope="Global" />
                <symlink name="LanmanRedirector" path="\Device\LanmanRedirector" scope="Global" />
                <symlink name="MailslotRedirector" path="\Device\MailslotRedirector" scope="Global" />
                <symlink name="Mup" path="\Device\Mup" scope="Global" />
                <symlink name="Ndis" path="\Device\Ndis" scope="Global" />
                <symlink name="Nsi" path="\Device\Nsi" scope="Global" />
                <symlink name="Null" path="\Device\Null" scope="Global" />
                <symlink name="PcwDrv" path="\Device\PcwDrv" scope="Global" />
                <symlink name="RawIp" path="\Device\RawIp" scope="Global" />
                <symlink name="RawIp6" path="\Device\RawIp6" scope="Global" />
                <symlink name="Tcp" path="\Device\Tcp" scope="Global" />
                <symlink name="Tcp6" path="\Device\Tcp6" scope="Global" />
                <symlink name="Tdx" path="\Device\Tdx" scope="Global" />
                <symlink name="Udp" path="\Device\Udp" scope="Global" />
                <symlink name="Udp6" path="\Device\Udp6" scope="Global" />
                <symlink name="VolumesSafeForWriteAccess" path="\Device\VolumesSafeForWriteAccess" scope="Global" />
                <symlink name="VRegDriver" path="\Device\VRegDriver" scope="Global" />
                <symlink name="WMIDataDevice" path="\Device\WMIDataDevice" scope="Global" />
                <symlink name="TermInptCDO" path="\Device\TermInptCDO" scope="Global" />
                <symlink name="RdpVideoMiniport0" path="\Device\RdpVideoMiniport0" scope="Global" />
                <symlink name="VhdHardDisk{d40a8aa1-df66-4002-9a1f-cbdfb037b4b7}" path="\Device\VhdHardDisk{d40a8aa1-df66-4002-9a1f-cbdfb037b4b7}" scope="Global" />
            </objdir>
            <objdir name="UMDFCommunicationPorts" clonesd="\UMDFCommunicationPorts" />
            <objdir name="ContainerMappedDirectories" />
        </ob>
        <registry>
            <symlink key="\Registry\WC\Silo8cc2d900-274d-11ee-9647-d2e71108c566Security\SAM" target="\Registry\Machine\SAM\SAM" />
            <symlink key="\Registry\WC\Silo8cc2d900-274d-11ee-9647-d2e71108c566User\S-1-5-18" target="\Registry\User\.Default" />
            <symlink key="\Registry\WC\Silo8cc2d900-274d-11ee-9647-d2e71108c566System\CurrentControlSet" target="\Registry\Machine\SYSTEM\ControlSet001" />
            <symlink key="\Registry\WC\Silo8cc2d900-274d-11ee-9647-d2e71108c566System\ControlSet001\Hardware Profiles\Current" target="\Registry\Machine\System\ControlSet001\Hardware Profiles\0001" />
            <redirectionnode containerpath="\Registry" hostpath="\Registry" access_mask="4294967295" />
            <redirectionnode containerpath="\Registry\MACHINE" hostpath="\Registry\WC\Silo8cc2d900-274d-11ee-9647-d2e71108c566Machine" access_mask="4294967295" />
            <redirectionnode containerpath="\Registry\MACHINE\Hardware" hostpath="\Registry\MACHINE\Hardware" access_mask="2197946393" trustedhive="true" />
            <redirectionnode containerpath="\Registry\MACHINE\HARDWARE\DEVICEMAP" hostpath="\Registry\WC\Silo8cc2d900-274d-11ee-9647-d2e71108c566Machine\HARDWARE\DEVICEMAP" access_mask="4294967295" />
            <redirectionnode containerpath="\Registry\MACHINE\SOFTWARE" hostpath="\Registry\WC\Silo8cc2d900-274d-11ee-9647-d2e71108c566Software" access_mask="4294967295" trustedhive="true" />
            <redirectionnode containerpath="\Registry\MACHINE\SYSTEM" hostpath="\Registry\WC\Silo8cc2d900-274d-11ee-9647-d2e71108c566System" access_mask="4294967295" trustedhive="true" />
            <redirectionnode containerpath="\Registry\MACHINE\SYSTEM\ControlSet001\Control\Nsi" hostpath="\Registry\MACHINE\SYSTEM\ControlSet001\Control\Nsi" access_mask="2197946393" />
            <redirectionnode containerpath="\Registry\MACHINE\SYSTEM\ControlSet001\Control\SystemInformation" hostpath="\Registry\MACHINE\SYSTEM\ControlSet001\Control\SystemInformation" access_mask="2197946393" />
            <redirectionnode containerpath="\Registry\MACHINE\SAM" hostpath="\Registry\WC\Silo8cc2d900-274d-11ee-9647-d2e71108c566Sam" access_mask="4294967295" trustedhive="true" />
            <redirectionnode containerpath="\Registry\MACHINE\Security" hostpath="\Registry\WC\Silo8cc2d900-274d-11ee-9647-d2e71108c566Security" access_mask="4294967295" trustedhive="true" />
            <redirectionnode containerpath="\Registry\USER" hostpath="\Registry\WC\Silo8cc2d900-274d-11ee-9647-d2e71108c566User" access_mask="4294967295" />
            <redirectionnode containerpath="\Registry\USER\.DEFAULT" hostpath="\Registry\WC\Silo8cc2d900-274d-11ee-9647-d2e71108c566DefaultUser" access_mask="4294967295" />
            <hivestack hive="machine">
                <layer filepath="\??\C:\Windows\system32\containers\machine_user" identifier="8cc2d900-274d-11ee-9647-d2e71108c566" readonly="true" trustedhive="true">
                    <fileaccesstoken>0</fileaccesstoken>
                </layer>
            </hivestack>
            <hivestack hive="security">
                <layer filepath="\??\C:\ProgramData\Docker\windowsfilter\d69a5485fa6c6f3b10905855bad15a0ff9787a3c25d08d675064442db268154e\Hives\security_Base" identifier="6ac038c1-a261-55ce-9fd9-95c017f02e6a" readonly="true" immutable="true" trustedhive="true">
                    <fileaccesstoken>0</fileaccesstoken>
                </layer>
                <layer filepath="\??\Volume{d40a8aa1-df66-4002-9a1f-cbdfb037b4b7}\WcSandboxState\Hives\security_Delta" identifier="8cc2d900-274d-11ee-9647-d2e71108c566" inherittrustclass="true">
                    <fileaccesstoken>0</fileaccesstoken>
                </layer>
                <delkey name="CCGPolicy" />
            </hivestack>
            <hivestack hive="system">
                <layer filepath="\??\C:\ProgramData\Docker\windowsfilter\d69a5485fa6c6f3b10905855bad15a0ff9787a3c25d08d675064442db268154e\Hives\system_Base" identifier="6ac038c1-a261-55ce-9fd9-95c017f02e6a" readonly="true" immutable="true" trustedhive="true">
                    <fileaccesstoken>0</fileaccesstoken>
                </layer>
                <layer filepath="\??\Volume{d40a8aa1-df66-4002-9a1f-cbdfb037b4b7}\WcSandboxState\Hives\system_Delta" identifier="8cc2d900-274d-11ee-9647-d2e71108c566" inherittrustclass="true">
                    <fileaccesstoken>0</fileaccesstoken>
                </layer>
                <mkkey name="">
                    <mkkey name="ControlSet001">
                        <mkkey name="Control">
                            <mkkey name="ComputerName">
                                <mkkey name="ComputerName">
                                    <mkvalue name="ComputerName" data_string="BA657E2B9E11" />
                                </mkkey>
                            </mkkey>
                        </mkkey>
                    </mkkey>
                </mkkey>
                <mkkey name="">
                    <mkkey name="ControlSet001">
                        <mkkey name="Services">
                            <mkkey name="Tcpip">
                                <mkkey name="Parameters">
                                    <mkvalue name="NV HostName" data_string="ba657e2b9e11" />
                                </mkkey>
                            </mkkey>
                        </mkkey>
                    </mkkey>
                </mkkey>
                <mkkey name="">
                    <mkkey name="ControlSet001">
                        <mkkey name="Services">
                            <mkkey name="Tcpip">
                                <mkkey name="Parameters">
                                    <mkvalue name="AllowUnqualifiedQuery" data_dword="1" />
                                </mkkey>
                            </mkkey>
                        </mkkey>
                    </mkkey>
                </mkkey>
                <mkkey name="">
                    <mkkey name="ControlSet001">
                        <mkkey name="Services">
                            <mkkey name="Dnscache">
                                <mkkey name="Parameters">
                                    <mkvalue name="ServerPriorityTimeLimit" data_dword="0" />
                                </mkkey>
                            </mkkey>
                        </mkkey>
                    </mkkey>
                </mkkey>
                <mkkey name="">
                    <mkkey name="ControlSet001">
                        <mkkey name="Control">
                            <mkvalue name="ContainerType" data_dword="1" />
                        </mkkey>
                    </mkkey>
                </mkkey>
                <mkkey name="">
                    <mkkey name="ControlSet001">
                        <mkkey name="Control">
                            <mkvalue name="ContainerId" data_string="0F2C1D6D-4449-5E97-825E-109616BCBCBD" />
                        </mkkey>
                    </mkkey>
                </mkkey>
                <delkey name="ControlSet001\Services\CCG" />
            </hivestack>
            <hivestack hive="software">
                <layer filepath="\??\C:\ProgramData\Docker\windowsfilter\d69a5485fa6c6f3b10905855bad15a0ff9787a3c25d08d675064442db268154e\Hives\software_Base" identifier="6ac038c1-a261-55ce-9fd9-95c017f02e6a" readonly="true" immutable="true" trustedhive="true">
                    <fileaccesstoken>0</fileaccesstoken>
                </layer>
                <layer filepath="\??\Volume{d40a8aa1-df66-4002-9a1f-cbdfb037b4b7}\WcSandboxState\Hives\software_Delta" identifier="8cc2d900-274d-11ee-9647-d2e71108c566" inherittrustclass="true">
                    <fileaccesstoken>0</fileaccesstoken>
                </layer>
                <mkkey name="">
                    <mkkey name="Microsoft">
                        <mkkey name="SQMClient">
                            <mkvalue name="MachineId" data_string="{0F2C1D6D-4449-5E97-825E-109616BCBCBD}" />
                        </mkkey>
                    </mkkey>
                </mkkey>
                <mkkey name="">
                    <mkkey name="Microsoft">
                        <mkkey name="Windows NT">
                            <mkkey name="CurrentVersion">
                                <mkkey name="Virtualization">
                                    <mkkey name="HvSocket">
                                        <mkkey name="Addresses">
                                            <mkvalue name="LocalAddress" data_string="{0F2C1D6D-4449-5E97-825E-109616BCBCBD}" />
                                        </mkkey>
                                    </mkkey>
                                </mkkey>
                            </mkkey>
                        </mkkey>
                    </mkkey>
                </mkkey>
                <mkkey name="">
                    <mkkey name="Microsoft">
                        <mkkey name="Windows NT">
                            <mkkey name="CurrentVersion">
                                <mkkey name="Virtualization">
                                    <mkkey name="HvSocket">
                                        <mkkey name="Addresses">
                                            <mkvalue name="ParentAddress" data_string="{894cc2d6-9d79-424f-93fe-42969ae6d8d1}" />
                                        </mkkey>
                                    </mkkey>
                                </mkkey>
                            </mkkey>
                        </mkkey>
                    </mkkey>
                </mkkey>
                <mkkey name="">
                    <mkkey name="Microsoft">
                        <mkkey name="Windows NT">
                            <mkkey name="CurrentVersion">
                                <mkkey name="Virtualization">
                                    <mkkey name="HvSocket">
                                        <mkkey name="Addresses">
                                            <mkvalue name="SiloHostAddress" data_string="{894cc2d6-9d79-424f-93fe-42969ae6d8d1}" />
                                        </mkkey>
                                    </mkkey>
                                </mkkey>
                            </mkkey>
                        </mkkey>
                    </mkkey>
                </mkkey>
            </hivestack>
            <hivestack hive="sam">
                <layer filepath="\??\C:\ProgramData\Docker\windowsfilter\d69a5485fa6c6f3b10905855bad15a0ff9787a3c25d08d675064442db268154e\Hives\sam_Base" identifier="6ac038c1-a261-55ce-9fd9-95c017f02e6a" readonly="true" immutable="true" trustedhive="true">
                    <fileaccesstoken>0</fileaccesstoken>
                </layer>
                <layer filepath="\??\Volume{d40a8aa1-df66-4002-9a1f-cbdfb037b4b7}\WcSandboxState\Hives\sam_Delta" identifier="8cc2d900-274d-11ee-9647-d2e71108c566" inherittrustclass="true">
                    <fileaccesstoken>0</fileaccesstoken>
                </layer>
            </hivestack>
            <hivestack hive="user">
                <layer filepath="\??\C:\Windows\system32\containers\machine_user" identifier="8cc2d900-274d-11ee-9647-d2e71108c566" readonly="true" trustedhive="true">
                    <fileaccesstoken>0</fileaccesstoken>
                </layer>
            </hivestack>
            <hivestack hive="defaultuser">
                <layer filepath="\??\C:\ProgramData\Docker\windowsfilter\d69a5485fa6c6f3b10905855bad15a0ff9787a3c25d08d675064442db268154e\Hives\defaultuser_Base" identifier="6ac038c1-a261-55ce-9fd9-95c017f02e6a" readonly="true" immutable="true">
                    <fileaccesstoken>0</fileaccesstoken>
                </layer>
                <layer filepath="\??\Volume{d40a8aa1-df66-4002-9a1f-cbdfb037b4b7}\WcSandboxState\Hives\defaultuser_Delta" identifier="8cc2d900-274d-11ee-9647-d2e71108c566" inherittrustclass="true">
                    <fileaccesstoken>0</fileaccesstoken>
                </layer>
            </hivestack>
        </registry>
        <network compartment="\Container_ba657e2b9e110cbbff75d0bc9ac2b2e90e4f4517583fa9141d5b7658b208119f" />
        <hostfiles base_image_path="C:\ProgramData\Docker\windowsfilter\b7267716533544c86c859ca4105d0e29bc7e6a495e131f89d9aa5a0303585b78" sandbox_path="\\?\Volume{d40a8aa1-df66-4002-9a1f-cbdfb037b4b7}">
            <file>System32\ntdll.dll</file>
            <file>System32\verifier.dll</file>
            <file>System32\wow64.dll</file>
            <file>System32\wow64cpu.dll</file>
            <file>System32\wow64win.dll</file>
            <file>System32\win32u.dll</file>
            <file>SysWOW64\ntdll.dll</file>
            <file>SysWOW64\verifier.dll</file>
            <file>SysWOW64\win32u.dll</file>
        </hostfiles>
    </namespace>
</container>
A Minimal Silo Code
The code below shows how to create a Silo using only Windows APIs.
To run it, it is necessary to own the SeTcbPrivilege privilege. This privilege allows to "Act as part of the operating system", and it is used for security purposes. Setting up a Silo requires this privilege.
#include <Windows.h>
#include <winternl.h>
#include <bcrypt.h>
#pragma comment(lib, "bcrypt.lib")

#include <iostream>

typedef NTSTATUS(WINAPI* NT_CREATE_JOB_OBJECT)(PHANDLE, ACCESS_MASK, POBJECT_ATTRIBUTES);
typedef NTSTATUS(WINAPI* NT_SET_INFORMATION_JOB_OBJECT)(
    HANDLE JobHandle,
    JOBOBJECTINFOCLASS JobInformationClass,
    PVOID JobInformation,
    ULONG JobInformationLength
    );

typedef VOID(WINAPI* RTL_INIT_UNICODE_STRING)(PUNICODE_STRING, PCWSTR);
typedef BOOLEAN(WINAPI* RTL_CREATE_UNICODE_STRING)(
    PUNICODE_STRING DestinationString,
    PCWSTR          SourceString
    );

typedef NTSTATUS(WINAPI* NT_ASSIGN_PROCESS_TO_JOB_OBJECT)(HANDLE JobHandle, HANDLE ProcessHandle);

NT_CREATE_JOB_OBJECT pNtCreateJobObject;
NT_SET_INFORMATION_JOB_OBJECT pNtSetInformationJobObject;
RTL_INIT_UNICODE_STRING pRtlInitUnicodeString;
RTL_CREATE_UNICODE_STRING pRtlCreateUnicodeString;
NT_ASSIGN_PROCESS_TO_JOB_OBJECT pNtAssignProcessToJobObject;

void FindNtdllFunctions()
{
    BOOL error = FALSE;
    HMODULE hNtDll = LoadLibraryA("ntdll.dll");

    if (hNtDll == NULL) {
        std::cerr << "Error ntdll.dll" << std::endl;
        exit(-1);
    }

    pNtCreateJobObject = (NT_CREATE_JOB_OBJECT)GetProcAddress(hNtDll, "NtCreateJobObject");
    if (pNtCreateJobObject == NULL) {
        std::cerr << "Error NtCreateJobObject" << std::endl;
        error = TRUE;
    }

    pNtSetInformationJobObject = (NT_SET_INFORMATION_JOB_OBJECT)GetProcAddress(hNtDll, "NtSetInformationJobObject");
    if (pNtSetInformationJobObject == NULL) {
        std::cerr << "Error NtSetInformationJobObject" << std::endl;
        error = TRUE;
    }

    pRtlInitUnicodeString = (RTL_INIT_UNICODE_STRING)GetProcAddress(hNtDll, "RtlInitUnicodeString");
    if (pRtlInitUnicodeString == NULL) {
        std::cerr << "Error RtlInitUnicodeString" << std::endl;
        error = TRUE;
    }

    pRtlCreateUnicodeString = (RTL_CREATE_UNICODE_STRING)GetProcAddress(hNtDll, "RtlCreateUnicodeString");
    if (pRtlCreateUnicodeString == NULL) {
        std::cerr << "Error RtlCreateUnicodeString" << std::endl;
        error = TRUE;
    }

    pNtAssignProcessToJobObject = (NT_ASSIGN_PROCESS_TO_JOB_OBJECT)GetProcAddress(hNtDll, "NtAssignProcessToJobObject");
    if (pNtAssignProcessToJobObject == NULL) {
        std::cerr << "Error pNtAssignProcessToJobObject" << std::endl;
        error = TRUE;
    }

    CloseHandle(hNtDll);

    if (error) {
        exit(-1);
    }
}

UINT32 swap_uint32(UINT32 val)
{
    val = ((val << 8) & 0xFF00FF00) | ((val >> 8) & 0xFF00FF);
    return (val << 16) | (val >> 16);
}

UINT16 swap_uint16(UINT16 val)
{
    return (val << 8) | (val >> 8);
}

void ConvertIdToGuid(WCHAR* containerId, UINT64 SiloId[2])
{
    UINT64 ComputeSystemSeedId[] = {
        0x41e4facbcab70344,
        0x6e3e289265abe5b5
    };

    UINT32* tmp32 = (UINT32*)&(ComputeSystemSeedId[0]);
    UINT16* tmp16 = (UINT16*)&(ComputeSystemSeedId[0]);
    *tmp32 = swap_uint32(*tmp32); // bswap
    *(tmp16 + 2) = swap_uint16(*(tmp16 + 2)); // ror 8
    *(tmp16 + 3) = swap_uint16(*(tmp16 + 3)); // ror 8

    BCRYPT_ALG_HANDLE hAlgo;
    BCRYPT_HASH_HANDLE hHash;

    (void)BCryptOpenAlgorithmProvider(&hAlgo, L"SHA1", L"Microsoft Primitive Provider", 0);
    (void)BCryptCreateHash(hAlgo, &hHash, NULL, NULL, 0, 0, 0);
    (void)BCryptHashData(hHash, (PUCHAR)ComputeSystemSeedId, sizeof(ComputeSystemSeedId), 0);
    (void)BCryptHashData(hHash, (PUCHAR)containerId, wcslen(containerId) * 2, 0);

    UCHAR hashed[0x14] = { 0 };
    (void)BCryptFinishHash(hHash, hashed, 0x14, 0);
    BCryptDestroyHash(hHash);
    BCryptCloseAlgorithmProvider(hAlgo, 0);

    tmp32 = (UINT32*)hashed;
    *tmp32 = swap_uint32(*tmp32);
    tmp16 = (UINT16*)hashed;
    *(tmp16 + 2) = swap_uint16(*(tmp16 + 2));
    *(tmp16 + 3) = (swap_uint16(*(tmp16 + 3)) & 0x0FFF) | 0x5000;
    hashed[8] = (hashed[8] & 0x3F) | 0x80;

    SiloId[0] = *(UINT64*)(&hashed);
    SiloId[1] = *(UINT64*)(&hashed[8]);
}

int main()
{
    NTSTATUS Status;
    WCHAR JobName[] = L"\\Container_30A261E2546330F6572686B3A1197367671197FB6369B68C97344C07C6D22A2A";
    WCHAR *ContainerId = &JobName[11];

    FindNtdllFunctions();

    UNICODE_STRING jobName = { 0 };
    pRtlInitUnicodeString(&jobName, JobName);

    OBJECT_ATTRIBUTES jobAttributes = { 0 };
    jobAttributes.Length = 0x30;
    jobAttributes.RootDirectory = 0;
    jobAttributes.ObjectName = &jobName;
    jobAttributes.Attributes = OBJ_PERMANENT;
    jobAttributes.SecurityDescriptor = 0;
    jobAttributes.SecurityQualityOfService = 0;
    ACCESS_MASK accessMask = 0x1f003f;

    HANDLE hJob;
    NTSTATUS status = pNtCreateJobObject(&hJob, accessMask, &jobAttributes);
    if (status != 0) {
        printf("Error 'NtCreateJobObject': %x\n", status);
        return 1;
    }

    UINT64 ObjectInformation1[2] = { 0 };
    for (size_t i = 0; i < wcslen(ContainerId); ++i) {
        ContainerId[i] = towupper(ContainerId[i]);
    }
    ConvertIdToGuid(ContainerId, ObjectInformation1);

    UINT64 ObjectInformation2[] = { 0, 0, 0x0400000, 0, 0, 0, 0, 0, 0, 0, 0, 0, 0, 0, 0, 0, 0, 0, 0 };

    PUNICODE_STRING ObjectInformation4 = { 0 };
    ObjectInformation4 = (PUNICODE_STRING)malloc(sizeof(UNICODE_STRING));
    pRtlCreateUnicodeString(ObjectInformation4, L"C:\\Windows");

    UINT64 ObjectInformation5[2] = { 2, 0 };

    Status = pNtSetInformationJobObject(hJob, (JOBOBJECTINFOCLASS)0x2C, ObjectInformation1, sizeof(ObjectInformation1));
    if (Status != 0) {
        printf("Error 'pNtSetInformationJobObject' 1: %x\n", Status);
        return 1;
    }

    Status = pNtSetInformationJobObject(hJob, (JOBOBJECTINFOCLASS)0x9, ObjectInformation2, sizeof(ObjectInformation2));
    if (Status != 0) {
        printf("Error 'pNtSetInformationJobObject' 2: %x\n", Status);
        return 1;
    }

    Status = pNtSetInformationJobObject(hJob, (JOBOBJECTINFOCLASS)0x23, NULL, 0);
    if (Status != 0) {
        printf("Error 'pNtSetInformationJobObject' 3: %x\n", Status);
        return 1;
    }

    Status = pNtSetInformationJobObject(hJob, (JOBOBJECTINFOCLASS)0x2d, ObjectInformation4, 0x10);
    if (Status != 0) {
        printf("Error 'pNtSetInformationJobObject' 4: %x\n", Status);
        return 1;
    }

    Status = pNtAssignProcessToJobObject(hJob, (HANDLE)0x0FFFFFFFFFFFFFFF9);
    if (Status != 0) {
        printf("Error 'AssignProcessToJobObject': %x\n", Status);
        return 1;
    }

    Status = pNtSetInformationJobObject(hJob, (JOBOBJECTINFOCLASS)0x25, ObjectInformation5, sizeof(ObjectInformation5));
    if (Status != 0) {
        printf("Error 'pNtSetInformationJobObject': 5 %x\n", Status);
        return 1;
    }

    std::cout << "Press enter to exit..." << std::endl;
    std::cin.ignore();

    CloseHandle(hJob);

    return EXIT_SUCCESS;
}