Author Eric Le Guevel
Category Android
Tags Android, reverse-engineering, 2021
A quick introduction to Android Emuroot, a Python script that allows to get root privileges on the fly on an Android Virtual Device (AVD). It explains the reverse engineering steps needed for the script to work with recent AVDs and provides a preview of specific Linux kernel structures in memory.
Introduction
In this article, we will introduce the Android Emuroot project, how it works, its capabilities, as well as the reverse engineering work we have made to enhance the original project.
Android Emuroot is a Python script that allows you to easily get the root privileges on Google Play Android systems running with the Google Android emulator (AVD) provided with the Android SDK. It was developed by Anaïs Gantet and Mouad Abouhali of Airbus Security Lab and presented during the SSTIC 2020.
Google Play labeled emulator images (AVD) offer access to both the Google API services and the Play Store application, making them as close as possible to a release environment that can be found in production on a physical device. By the way, some Android applications may be affected by the absence of these components.
The two main advantages of this script are:
It provides a convenient way to get root capabilities on systems that do not offer this feature (no su binary) and moreover are not compatible with the usual rooting procedures used on physical devices.
It is not/hardly detectable by the anti-root mechanisms commonly included in Android applications. This offers some interesting perspectives, especially for the transparent implementation of application analysis tools that require super-user privileges to run properly.
How Android Emuroot works?
Android Emuroot leverages an interesting feature offered by Google's Android emulator via a QEMU setting. Indeed, it is possible via a QEMU parameter (-qemu -s), to launch a GDB server that allows us to debug the kernel and to access the memory of the emulated system.
Using the GDB server parameter:
$ emulator @Pixel_2_API_28_x86_64 -qemu -s
Accessing the server with GDB:
gdb> set arch i386:x86-64:intel
The target architecture is assumed to be i386:x86-64:intel

gdb> target remote :1234
Remote debugging using :1234
The Airbus solution uses the pygdbmi Python module to instrument GDB so that it can execute GDB commands directly from their Python script and also read the results obtained.
In order to assign root capabilities to a particular process, Emuroot must first locate the process descriptor in memory, then modify some fields of the credentials structure of the process (whose pointer is available in the descriptor) and finally change the operating mode of SELinux to avoid an erratic operation of the system or even a crash of the process.
Here is an overview of the credentials structure (cred) from the Linux kernel sources:
struct cred {
    atomic_t        usage;
#ifdef CONFIG_DEBUG_CREDENTIALS
    atomic_t        subscribers;    /* number of processes subscribed */
    void            *put_addr;
    unsigned        magic;
#define CRED_MAGIC  0x43736564
#define CRED_MAGIC_DEAD     0x44656144
#endif
    kuid_t          uid;            /* real UID of the task */
    kgid_t          gid;            /* real GID of the task */
    kuid_t          suid;           /* saved UID of the task */
    kgid_t          sgid;           /* saved GID of the task */
    kuid_t          euid;           /* effective UID of the task */
    kgid_t          egid;           /* effective GID of the task */
    kuid_t          fsuid;          /* UID for VFS ops */
    kgid_t          fsgid;          /* GID for VFS ops */
    unsigned        securebits;     /* SUID-less security management */
    kernel_cap_t    cap_inheritable; /* caps our children can inherit */
    kernel_cap_t    cap_permitted;  /* caps we're permitted */
    kernel_cap_t    cap_effective;  /* caps we can actually use */
    kernel_cap_t    cap_bset;       /* capability bounding set */
    kernel_cap_t    cap_ambient;    /* Ambient capability set */
#ifdef CONFIG_KEYS
    unsigned char   jit_keyring;    /* default keyring to attach requested
                     * keys to */
    struct key      *session_keyring; /* keyring inherited over fork */
    struct key      *process_keyring; /* keyring private to this process */
    struct key      *thread_keyring; /* keyring private to this thread */
    struct key      *request_key_auth; /* assumed request_key authority */
#endif
#ifdef CONFIG_SECURITY
    void            *security;      /* subjective LSM security */
#endif
    struct user_struct *user;       /* real user ID subscription */
    struct user_namespace *user_ns; /* user_ns the caps and keyrings are relative to. */
    struct group_info *group_info;  /* supplementary groups for euid/fsgid */
    /* RCU deletion */
    union {
        int non_rcu;                        /* Can we skip RCU deletion? */
        struct rcu_head     rcu;            /* RCU deletion hook */
    };
} __randomize_layout;
Emuroot overwrites the *id_t and the kernel_cap_t fields to give a process the root permissions.
Currently two versions of the script are available on the project repository. The first version (master branch) uses the gdb command find to locate the target process descriptor in memory via the name of the process. The main drawback of this version is that it is relatively slow. The find command has to scan a large memory range, several occurrences of the process name are often present in the scanned memory range which then needs to determine which result actually corresponds to a field of the process descriptor using a heuristic method.
The second version of the script (devs branch) overcomes this problem of slowness. Indeed, the method used to locate the process descriptor in memory is no longer the same. In this development version Emuroot uses a kernel structure: the task list.
In Linux the task list is a double linked circular list which contains all the descriptors (task_struct) of the active processes on the system. For example, if we create a process named "QUARKSLAB", its descriptor will be added to the system task list as follows:
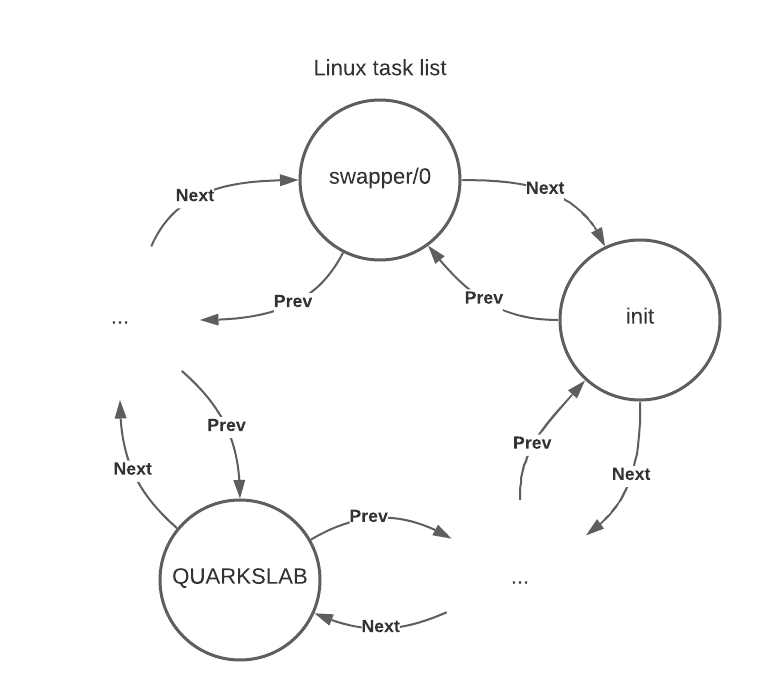
With swapper/0 being the beginning of the list followed by the init process descriptor.
Both versions of the Airbus script run on the following images (AVD):
| Release Name | API Level | ABI | Target |
|---|---|---|---|
| Nougat | 24 | x86 | Android 7.0 (Google Play) |
| Nougat | 25 | x86 | Android 7.1.1 (Google Play) |
| Oreo | 26 | x86 | Android 8.0 (Google Play) |
| Oreo | 27 | x86 | Android 8.1 (Google Play) |
Google does not offer a Play Store image for ARM architectures, so these are of little interest in the present context, but what about newer versions of Android and the x86_64 architecture?
The Emuroot project seems not to have received any contribution recently, so we decided to play around with it a bit in order to first determine if porting the script to more recent versions of Android is possible …
Improvements and changes
This section summarizes the results we have been able to achieve as well as the modifications we have made to the original solution.
You can find the code on the following repository: https://github.com/quarkslab/AERoot
First of all, we extended the script compatibility to more recent versions of Android. The solution now works with the following systems:
| Release Name | API Level | ABI | Target |
|---|---|---|---|
| Nougat | 24 | x86 | Android 7.0 (Google Play) |
| Nougat | 25 | x86 | Android 7.1.1 (Google Play) |
| Oreo | 26 | x86 | Android 8.0 (Google Play) |
| Oreo | 27 | x86 | Android 8.1 (Google Play) |
| Pie | 28 | x86 | Android 9.0 (Google Play) |
| Pie | 28 | x86_64 | Android 9.0 (Google Play) |
| Q | 29 | x86 | Android 10.0 (Google Play) |
| Q | 29 | x86_64 | Android 10.0 (Google Play) |
| R | 30 | x86 | Android 11.0 (Google Play) |
| R | 30 | x86_64 | Android 11.0 (Google Play) |
We also added the possibility to search a process by its PID. It is not uncommon to have several processes with the same name in memory, for example several shells (sh), so using the process ID rather than its name seems more relevant in this case. We use the PID field from the process descriptor structure (task_struct):
pid_t pid;
Finally we tried to optimize the execution speed of the script. To do so, we iterate on the task list from the begining to the end. Why? Because in most cases we want to assign root permissions to a process we just created (often a shell) and the more recent the process is, the closer it is to the end of the list.
Reverse engineering work to get root on Android 11.0
In this part, we will detail the method we used to port Emuroot to the Android 11.0 x86_64 image knowing that the procedure is very similar to the one used the previous versions.
The necessary elements to adapt Emuroot for a new image of the emulator are the following:
The address of a process descriptor in the system task list to be able to iterate over it ;
The address of the SELinux mode variable.
Find an entry point to the task list
The designers of Android Emuroot have chosen to locate the process descriptor "init" as a reference point to access the task list. "init" is an always-present process in the Linux system whose identifier is 1.
In recent versions of the Android system, the address of the init descriptor can change (after a cold reboot of the system for example). It is therefore preferable to use the descriptor of the first process created by the kernel as a reference point: swapper.
swapper (PID 0) is a special process crafted by the kernel. Historically, it was used for swap operations, now it mainly runs the idle loop when the CPU is idle. This is the very first process spawned on the system.
To retrieve the descriptor of the swapper process in memory we use the following method.
First we create a process with a particular name via Android Debug Bridge (ADB):
$ adb shell
$ cd /data/local/tmp
$ ln -s /system/bin/sh QUARKSLAB
$ ./QUARKSLAB
Here, we simply create a symbolic link named "QUARKSLAB" to the sh (shell) binary, then we execute the shell using this link. This creates a new sh process with the name "QUARKSLAB":
$ ps
USER            PID   PPID     VSZ    RSS WCHAN            ADDR S NAME
shell          2955    366   12916   3172 __ia32_co+          0 S sh
shell          4395   2955   12916   2880 __ia32_co+          0 S QUARKSLAB
shell          4463   4395   12584   3836 0                   0 R ps
The goal is to locate the descriptor of the QUARKSLAB process in memory. The process descriptors are represented by a structure named task_struct. These structures are very regularly accessed by the system and as such are present in a directly mapped physical memory area (0xffff8800000000 - 0xffffc7ffffffff). For this we use GDB:
gdb> find 0xffffa30440000000, +0x40000000, "QUARKSLAB"
0xffffa30441257310
0xffffa3045d9a5378
Two occurrences of the string "QUARKSLAB" were found. One of them is associated with the comm field of the task_struct structure associated with the process :
/*
 * executable name, excluding path.
 *
 * - normally initialized setup_new_exec()
 * - access it with [gs]et_task_comm()
 * - lock it with task_lock()
 */
char                                comm[TASK_COMM_LEN];
To identify which of the two previous results is the one we are looking for, we will use a Python interactive interpreter and the pygdbmi module. More precisely, a wrapper we developed in our script that provides various methods to read and write in the emulated system memory. This is not the only solution, but it has the advantage of being fast and simple to implement (find_tasks_field.py):
from aeroot import GdbHelper

comm = 0xffffa30441257310

gdb = GdbHelper("x86_64")
gdb.start()

for offset in range(0, 3000, 8):
    ptr_prev = gdb.read_addr(comm - offset)

     if hex(ptr_prev).startswith("0xffff"):
         ptr_next = gdb.read_addr(comm - offset - 8)

         if hex(ptr_next).startswith("0xffff"):
             print(hex(comm - offset - 8), gdb.read_str(ptr_next + offset + 8), gdb.read_str(ptr_prev + offset + 8))

gdb.stop()
Output:
0xffffa304412572f8
0xffffa30441257208 \\377\\377\\377\\377\\377\\377\\377\\377 \\377\\377\\377\\377\\377\\377\\377\\377
0xffffa30441257200
0xffffa304412571f8 QUARKSLAB QUARKSLAB
0xffffa304412571f0  B
0xffffa304412571e8 sh
0xffffa304412571e0  0
0xffffa304412571a8
0xffffa304412571a0 QUARKSLAB QUARKSLAB
0xffffa30441257198  B
0xffffa30441257190 QUARKSLAB QUARKSLAB
0xffffa30441257188  B
0xffffa30441257180 \\200aP\\250\\004\\243\\377\\377\\200aP\\250\\004\\243\\377\\377 \\b
0xffffa30441257178 \\200aP\\250\\004\\243\\377\\377 \\200aP\\250\\004\\243\\377\\377
0xffffa30441257170
0xffffa30441257168 QUARKSLAB QUARKSLAB
0xffffa30441257160 , B
0xffffa30441257158
0xffffa304412570c0 \\300\\300$\\264\\377\\377\\377\\377\\064 \\240\\324#\\264\\377\\377\\377\\377
0xffffa304412570b8 \\022 4
0xffffa30441257098
0xffffa30441257078  B
0xffffa30441257070 QUARKSLAB QUARKSLAB
0xffffa30441257068  B
0xffffa30441257060 QUARKSLAB QUARKSLAB
0xffffa30441257048 kworker/3:0 sh
0xffffa30441257018 QUARKSLAB QUARKSLAB
What does this badly coded snippet do? It iterates downwards in steps of 8 from the potential comm field that is initialized with the first address we want to test comm = 0xffffa30441257310. The algorithm tests the presence of two contiguous pointers (result starting with 0xffff). The goal is to find the tasks field (located before the comm field) of the process descriptor.
struct list_head tasks;
list_head is declared as follows in types.h:
struct list_head {
    struct list_head *next, *prev;
};
That is to say, the task list of the system!
For each pair of addresses preceding the comm field found, the code will try to display the comm fields of the previous and next process descriptor in the task list by reapplying the offset that corresponds to the current difference with the comm field (in the example: 0xffffa30441257310).
In the output of the script we can see in the penultimate line that the task list pointers were most probably found:
0xffffa30441257048 kworker/3:0 sh
From there, it is possible to iterate on the task list to the process descriptor "init". As a bonus we also got the offset that separates the task field from the comm field.
With a few tricks of the same style it is possible to simply identify the other useful fields of the task_struct structure (pointer to the credentials structure, PID of the process).
Address of the SELinux mode variable
In order to be able to change the mode of operation of SELinux (change it to Permissive mode) it is necessary to locate the enforcing variable present in the selinux_state structure (security/selinux/include/security.h):
struct selinux_state {
    bool disabled;
#ifdef CONFIG_SECURITY_SELINUX_DEVELOP
    bool enforcing;
#endif
    bool checkreqprot;
    bool initialized;
    bool policycap[__POLICYDB_CAPABILITY_MAX];
    struct selinux_avc *avc;
    struct selinux_ss *ss;
};
In order to do so, the authors of Emuroot proceed to the static analysis of the AVD kernel with IDA and localize the enforcing variable using specific strings. This method is not usable for all versions of the kernel. We preferred to use dynamic analysis.
So we started to work with an Android 11.0 x86_64 image that uses the same version of the Linux kernel as the Google Play image and provides the su binary in order to be able to manipulate the SELinux mode via the setenforce command.
The goal of the procedure is to locate the address of the enforcing variable via several successive dumps of a certain memory range (in kernel space) by changing the value of the variable via the setenforce command between two dumps.
It is possible to produce real (binary) memory dumps via gdb, however we preferred to use the debugger logs so as to work directly with the output of the find command which we use to look for the values in memory.
The default SELinux mode is Enforcing, so the enforcing variable has the value 1.
# getenforce
Enforcing
So we scan the memory range we are interested in with gdb looking for bytes whose value is "1". An important point to note, is that the implementation of the enforcing field in the kernel used by Android 11.0 (Linux 5.4) changes compared to previous versions. Indeed, in version 5.4 the field is of type bool (stored on one byte in memory). Before, enforcing was stored in a u32 (double-word). This point is important because searching for the 1 value as bytes or double-words is not the same thing and does not lead to the same result. The selinux_state structure is loaded into the kernel module mapping space (0xffffffffa0000000 - 0xffffffffff5fffff).
In GDB:
gdb> set logging file A
gdb> set log on
gdb> find /b 0xffffffffb4693000, +0x40000000, 1
gdb> set log off
First we define the A file as log output. Then we execute the find command looking for bytes (switch /b) whose value is 1.
This gives us a resulting set of 45624 addresses of bytes whose value is 1. The variable enforcing is one of these 45624 bytes.
We then change the value of the variable using the setenforce command:
# setenforce 0
We repeat the search in memory with gdb:
gdb> set logging file B
gdb> set log on
gdb> find /b 0xffffffffb4693000, +0x40000000, 1
gdb> set log off
This gives us a set of 45518 addresses that cannot be the enforcing variable. We search for the "1's" with the find command while the current value is "0". The results are stored in the B file.
We finally prepare a last set of results:
gdb> set logging file C
gdb> set log on
gdb> find /b 0xffffffffb4693000, +0x40000000, 0
gdb> set log off
The resulting C file contains the addresses of the 2002519 bytes with "0" in the memory range.
So for the moment we have 3 files (A, B and C) which contain a lot of addresses... Far too many to be analyzed manually. So the next step is to reduce the number of potential candidates for the enforcing variable.
To do this we use the following formula : CANDIDATES = (A \ B) ∩ C
First of all, we make the difference between A and B as a whole:

Then we perform the intersection of the resulting set (A') with C :

The result of this intersection gives us the set candidates.
Put into practice with Python:
with open(“A”, “r”) as f:
    A = {int(l, 16) for l in f if l.startswith(“0x”)}

with open(“B”, “r”) as f:
    B = {int(l, 16) for l in f if l.startswith(“0x”)}

with open(“C”, “r”) as f:
    C = {int(l, 16) for l in f if l.startswith(“0x”)}

candidates = (A - B) & C
This results in a candidates set of about 50 addresses. If the resulting set would have been larger, we would have extracted more dumps to reduce it further. After a certain number of iterations (the volatility of the values in memory helps) the set ends up being reduced to a reasonable number of results. This method has the advantage of being quite fast (a few minutes to extract a set of candidate addresses via the gdb logs) and simple to implement.
To find the address of the SELinux mode variable among these 50 addresses, we use the following method:
Set SELinux to enforcing mode:
# setenforce 1
Then with a small Python script (find_enforcing_candidates.py):
from aeroot import GdbHelper

gdb = GdbHelper(“x86_64”)
gdb.start()

for addr in candidates:
    if gdb.read_byte(addr) == 1:
        print(hex(addr))
Output:
0xffffffffb4718b19
0xffffffffb472ab4c
The total of 45624 potential departure candidates is now reduced to two possibilities.
To determine which of these two addresses corresponds to the variable enforcing we will modify the value of the byte of one of the two addresses. In GDB:
gdb> set *(unsigned char*) (0xffffffffffffb4718b19) = 0
And observe the impact via the getenforce command :
# getenforce
Permissive
SELinux has switched to Permissive mode, so the address of the enforcing variable is 0xffffffffb4718b19.
Dealing with KASLR
In the previous part we saw how to retrieve both the absolute memory address of the swapper task_struct and the SELinux mode variable.
Unfortunately, if we cold reboot the emulated device, the solution we found will not work anymore. That is due to the KASLR.
Address Space Layout Randomization is a well known security mechanism used in various OS which is intended to complicate the implementation of exploits based on the use of absolute addresses. To make this possible, ASLR loads the different sections of a process at random addresses in memory.
KASLR is the same kind of mechanism but for the kernel. At boot time the kernel code is loaded in a randomized address space. This feature has been implemented in the Linux kernel since version 3 and enabled by default since the version 4.12.
This feature will make unusable the addresses we previously found.
One solution is to disable KASLR at boot time with the parameter nokaslr as follows:
$ emulator @Pixel_2_API_30_x86_64 -qemu -s -append nokaslr
Once the addresses of the swapper task_struct and SELinux mode variable are found, they will not change as long as we use this parameter to boot the emulated system.
A funnier solution is to bypass KASLR so we don't need to disable the feature and the script will work properly regardless of whether KALSR activated or not.
Bypassing KASLR can be done by finding the dynamic virtual address of a kernel element whose offset from the kernel base address is fixed. Several vulnerabilities allowing this from the user space on real machines have been reported in the past. A notable vulnerability is the CVE-2019-10639 which allows to obtain the kernel address in memory via ICMP or UDP, so it can be exploited remotely.
In our case, the use of GDB server gives us access to the memory of the emulated device. So we just need to locate a non-randomized memory area that contains a pointer to the kernel space. To maximize our chances of finding a pointer to the kernel space we are interested in, we search the cpu_entry_area range which contains the global descriptor table (GDT) and trampolines for syscalls (0xfffffe00000000 - 0xfffffe7fffffff).
For this we use a Python interpreter and the pygdbmi module (find_ptrs_to_kernel.py):
from aeroot import GdbHelper

gdb = GdbHelper(“x86_64”)
gdb.start()

candidate_ptrs = dict()

for addr in range(0xfffffe0000000000, 0xfffffe000000fff8, 4):
     candidate = gdb.read_addr(addr)
     hex_candidate = hex(candidate)

     if 0xffffffff00000000 <= candidate <= 0xfffffffffeffffff:
         candidate_ptrs[addr] = 0xffffffffb3028310 - candidate
         print(hex(addr), hex(candidate), 0xffffffffb3028310 - candidate)
This script lists the potential pointers to the kernel space as well as the offsets to the comm field of the swapper descriptor calculated from each potential pointer.
Output:
# PTR              ADDR               OFFSET TO SWAPPER COMM FIELD
0xfffffe0000000004 0xffffffffb2448e00 12449040
0xfffffe0000000014 0xffffffffb2448e03 12449037
0xfffffe0000000024 0xffffffffb2448e02 12449038
0xfffffe0000000034 0xffffffffb244ee00 12424464
0xfffffe0000000044 0xffffffffb243ee00 12490000
0xfffffe0000000054 0xffffffffb2448e00 12449040
0xfffffe0000000064 0xffffffffb2448e00 12449040
0xfffffe0000000074 0xffffffffb2438e00 12514576
0xfffffe0000000084 0xffffffffb2448e01 12449039
0xfffffe0000000094 0xffffffffb2448e00 12449040
0xfffffe00000000a4 0xffffffffb2448e00 12449040
0xfffffe00000000b4 0xffffffffb2438e00 12514576
0xfffffe00000000c4 0xffffffffb2448e00 12449040
0xfffffe00000000d4 0xffffffffb2448e00 12449040
0xfffffe00000000e4 0xffffffffb2448e00 12449040
0xfffffe00000000f4 0xffffffffb2438e00 12514576
0xfffffe0000000104 0xffffffffb2448e00 12449040
0xfffffe0000000114 0xffffffffb2448e00 12449040
0xfffffe0000000124 0xffffffffb2448e04 12449036
0xfffffe0000000134 0xffffffffb2448e00 12449040
0xfffffe0000000144 0xffffffffb3178e00 -1379056
0xfffffe0000000154 0xffffffffb3178e00 -1379056
0xfffffe0000000164 0xffffffffb3178e00 -1379056
We then perform a cold reboot of the emulator to test our pointer dictionary.
Then we test the different candidate pointers as follows (validate_ptrs_to_kernel.py):
for ptr, offset in candidate_ptrs.items():
    addr = gdb.read_addr(ptr)
    swapper_comm_addr = addr + offset

    print(hex(ptr), gdb.read_str(swapper_comm_addr))
Output:
# PTR              ADDR               STR @ ADDR + OFFSET
0xfffffe0000000004 0xffffffffa2448e00 swapper/0
0xfffffe0000000014 0xffffffffa2448e03 swapper/0
0xfffffe0000000024 0xffffffffa2448e02 swapper/0
0xfffffe0000000034 0xffffffffa244ee00 swapper/0
0xfffffe0000000044 0xffffffffa243ee00 swapper/0
0xfffffe0000000054 0xffffffffa2448e00 swapper/0
0xfffffe0000000064 0xffffffffa2448e00 swapper/0
0xfffffe0000000074 0xffffffffa2438e00 swapper/0
0xfffffe0000000084 0xffffffffa2448e01 swapper/0
0xfffffe0000000094 0xffffffffa2448e00 swapper/0
0xfffffe00000000a4 0xffffffffa2448e00 swapper/0
0xfffffe00000000b4 0xffffffffa2438e00 swapper/0
0xfffffe00000000c4 0xffffffffa2448e00 swapper/0
0xfffffe00000000d4 0xffffffffa2448e00 swapper/0
0xfffffe00000000e4 0xffffffffa2448e00 swapper/0
0xfffffe00000000f4 0xffffffffa2438e00 swapper/0
0xfffffe0000000104 0xffffffffa2448e00 swapper/0
0xfffffe0000000114 0xffffffffa2448e00 swapper/0
0xfffffe0000000124 0xffffffffa2448e04 swapper/0
0xfffffe0000000134 0xffffffffa2448e00 swapper/0
0xfffffe0000000144 0xffffffffa3178e00 swapper/0
0xfffffe0000000154 0xffffffffa3178e00 swapper/0
0xfffffe0000000164 0xffffffffa3178e00 swapper/0
...
We see that once each pointer is resolved and the offset applied, we fall back to the swapper comm field. So here we have a set of persistent pointers to the kernel space. We just have to choose one of them and then apply offsets to get back the addresses of:
the task_struct of swapper
the SELinux mode variable
KASLR is bypassed!
Conclusion
Through this article we have seen how to retrieve values and structures used by the Linux kernel in the memory of an emulated Android device with little effort. We have also seen the possibilities offered by the access to the memory of the device, in particular by bypassing the KASLR kernel security mechanism.
Our improvements to Android Emuroot have allowed us to add support for recent versions of Android images, thus providing a convenient way to run other analysis tools requiring super-user permissions on AVD.
The possibilty to access the emulated device's memory opens other interesting perspectives. To push our work one step further, we could implement a solution making the use of the emulator transparent for Android applications that try to detect its presence...