Authors Maxime Rossi Bellom, Damiano Melotti
Category Android
Tags reverse-engineering, exploitation, Android, 2023
Join us in our journey into modern Android's Data Encryption at rest, in which we study how it works and assess how resistant it is against attackers having access to a range of high end software vulnerabilities.

Introduction
Following our latest presentation on the Titan M, the security chip made by Google for their Android smartphones, we received a request from someone who had broken their device. While the main SoC appeared to be dead, the Titan M was still working, therefore they were asking if they could recover the data in storage. Sadly, that was not possible, since the main SoC has a critical role in the encryption schema. Still, this question aroused our curiosity and was the starting point for this research.
We started asking ourselves how an attacker with access to a wide range of software vulnerabilities can defeat the Android data encryption. In particular, what components of the OS should be targeted? How can multiple bugs be chained together, and what happens when security chips are involved? And most importantly, what is the role of the user's credentials? To answer those questions, we put in place two PoCs exploiting critical known vulnerabilities, targeting the two mechanisms for authentication: one relying on TrustZone with the Gatekeeper Trusted Application, and the other one relying on security chips with Weaver. While hardware- or cryptographic-based approaches could be considered as well, this research is focused on software attacks only.
We presented a talk based on this work at REcon'23, you can find the slides here.
Background on Android FBE
In this blog post, we focus on data encryption at rest. In short, this feature allows to never store files in plaintext, to prevent attackers from being able to read them by simply extracting the storage device. Instead, files are automatically decrypted on the fly when loaded in memory (e.g., by a text editor), and encrypted again when written back to disk. This is made possible thanks to OS support, and historically Android has used two methods: full-disk encryption (FDE) and file-based encryption (FBE). Since Android 10 the latter is required, and there exist many resources explaining the differences between the two, for those interested. In the following section, we go over the details of FBE.
As the name suggests, File-Based Encryption works at the file level. That is, each file has its own key and can be decrypted independently from other ones. Android relies on a Linux kernel feature to achieve this, called fscrypt, supported in various file systems such as Ext4 and F2FS. We do not dive into the implementation details themselves, as they are not needed for this research, but the upstream documentation offers a great overview for interested readers. As far as we are concerned, we need to know that after deriving a master key for the directory tree, the system retrieves separate keys for files, directories, and symbolic links. Therefore, from a conceptual point of view, we are interested in recovering the system master key that allows to unlock the directory where all user's data is stored (i.e. the /data folder).
Thanks to the file-level approach, FBE allows to achieve very precise granularity. Android leverages this to divide files into two encryption levels1:
- Device Encrypted (DE): files are available right after boot;
- Credential Encrypted (CE): files are only available after the user has authenticated (this is the level of choice for user data).
The DE key is automatically derived when booting the device. Given this and the type of data it protects, it is not particularly interesting from an attacker's point of view. It is, however, worth noting that this is at the base of the Direct Boot feature, allowing to unlock some features of the device (alarms are often used as an example) before the user has authenticated.
Still, since an attacker probably has the goal to retrieve private data, our main focus goes to the CE key. The steps to derive it are rather complex, and the procedure starts from some DE-protected files owned by system (under /data/system_de/<uid>/spblob). In the following sections we scope down to some parts of this derivation, but to reply immediately to one of our initial questions, user credentials are directly used. That is, the raw bytes of the final key are actually derived from those of the credentials. Even though there is a number of steps in between, this means that regardless of how many vulnerabilities an attacker can leverage, they still need to bruteforce the credentials to feed them into the key derivation process.
CE key derivation with TrustZone
The picture above shows schematically how the different components needed to derive the CE key are chained together. As we mentioned previously, it is a rather complex procedure, so we suggest opening the picture in a separate tab if you want to zoom into some of the steps. For devices that do not feature security chips, the "ingredients" for key derivation come from two different protected components:
- files owned by privileged users (
systemorroot): normal users cannot access them; - TEE-protected keys: these keys can only be used inside the TEE, by the Keymaster application. These keys are also authentication-bound, so they can only be used when the user has successfully authenticated.
This is already guiding us toward how an attacker would need to attack the schema: they should both be able to escalate privileges and tamper with the trusted execution environment, to either extract the keys or be able to use them before authentication. Let us focus on the second part, and in particular, on how authentication works with Gatekeeper.
Authentication with Gatekeeper
Gatekeeper is one of the Trusted Applications (TA) that are always found in TEEs. By communicating with the corresponding Android daemon (and the Hardware Abstraction Layer), it plays a critical role in validating the user's credentials for authentication. Note that Gatekeeper is only involved in authentication via PIN/password/pattern, while other TAs are used to support biometrics. Nonetheless, the first time a user authenticates when booting their device, they cannot use biometrics, and the reason is precisely linked to data encryption.
Gatekeeper implements two conceptually simple commands: Enroll and Verify. Enroll is usually called when a user first sets an authentication factor, or when they change it. The command takes a so-called password (pwd) blob, signs it, and returns it, turning it into a password handle. Password blobs are created from the credentials, which are first stretched using scrypt (more details on that below), then combined with a hashed string. The key used to sign the provided password is internal to Gatekeeper, and essential to verify the credentials when needed. Such a feature is implemented by - not surprisingly - the Verify command, which is instead called whenever the user tries to authenticate. As the name suggests, it verifies if the password blob for the current authentication attempt is a valid one. It does so by computing its HMAC and comparing it with the original password handle, which is also sent with the command.
Scrypt is a key derivation function that in this context is used to slow down custom hardware attacks, by requiring a significant amount of memory. Its parameters are stored in a file, together with the credentials' salt. This very simple step implies a negligible delay for each authentication attempt, but incredibly slows down an attacker who needs to go through it many times. This is ultimately also our bottleneck, as we later show in our proof-of-concepts.
If authentication is successful, Gatekeeper creates an authentication (auth) token. This is a signed token of standard format (as specified in the AOSP), designed to prevent replay attacks. This token proves that the user has authenticated, and needs to be sent to the Keymaster TA to unlock an authentication-bound key. If instead the authentication attempt fails, Gatekeeper's throttling mechanism kicks in, to make bruteforcing impossible. This is implementation-dependent, but generally the TA stores information about the time of each failed request, and starts returning errors when the frequency of such failed requests becomes suspicious. The counters are reset when the user successfully authenticates again.
Synthetic Password
Once the user has authenticated, the system has a valid applicationId. This needs to go through a few more steps, before actually becoming the CE key. The first and more interesting one for us is the one behind the derivation of the Synthetic Password. Once this has been retrieved, there are still a number of further steps, which however do not require anything from the user or from some trusted components.
The synthetic password is stored on the Android file system and has to be decrypted with two different keys. The first one is a regular key stored in the Android Keystore, which is TEE-protected and authentication-bound. Since these keys can never leave the TEE, they are stored in encrypted form and need to be decrypted inside the Keymaster TA. In addition to that, as described previously, they can only be used if the command also contains an auth token that was previously generated by Gatekeeper (and that is still valid). Once the first decryption has been done (in the TEE), the intermediate buffer is decrypted again, using the hashed applicationId as key. Note that AES here is done using GCM mode: if something went wrong with the key, the operation fails due to the mismatching tag. Keep this in mind, as it turns out to be useful later.
At this point, there are essentially three things an attacker needs to achieve to recover the CE key. First, they need to be able to retrieve files owned by privileged users, likely with a kernel exploit that chains several vulnerabilities. Then, they also have to tamper with the TEE, either leaking the required keys from Keymaster, or attacking the credential validation and auth token generation in Gatekeeper. Finally, they need to perform the bruteforce with the obtained information.
PoC for Gatekeeper
Once we understood how we had to proceed, we started looking for known vulnerabilities in devices without security chips. By reading some online blogs dedicated to custom ROMs and Android tweaks, we ended up finding a tutorial that was citing MTKClient (by Bjoern Kerler – @viperbjk) as the tool to be used. As soon as we read what the tutorial allowed users to do, we understood that there was no way anyone could achieve that without exploiting some vulnerabilities. Indeed, MTKClient exploits some Boot ROM bugs impacting several Mediatek SoCs: by doing so, it allows to read/write all the partitions and bypass secure boot. That was exactly what we were looking for, with the extra advantage of being very easy to use and working almost out of the box (kudos to the author for that!). By patching the whole boot chain, we can root the device, and also replace the original TAs with custom ones, making our attack possible. To explain how we did that though, we need to provide some details on the Mediatek boot process.
Mediatek boot process
We implemented our PoC on the Samsung A22 device (more precisely on the A226B and the A225F). These devices are using two vulnerable SoCs from Mediatek: MT6769V and MT6833V, which can be exploited using MTKClient. This tool interacts with the Download Mode (similar to the EDL mode on Qualcomm SoCs), which exposes a USB interface that is originally used to perform support operations on it (such as flashing the firmware). To trigger the bug, physical access is required, and on some devices (such as the A225F) two pins must be shorted on the device PCB to enter Download Mode. Once the device is booted in the right mode, the tool exploits the boot ROM vulnerability, then modifies BL2 (called preloader in the Mediatek boot schema) to disable the next secure boot check, and finally loads it on the device and boots on it.
To mount our attack, we need to patch the following components:
- the next bootloader, BL3, which is called Little Kernel (shorted as LK), to disable the Android Verified Boot checks as we want to boot modified Android images;
- the Android system (in our case the boot image), to grant ourselves root access, and to modify the Gatekeeper Trusted Application, which is present in the vendor partition;
- the TEE OS, called TEEGRIS, to disable the verification of the Trusted Applications.
Rooting Android
To root Android, we are using the infamous Magisk, which patches the boot image to embed some binaries that provide root access to applications (and to the shell user). It also disables the verification of Android images (other than boot that is verified by Little Kernel) done by dm-verity.
However, Magisk had a few limitations for our use case, for which we had to make some modifications to the version we are using:
- It usually comes as an application to be used on an Android device. In our case, we wanted to use it directly from our laptops.
- It asks the user to grant root access when requested by any application through a prompt on the screen. We do not want this, as we are still not able to unlock the device when we need root access.
One last thing we implemented in Magisk is a little feature to automatically bind (through the mount syscall) files from the SPU partition (which was empty on both devices) into the Android filesystem. This little trick was a good way for us to avoid playing with the dynamic partitions, which seem to lack the tools to manipulate them. Indeed, the super.img partition is a dynamic partition, and as such contains several logical partitions including system, vendor, and others.
To replace the Gatekeeper TA with the one we patched, we simply need to create a new file in the SPU partition, following the same directory tree structure: the init program from Magisk then mounts it at boot in place of the existing one. This method has the advantage that it makes it simple to replace any file, since we just need to put it in the SPU partition replicating the directory tree.
Once this is done, we have root access on the device that we can use to access the files involved in the CE Key derivation.
Patching TEEGRIS
TEEGRIS is the TrustZone OS designed by Samsung that can be found on both Exynos and Mediatek SoCs. Its design and reverse engineering have been covered many times already, so we focus only on the parts we need to patch to achieve our goal: execute a modified TA. In our case, we decided to patch Gatekeeper, to bypass the handle verification and always produce valid auth tokens.
TEEGRIS is divided in several images:
tee1.img: it contains the Arm Trusted Firmware (which is executed in monitor mode with the highest privileges - EL3), the Secure World kernel, and a binary calleduserboot.so. This last one is quite important for us, as it is used to load and verify the root filesystem of TEEGRIS.tzar.img: this is the root filesystem of TEEGRIS, stored in a custom archive format that has been reversed engineered. It contains libraries that can be used by other libraries but also by the TAs, and binaries including one calledroot_task, that is in charge of verifying and running the TAs provided by Android.super.imgwhich is the Android main partition containing several logical partitions. One of them is the vendor partition and contains most of the TAs, including Gatekeeper.
To sum up, we need to patch the userboot.so binary to disable the verification of the TZAR. Then we patch the root_task to disable the verification of the TAs. So we can finally patch Gatekeeper.
Patching Gatekeeper
Gatekeeper is used to verify the user's credentials. The verification uses a Key Derivation Function (KDF) to produce a unique value that can then be compared to the expected value passed as argument. In the Trusty TEE implementation, the KDF is actually an HMAC using an internal secret key. For TEEGRIS, the KDF seems to be a custom one apparently implemented in the crypto driver and, at least on exynos-based devices, relying on the internal crypto processor.
If the credentials match, Gatekeeper generates an auth_token and sends it back to Android, so that it can be attached to the Keymaster requests. As a reminder, this is needed for Keymaster to decrypt authentication-bound keys, such as the encrypted synthetic password.
Here there are several options, but we decided to patch the comparison between the two values to make sure any credentials are accepted. This is possible because the auth_token generation mechanism does not use any bits from the credentials. Thanks to our modification, every time we enter some credentials Gatekeeper generates the token and returns success, making the system believe it can move forward with the next steps to unlock the device. For sure it is not be able to decrypt the user data with wrong credentials. But before trying that, the Keymaster task has to perform the first decryption of the Synthetic Password (which is encrypted twice).
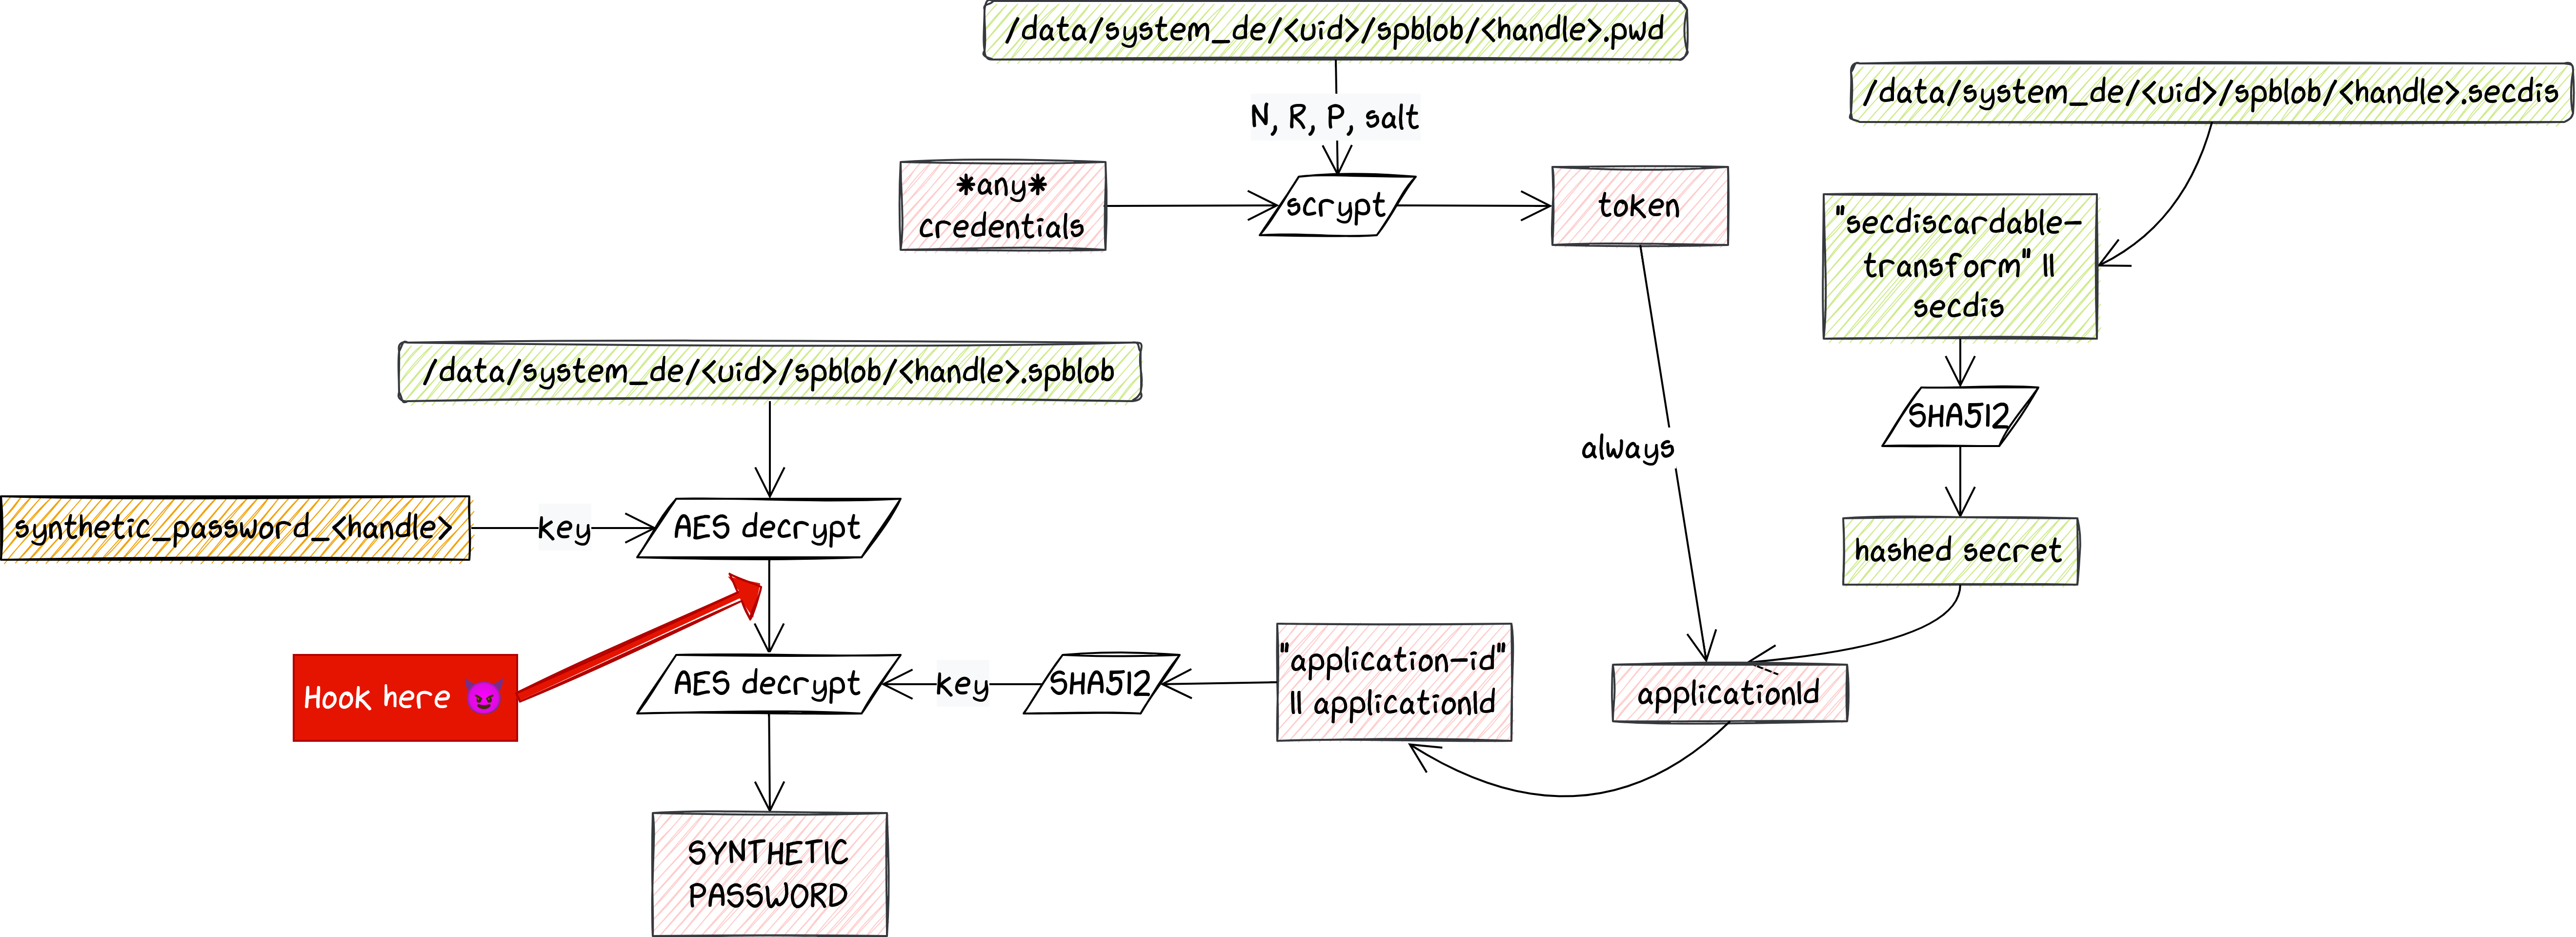
Following this approach, we can leak the result of this first AES decrypt operation. The device is rooted, and using Frida we can hook the system_server process that is requesting this operation in SyntheticPasswordCrypto.decryptBlob. With this value retrieved, we have everything needed to start brute forcing the credentials.
Bruteforcing the credentials
We can summarize the bruteforce as the following pseudo-code:
pwd = generate new password
token = scrypt(pwd, R, N, P, Salt)
Application_id = token || Prehashed value
key = SHA512("application_id" || application_id)
AES_Decrypt(value_leaked_from_keymaster, key)
Here the parameters of scrypt and the prehashed value are retrieved from the files that are device encrypted. The value_leaked_from_keymaster, as the name suggest, is the value we leaked with Frida.
Thanks to the GCM mode of operation used behind this AES_Decrypt function, the decryption fails if the key is the wrong one, and we know we need to pick another password. If it succeeds, it means we found the right value.
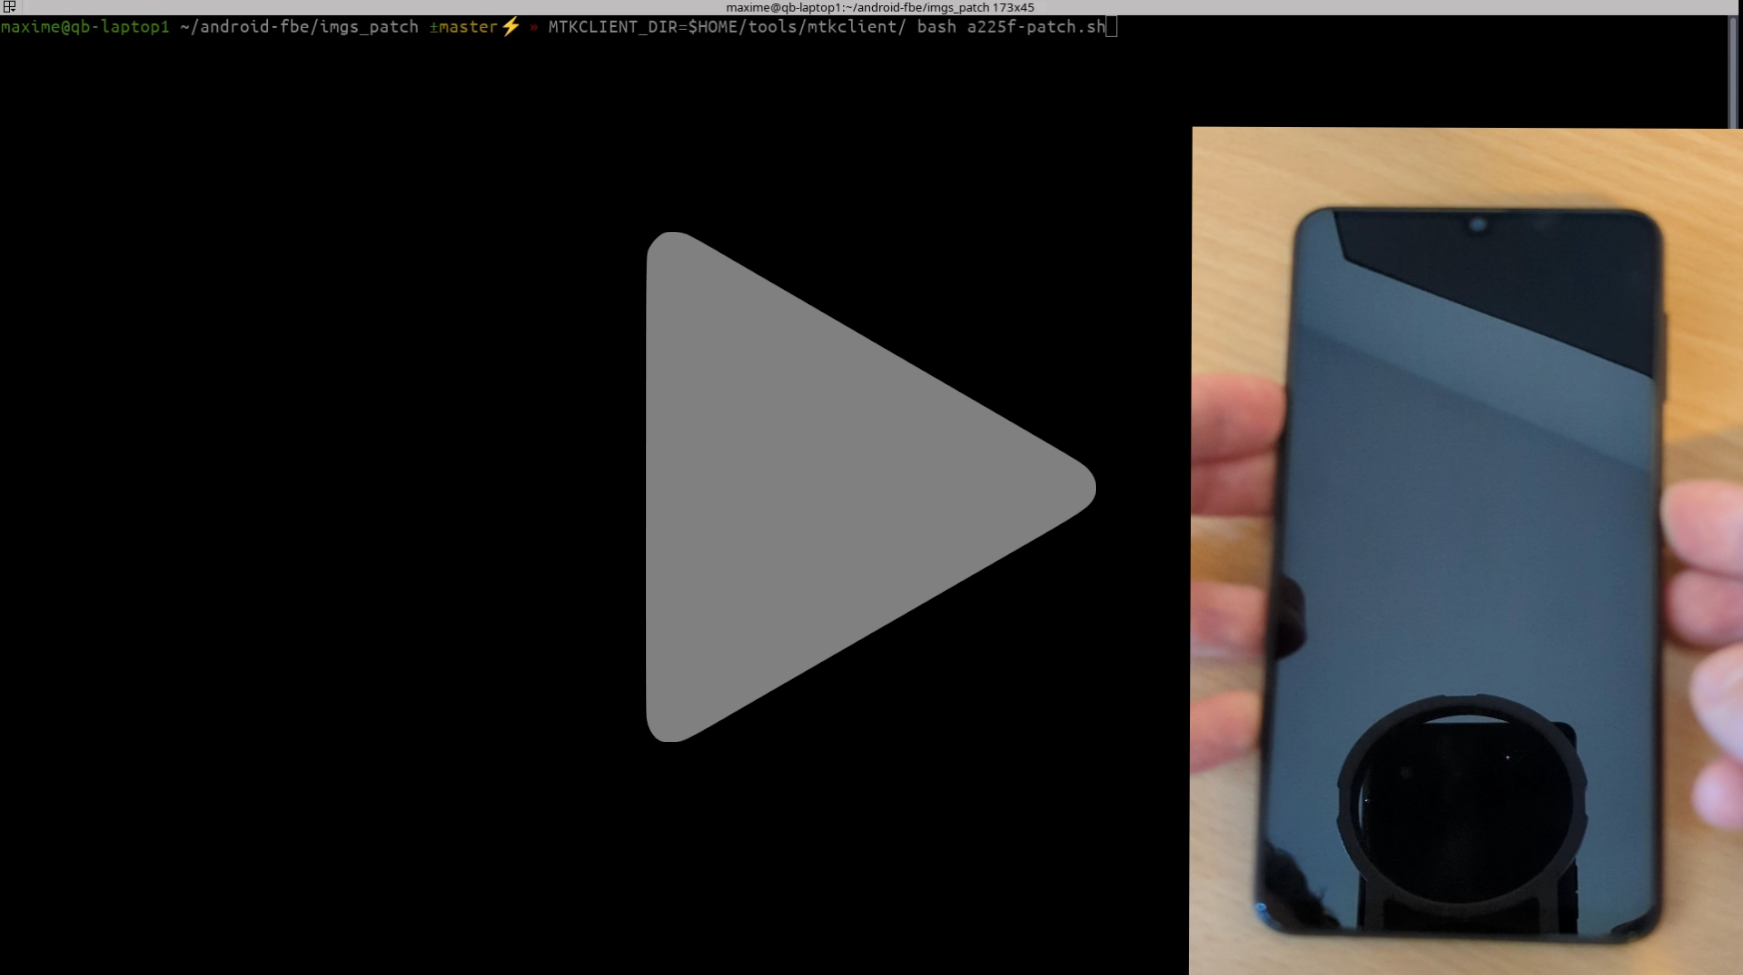
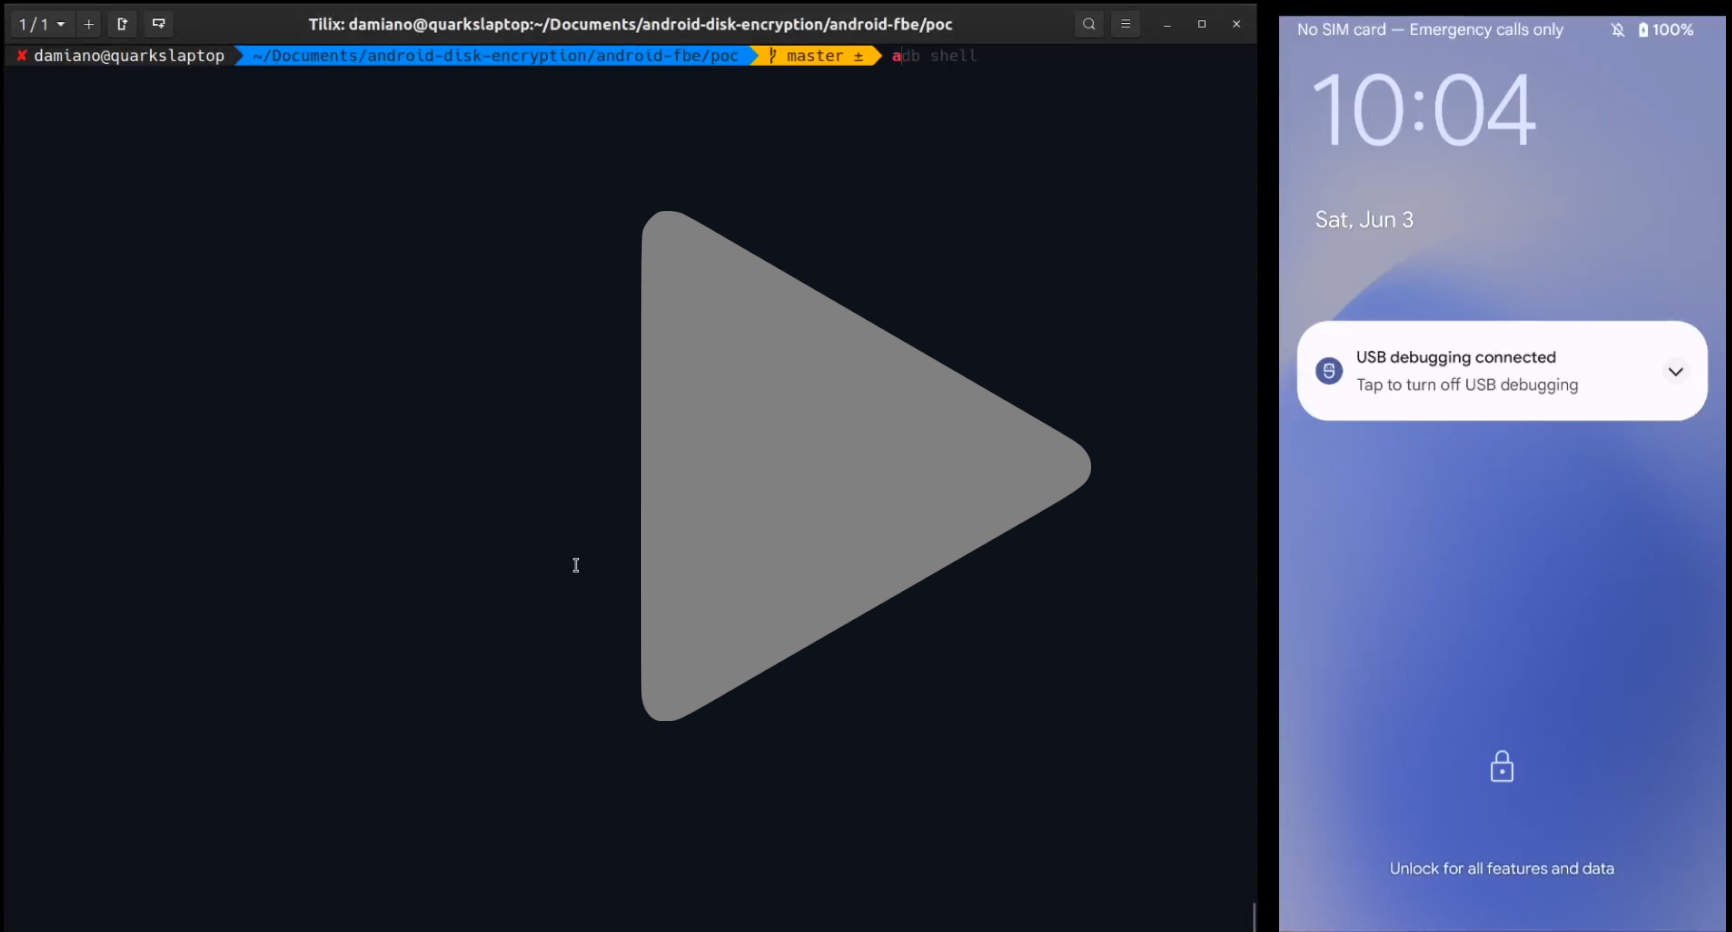
Performance-wise, our bruteforcing script can be definitely improved. In the video above, we were running it on our machine; we noticed a significant improvement even by simply moving it to a moderately powerful VM. Using dedicated hardware would make the difference here, but it is not the point of our PoC, where we rather put the focus on the steps required to make bruteforcing actually possible at all.
CE key derivation with Security chip
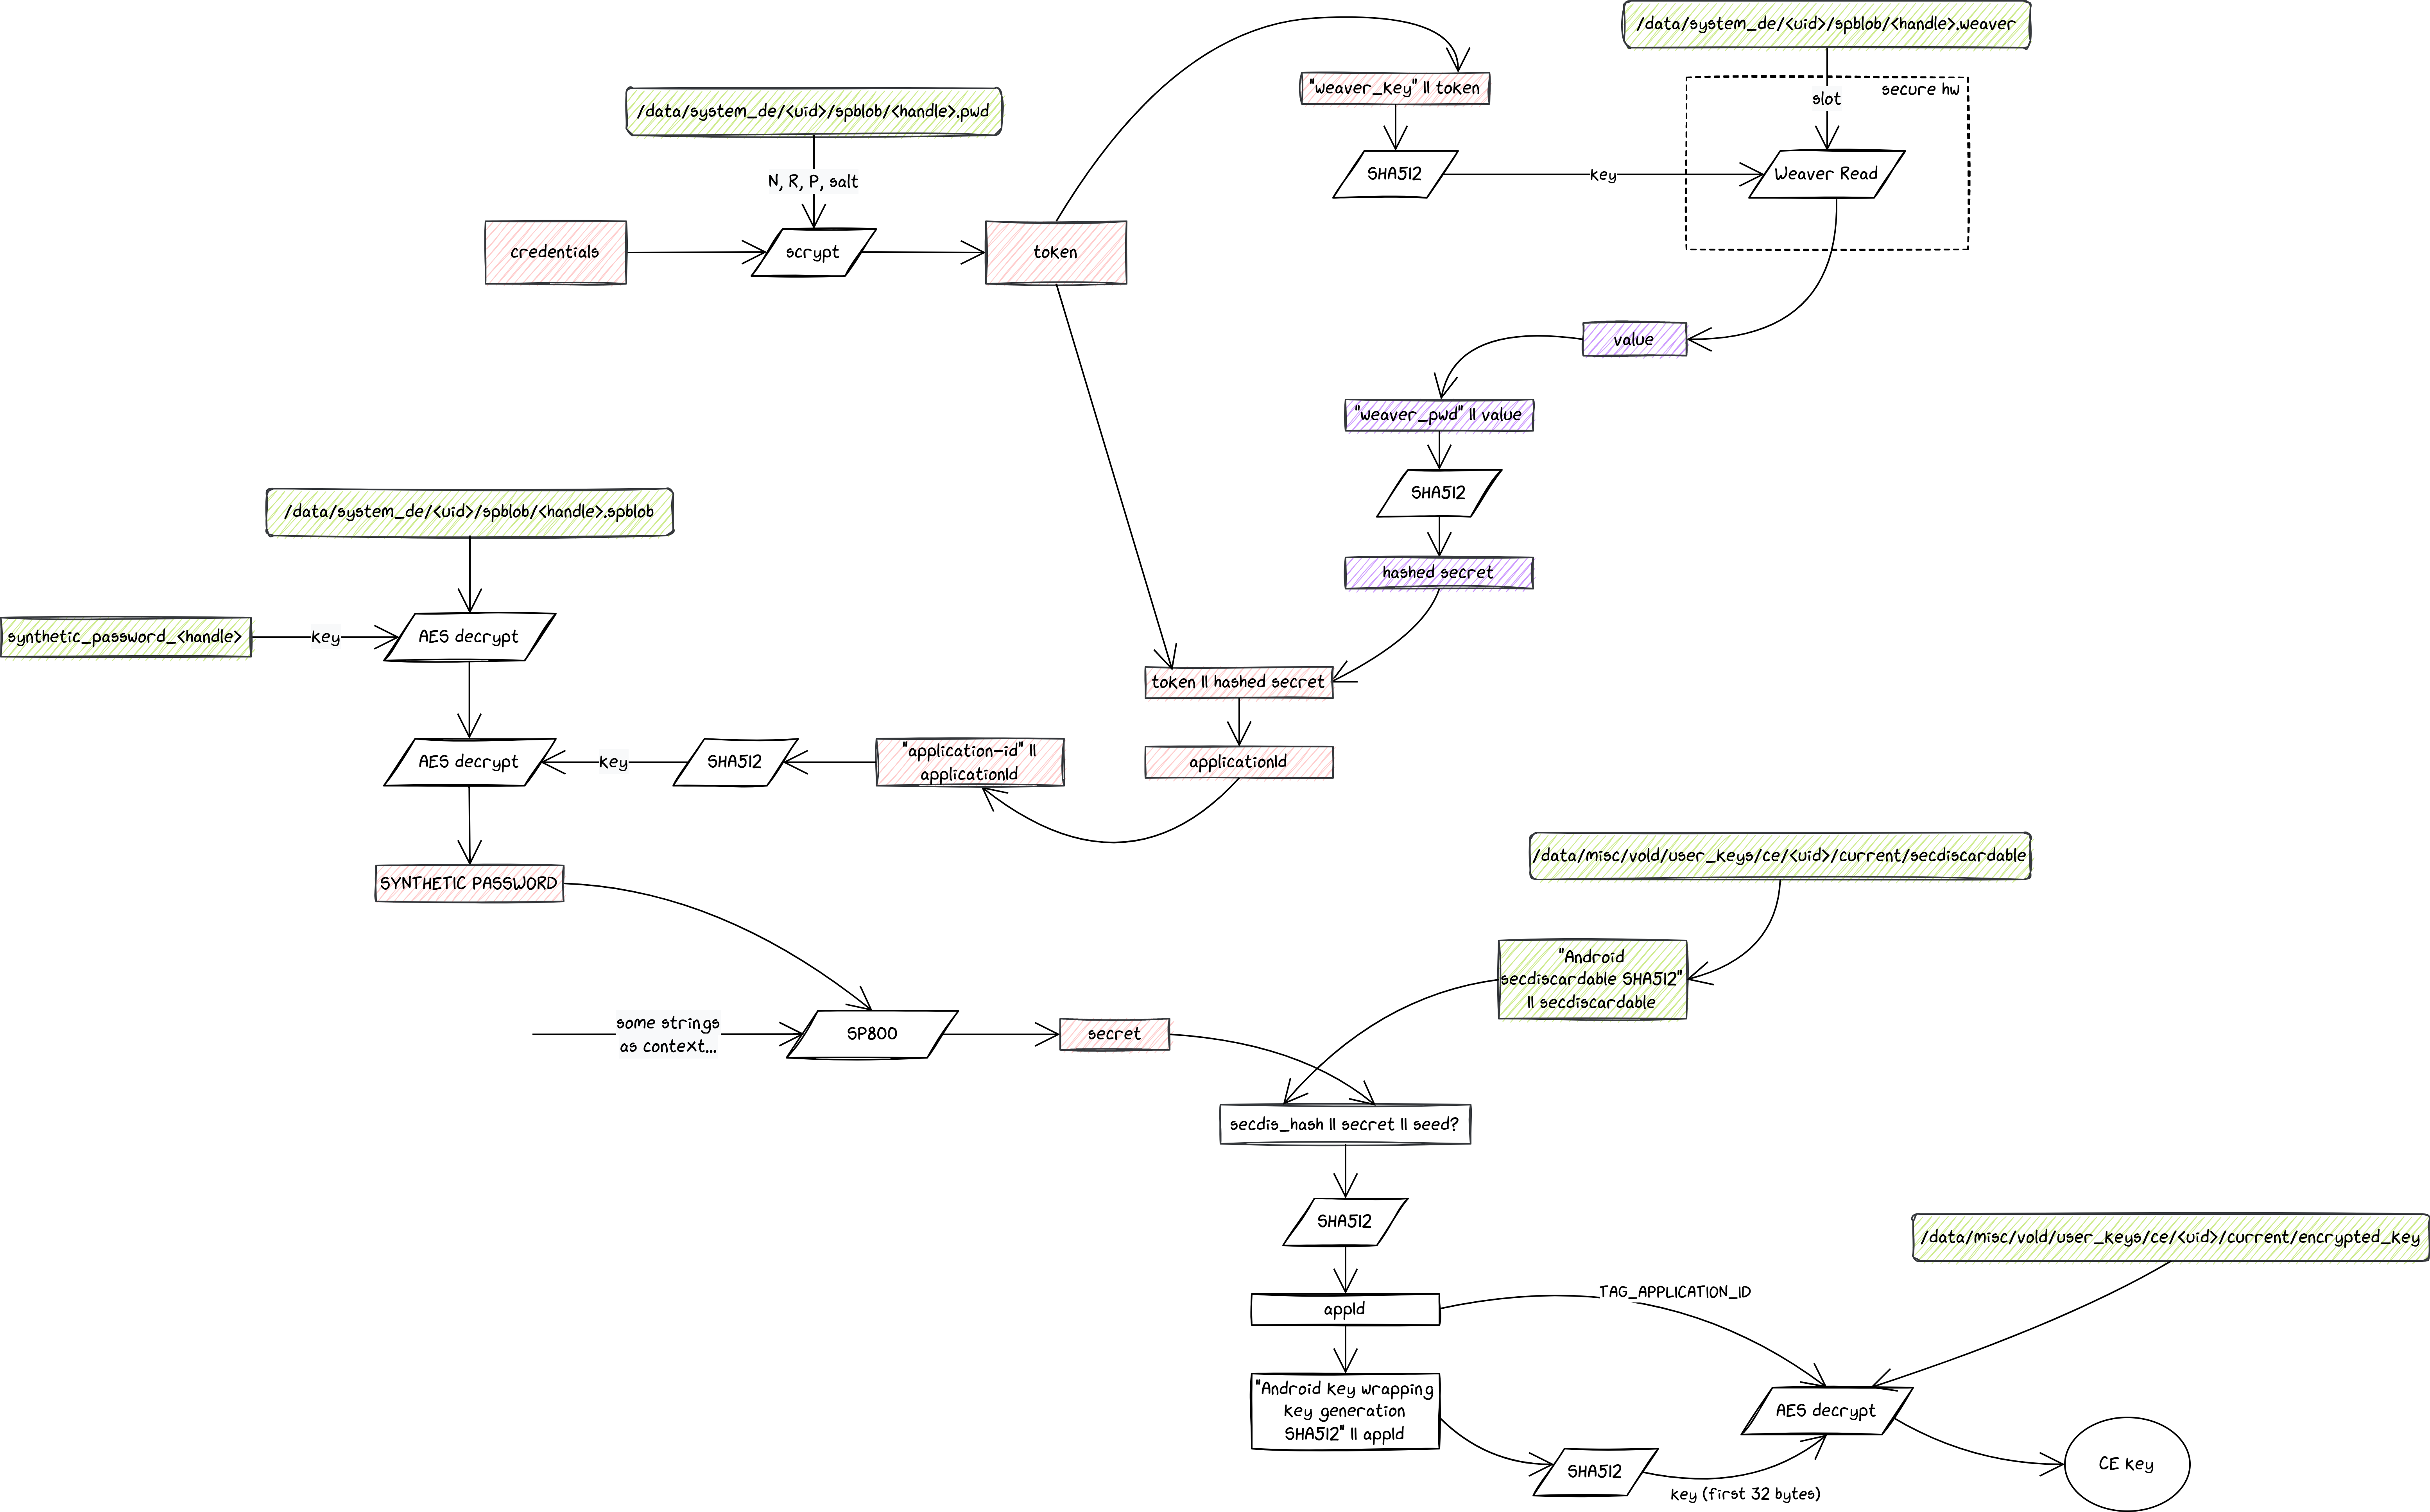
The picture above shows how the CE key is derived when a security chip is used. The schema is quite similar to the one presented in the previous part, with the main difference that a new component called Weaver has been introduced and is used in the generation of the applicationId.
Authentication with Weaver
Weaver is a feature that relies on a security chip to store pairs of keys and values. Each pair is assigned to a unique slot. It exposes a very simple API of three commands:
read: provide a slot number and a key in input, and receive the associated value if the key is correct;write: provide a slot number, a key and a value to be stored;getConfig: retrieves the config information for this implementation of Weaver.
Similarly to Gatekeeper, Weaver implements a throttling mechanism, that kicks in after several failed read attempts.
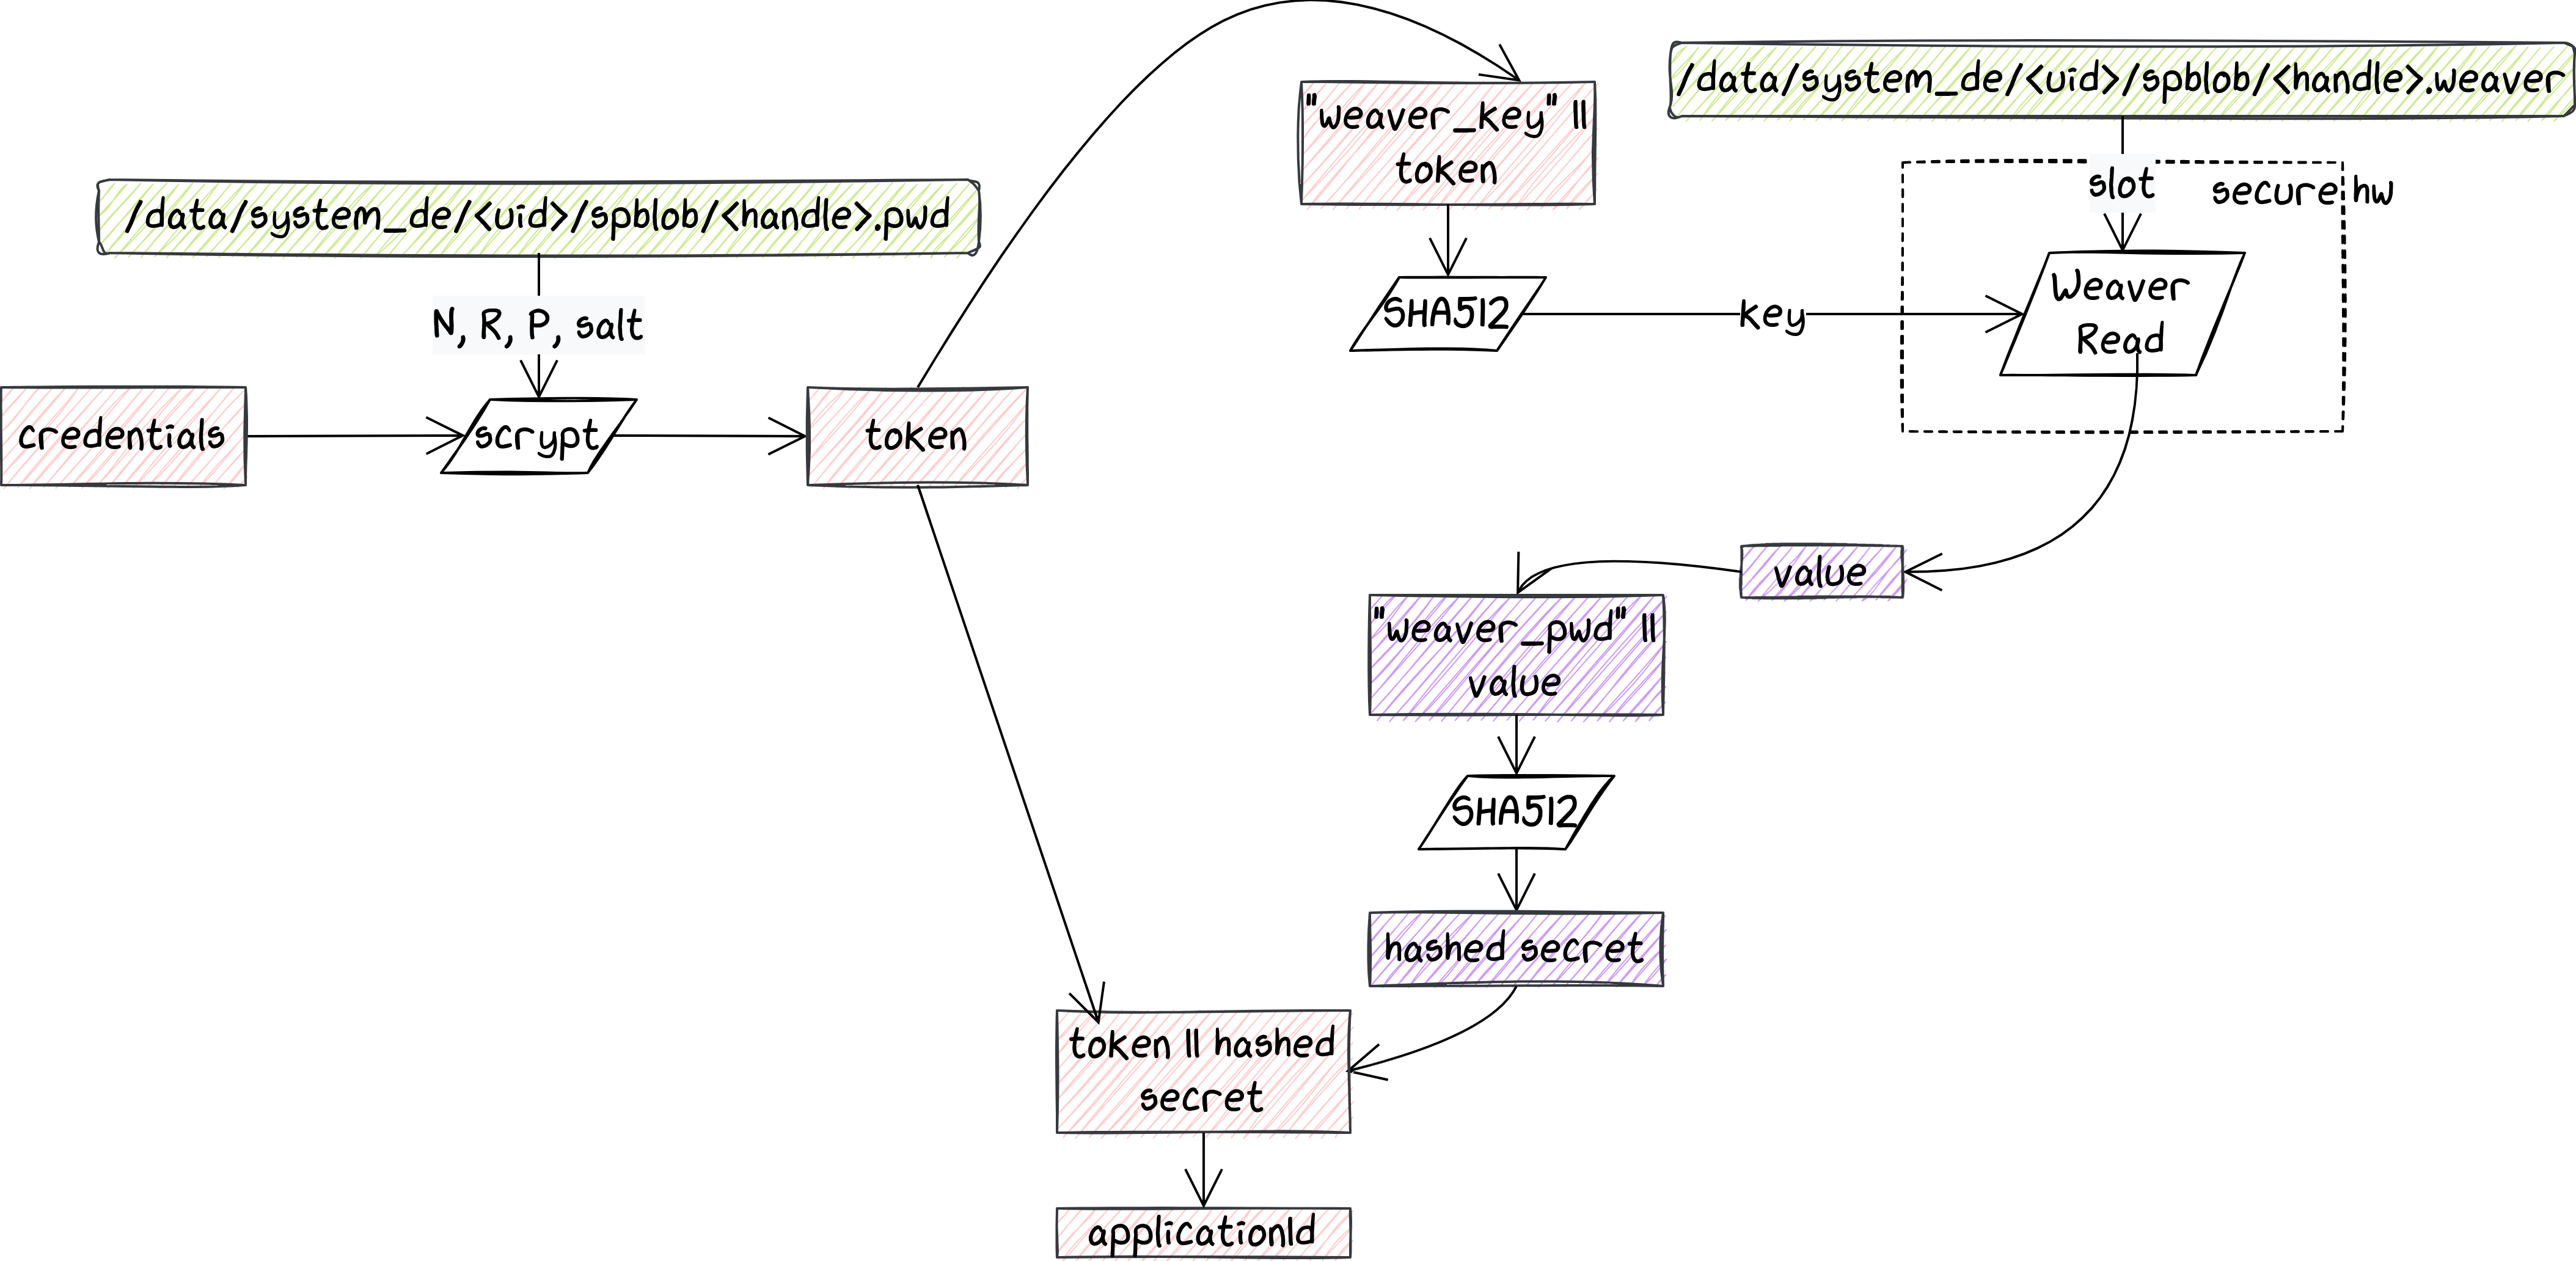
When a security chip is available, the token produced with scrypt is turned into a Weaver key, which is then sent to the security chip, along with the slot number that is stored in a device-encrypted file (/data/system_de/<uid>/spblob/<handle>.weaver). If the key and the slot match, the security chip sends back the value, which is then hashed to produce what we called in the schema above the hashed secret.
Finally, the token and the hashed secret are combined to produce the applicationId. From there the CE key derivation is the same as what is presented in the Gatekeeper schema.
PoC for Weaver
Weaver is a relatively recent addition to the Android world, as security chips are becoming increasingly popular in more and more devices. At Quarkslab, we spent quite some time working with the Titan M chip, that was introduced by Google with the Pixel 3. For a comprehensive introduction to this topic, you can have a look at our first whitepaper, as well as the Black Hat EU '21 talk (video, slides), where we first publicly presented our research.
Once we became familiar with this component, we spent some time investigating how to do vulnerability research on it (Black Hat USA '22 video, slides). We managed to find an interesting bug, that was later assigned CVE-2022-20233, which we exploited to obtain code execution on the chip. If you are interested in a full write-up of the exploit, you can find it here in our blog. Once we obtained code execution on the chip, we created an arbitrary read primitive, to be able to extract anything we wanted on the chip's memory. Note that this is the highest impact that we can seek for, as much of the security provided by these chips is related to the protection of various types of secrets.
Weaver keys and values are stored in the flash and accessible via such a read primitive. The only challenge is to find the right addresses. We first reverse engineered the Weaver task to get a better understanding of how these are computed, and then we went for some trial and error. Our tool to communicate with the Titan M - nosclient - was very helpful here: we used it to add new entries and try to leak them with our exploit. Also thanks to the fact that the Weaver key we are looking for is composed of 16 random bytes (which stand out when surrounded by null ones), we managed to obtain it without too many difficulties.
Also for this proof-of-concept, we need to obtain root privileges on the Application Processor. We did it by rooting the device using Magisk, while a real-world attack would have to rely on one (or multiple) vulnerabilities affecting the kernel. Having said that, our exploit can be used to mount a similar attack as the Gatekeeper one, using a slightly different strategy to start bruteforcing the credentials. In practice, we proceed as follows:
pwd = generate new password
token = scrypt(pwd, R, N, P, Salt)
key = SHA512("weaver_key" || token)
Compare with leaked Weaver key
Conclusion
Android Disk Encryption is definitely an interesting feature to play with. The first takeaway should probably be on how solidly designed the schema is overall: by combining several pieces coming from different components, it requires an attacker to have very powerful vulnerabilities to defeat it. Trusted chips guarantee an even higher security level, by adding an additional target to be attacked, with a limited attack surface. And still, even after obtaining all the required bits, the credentials need to be bruteforced. While custom hardware can overcome the limitations imposed by scrypt, a very long passphrase remains very hard to guess.
A huge thanks to our colleagues at Quarkslab for proofreading this article and to OffensiveCon for letting us use this cool picture generated from the title of our talk.
-
This is slightly different when a device has multiple users. In that case, users share the same DE key but have separate CE keys to protect their own files. ↩