Author Madimodi Diawara
Category Vulnerability
Tags reverse-engineering, vulnerability, iOS, iPhone, Apple, 2025
On August 20th, Apple released an out-of-band security fix for its main operating systems. This patch allegedly fixes CVE-2025-43300, an out-of-bounds write, addressed with improved bounds checking in the ImageIO framework. In this blog post we provide a root cause analysis of the vulnerability.
Introduction
On August 20th, Apple released an out-of-band security fix for its main operating systems. The patch allegedly fixes an out-of-bounds write, addressed with improved bounds checking into the ImageIO framework. The full advisory can be found here.
This security release attracted a lot of attention because the vulnerability was said to be exploited in the wild in zero-click campaigns. Recently, WhatsApp released a security fix stating that actors could force targeted users to download a resource from an arbitrary URL and trigger its processing. It said that this vulnerability may have been used in an exploit chain in combination to CVE-2025-43300.
Sounds interesting, so let's dig deeper.
Be prepared to look at the patch to understand the root cause, dive into image compression and a few rather tricky internals of image processing in the Apple environment.
Prior work
Quickly, researchers published works on the case:
- @b1n4r1b01 found out that the problem was related to the parsing of DNG image files, embedding JPEG compressed data. He was the first to publish a public working Proof of Concept.
- @msuiche published a more detailed conceptual explanation of the issue. He also added a detection mechanism to his tool ELEGANTBOUNCER.
- Finally, DarkNavy published the most precise yet concise description of the root cause of the bug.
Ok, that gives clues about what to look at.
Patch analysis
As stated, the vulnerability seems to be located in the ImageIO.framework. Frameworks and functionalities are implemented into multiple files. So, the first step is to identify which files changed before and after the patch.
@blacktop regularly publishes diffing results for each new iOS release. The output of the current iteration (18.6.1 against 18.6.2 for iOS) shows that a single file was updated, namely RawCamera.
We can see that new APIs are called from the CMPhoto framework and some code changed. We now know that the file to diff is RawCamera.
Getting the binary
Getting the two files is as simple as getting the ipsw for each file versions and extracting both of them: they are present as standalone files.
Or directly use the dyld_shared_cache, as RawCamera is part of it.
After having exported them to the BinExport format with Binary Ninja we fed those two files to BinDiff.
Diffing versions
As this fix is out-of-band, changes were minimal: 13 functions seems to have changed across the update.
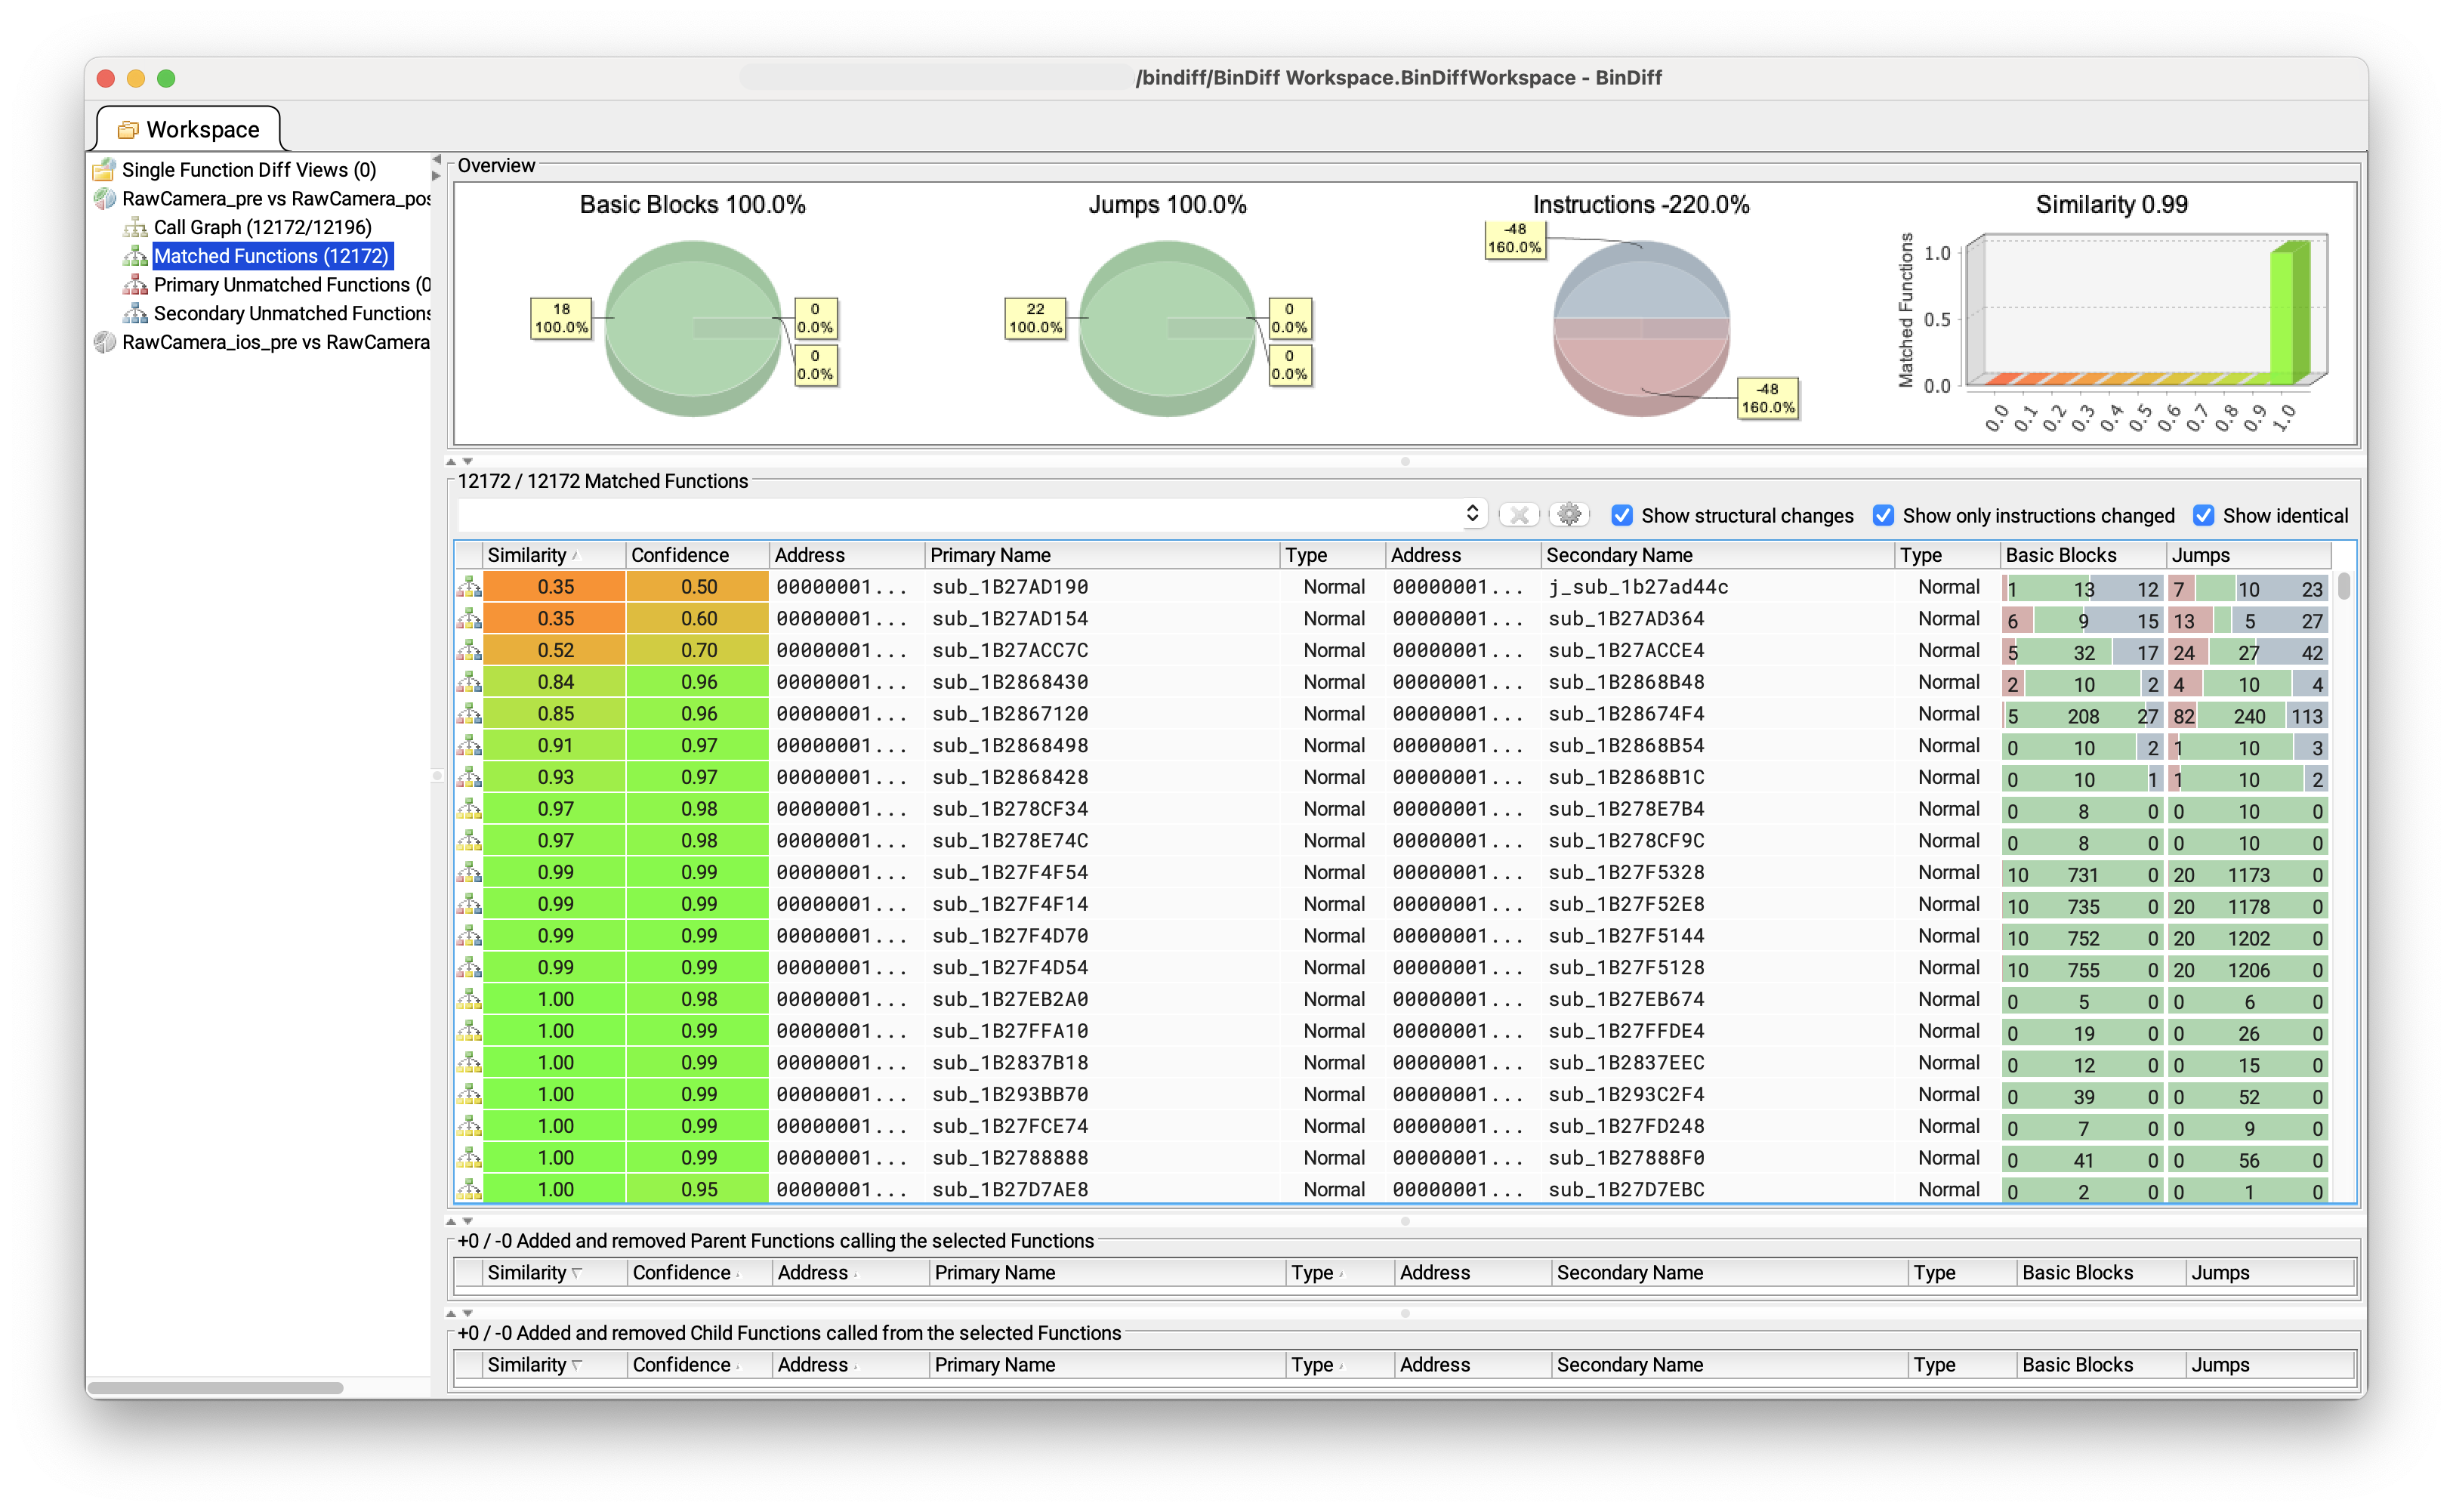
Diffing results for 15.6 vs 15.6.1 (macOS)
But remember this patch is made available for all versions of Apple's operating systems. Hence, we map the results for macOS to those from iOS, iPadOS and so on.
Why? Because changes are not necessarily the same for all versions. And we need to locate the root cause the more precisely possible, which means reduce the amount of assembly to analyze.
Thus, we also performed the diff for iOS, with more accurate results: 6 changed functions.
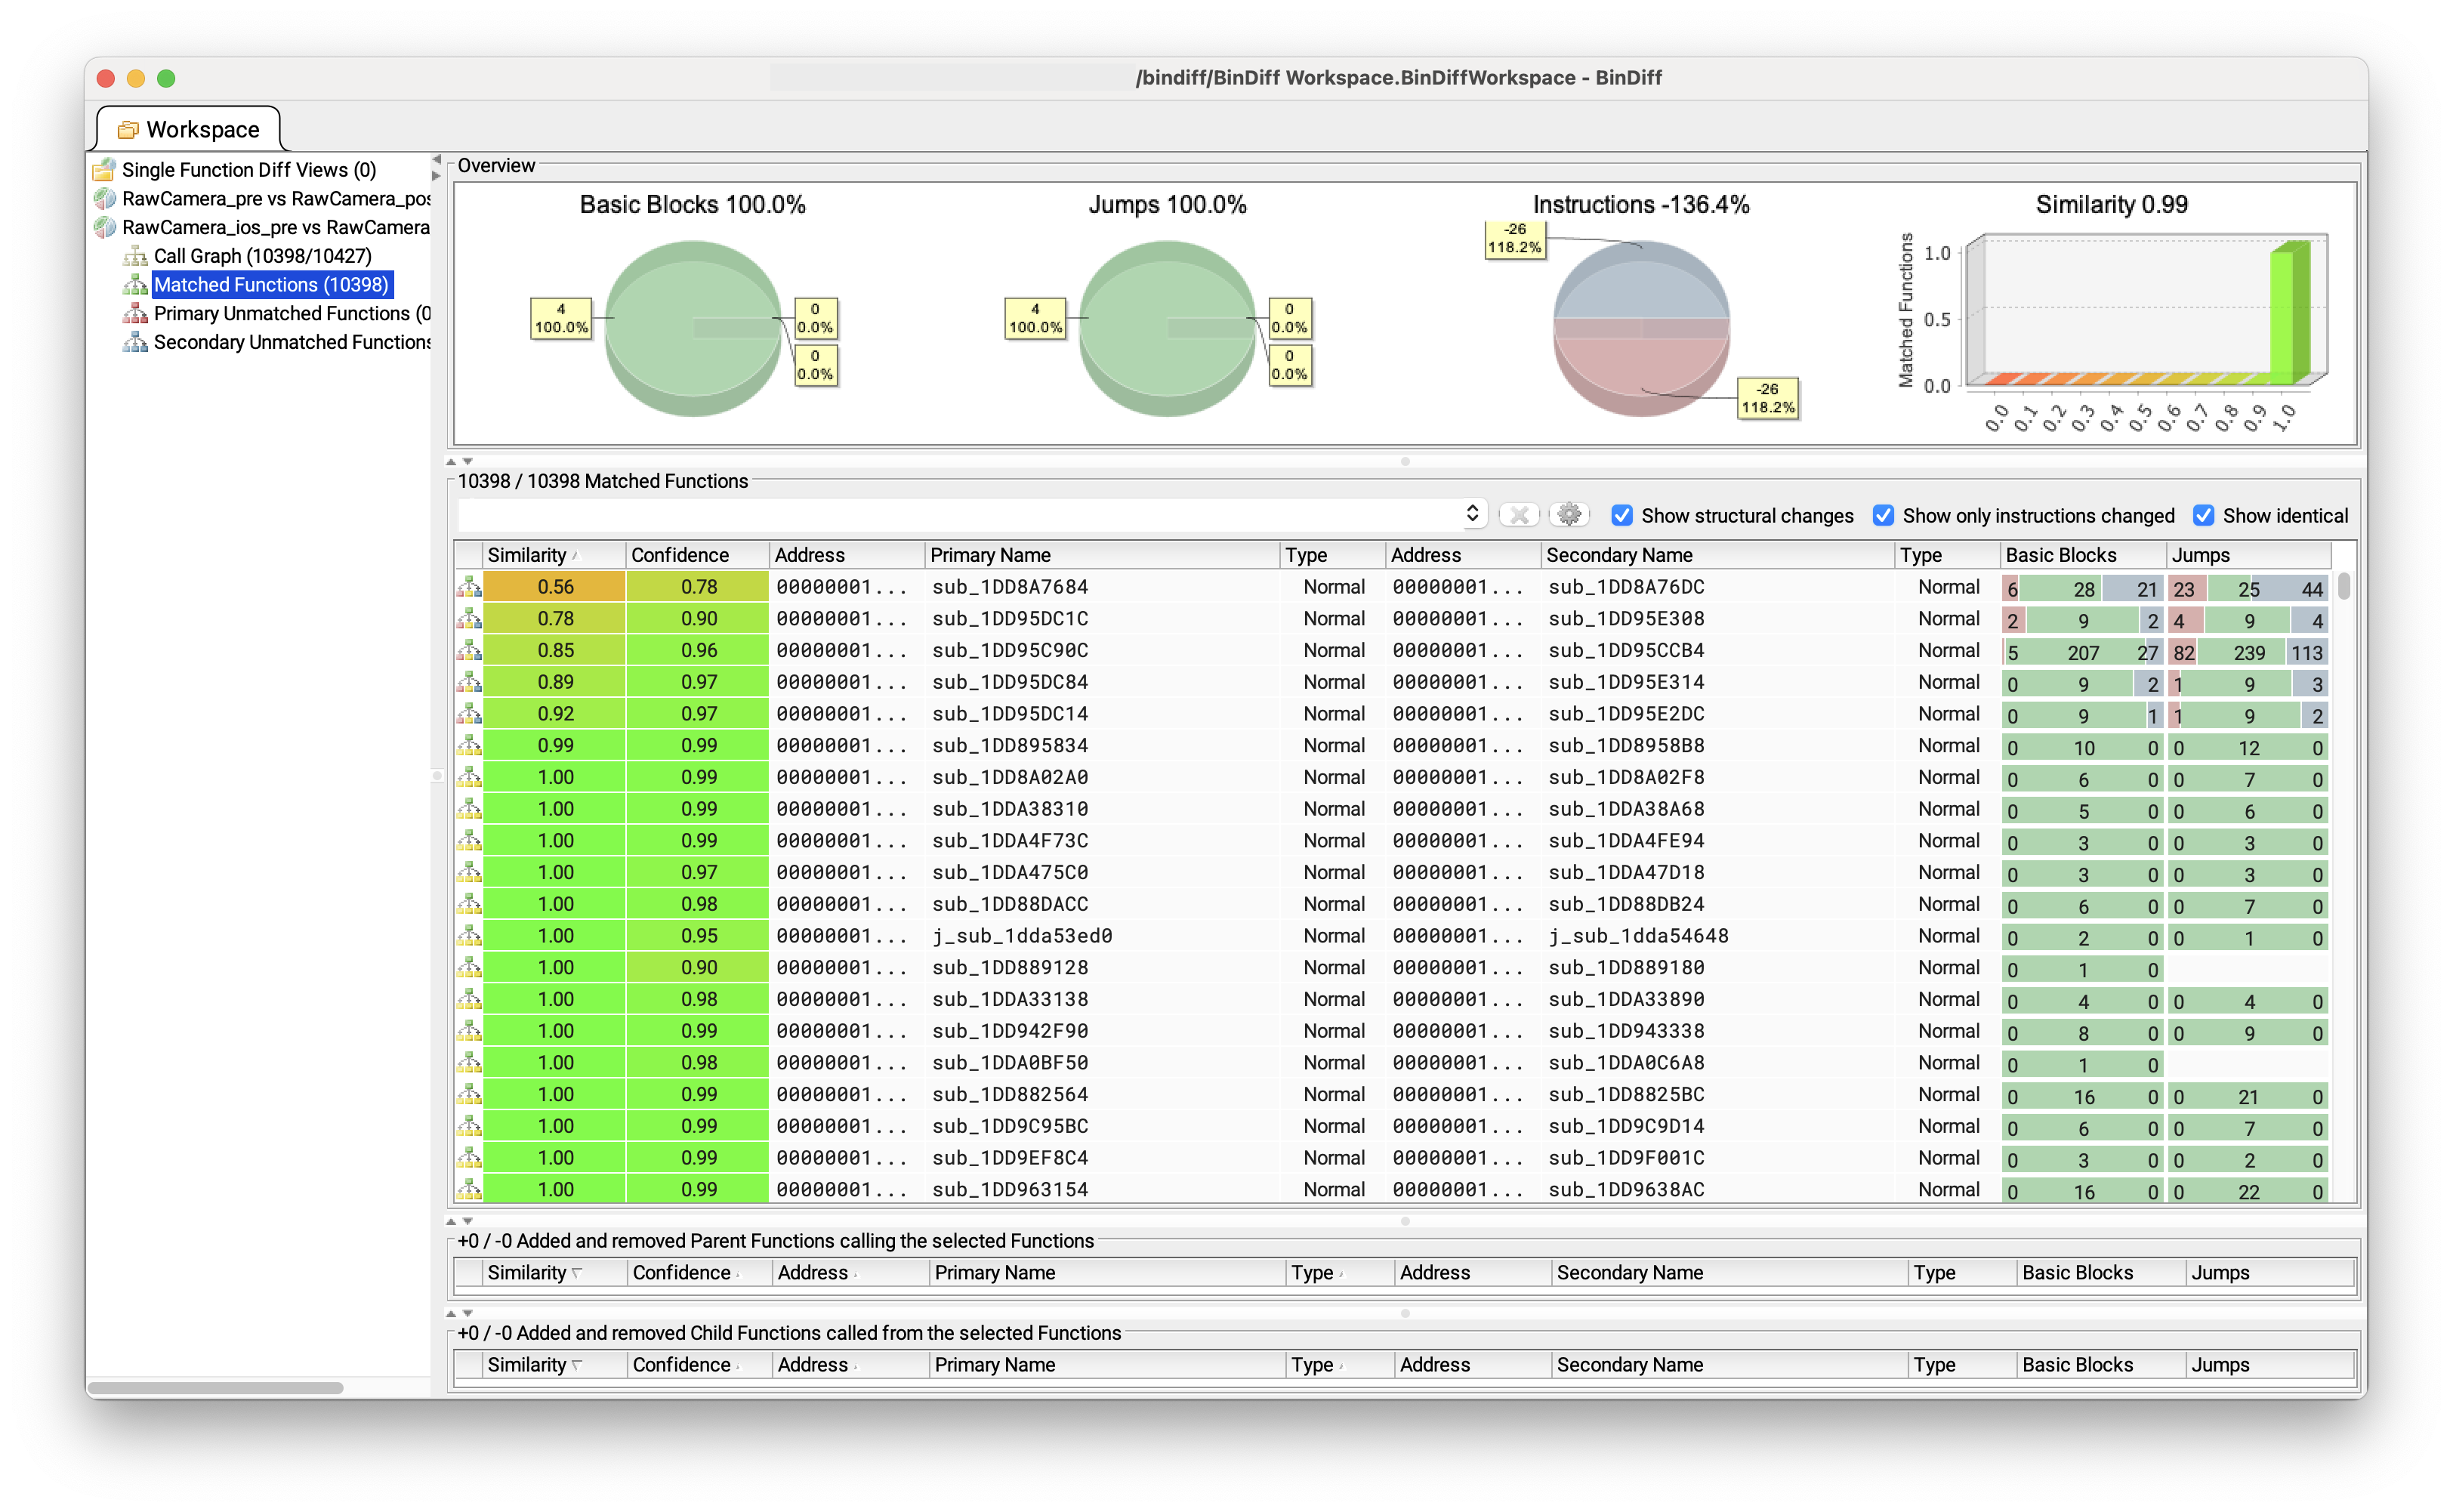
Diffing results for 18.6.1 vs 18.6.2 (iOS)
Out of the 6 functions 4 have unsignificant changes, mainly reordering instructions.
The two remaining functions, sub_1DD95DC1C/sub_1DD95E308 and sub_1DD8A7684/sub_1DD8A76DC went through heavier rework.
Let us focus solely on the sub_1DD95DC1C/sub_1DD95E308 which are the analogous functions of the sub_1B2867120/sub_1B28674F4
on the macOS versions.
We will for now on only consider the macOS version for simplicity since we know where to look. It will make test and debug easier.
Analyzing the modifications
Sometimes, especially for lengthy functions such as this one, BinDiff view can be quite confusing to look at. The simplest and clearest way is just to analyze functions side by side in a disassembler. By performing a shallow high-level basic block review and becoming eventually more specific, we finally spot a basic block which is quite self explaining.
Tip
Whenever you have to analyze adyld_shared_cachebinary, load the entire shared cache. If you load only the binary, the disassembler may be unable to do its magic with classes/methods recovery.
The new version of the function has an additional condition (line 942, right side) that performs a check on the data before going for a another iteration of the loop. We can clearly see that the left-hand size value is a pointer by looking at the previous lines of code. It is used to write somewhere in memory and gets incremented with a step of 2.
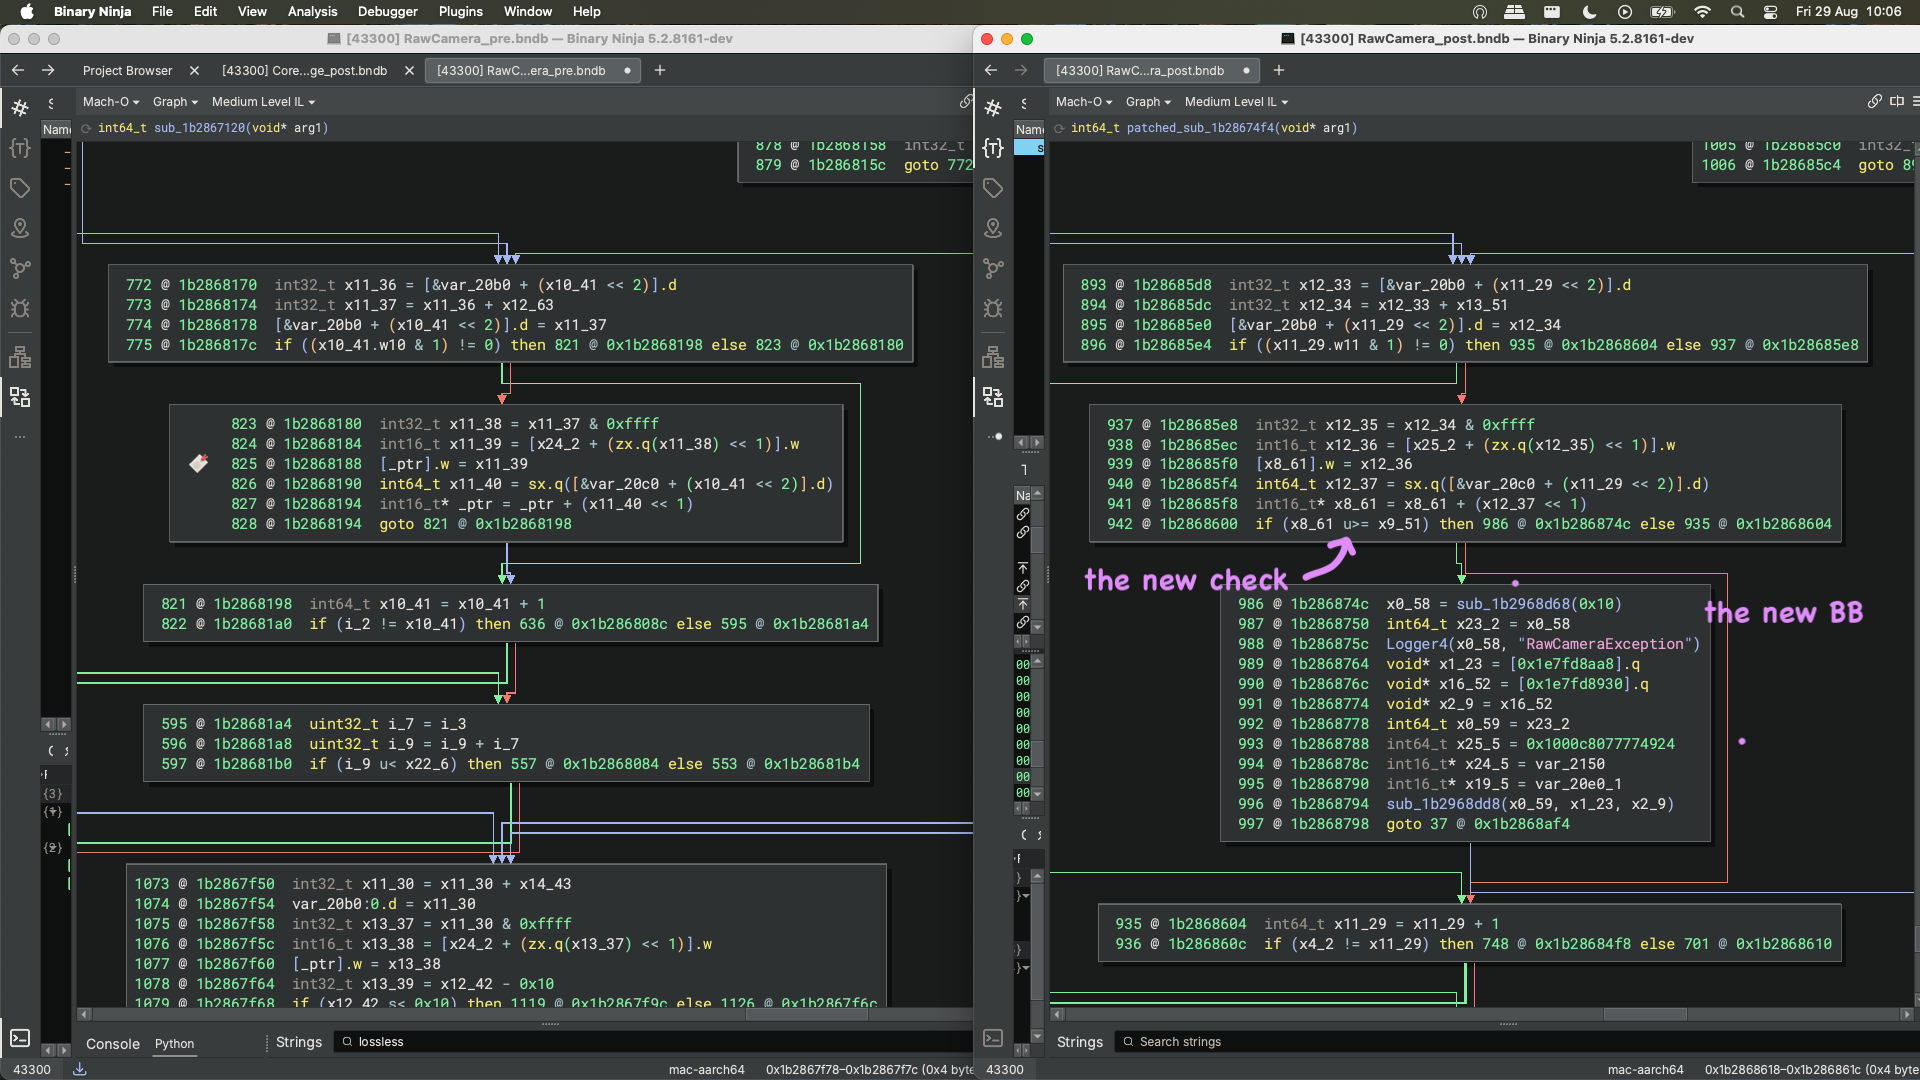
Side by side comparison
If that pointer is greater than some value, the code jumps on a BB handling an exception.
All that smells good, especially considering the fix rationale. Now we need to understand what this check is on, and more importantly, why it is needed.
Fast-paced reversing
Before going any deeper, trying to know more about the target is nearly mandatory. For us, it began by first trying to understand what is going around that function, who's calling it, what arguments it takes...
We quickly spot that many functions mentionned CDNGLosslessJpegUnpacker in their body. This tells us instantly what kind of code this part of the binary is handling.
As was already published by @b1n4r1b01, the code is related to the "unpacking" (meaning decompression) of JPEG Lossless compressed content embedded in DNG files (see next part for details).
We also noticed that the caller of the patched function is part of a C++ like vtable.
We can help ourselves with a script that parses that vtable, creates a structure containing the pointers to the functions, and casts the first parameter (the this pointer) to a generated class we called CDNGLosslessJpegUnpacker. This operation also helps to understand how the function of interest can be reached by looking at the cross references to the vtable.
The goal is to propagate as much as possible the class to generate as many cross references as we could, which helps understanding which code paths lead to our function. The more the insight, the better it is.
The code is making an extensive use of blocks, so we also make sure to include the type where it belongs in the captured arguments, as well as in the associated callback.
This initial phase enabled us to make important observations to understand how to trigger the vulnerability.
First, it turned out the patched function also takes as input the class CDNGLosslessJpegUnpacker.
Second, the patched function doesn't seem to be accessible by a multitude of functions.
After that session of type casting, not so many references are calling the patched function. We use the references to the callers to build a kind of call stack:
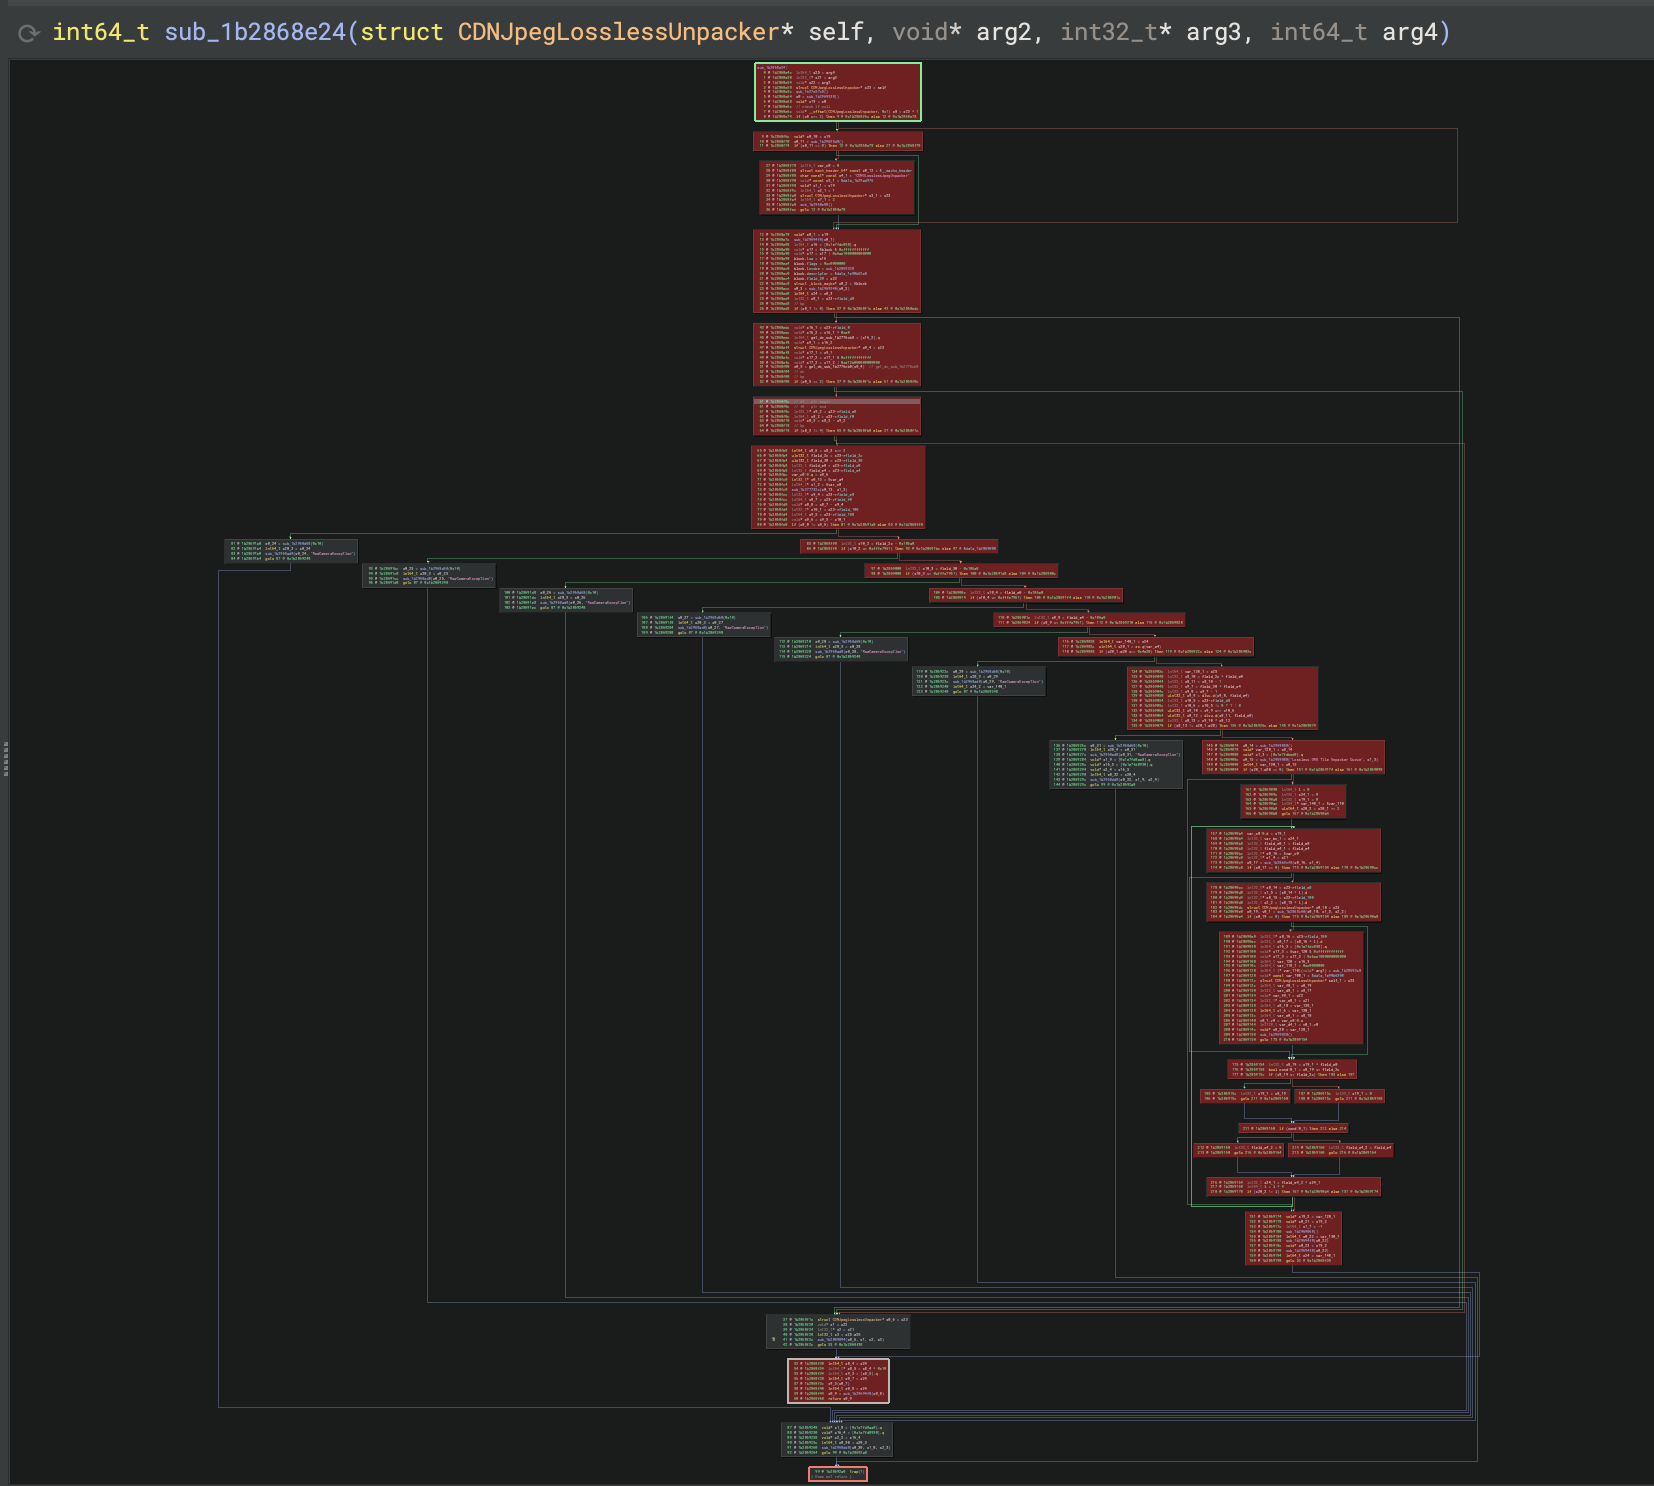
sub_1b2868e24
    calls_caller_of_caller_sub_1b2809094
    calls_caller_of_caller_sub_1b2865c60
        calls_caller_sub_1b2808208
            calls_patched_sub_1b2866f98
                patched_sub
Third, for the patch function to be called, some checks must be validated.
The top level function sub_1b2868e24 enables three different states to proceed to the next function in the stack.
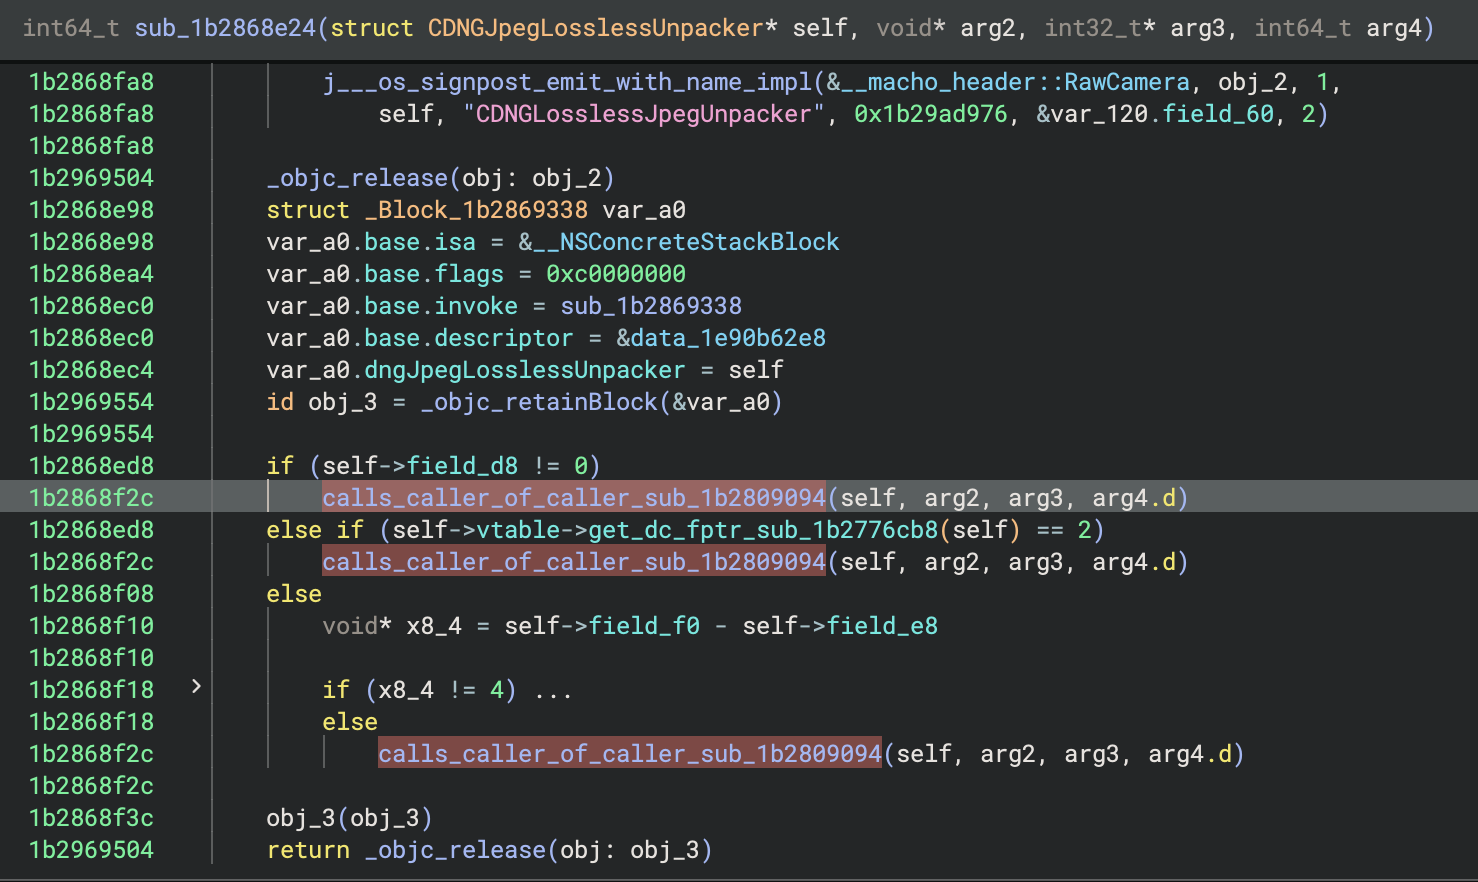
Check that must be satisfied to proceed.
Either:
- The field at offset
0xd8of ourCDNGLosslessJpegUnpackermust NOT be null. - The
field_dcmust be strictly equal to2. - The difference between
field_f0andfield_e8must be strictly equal to4.
The direct caller of the patched function requires one of the first two conditions to be true:
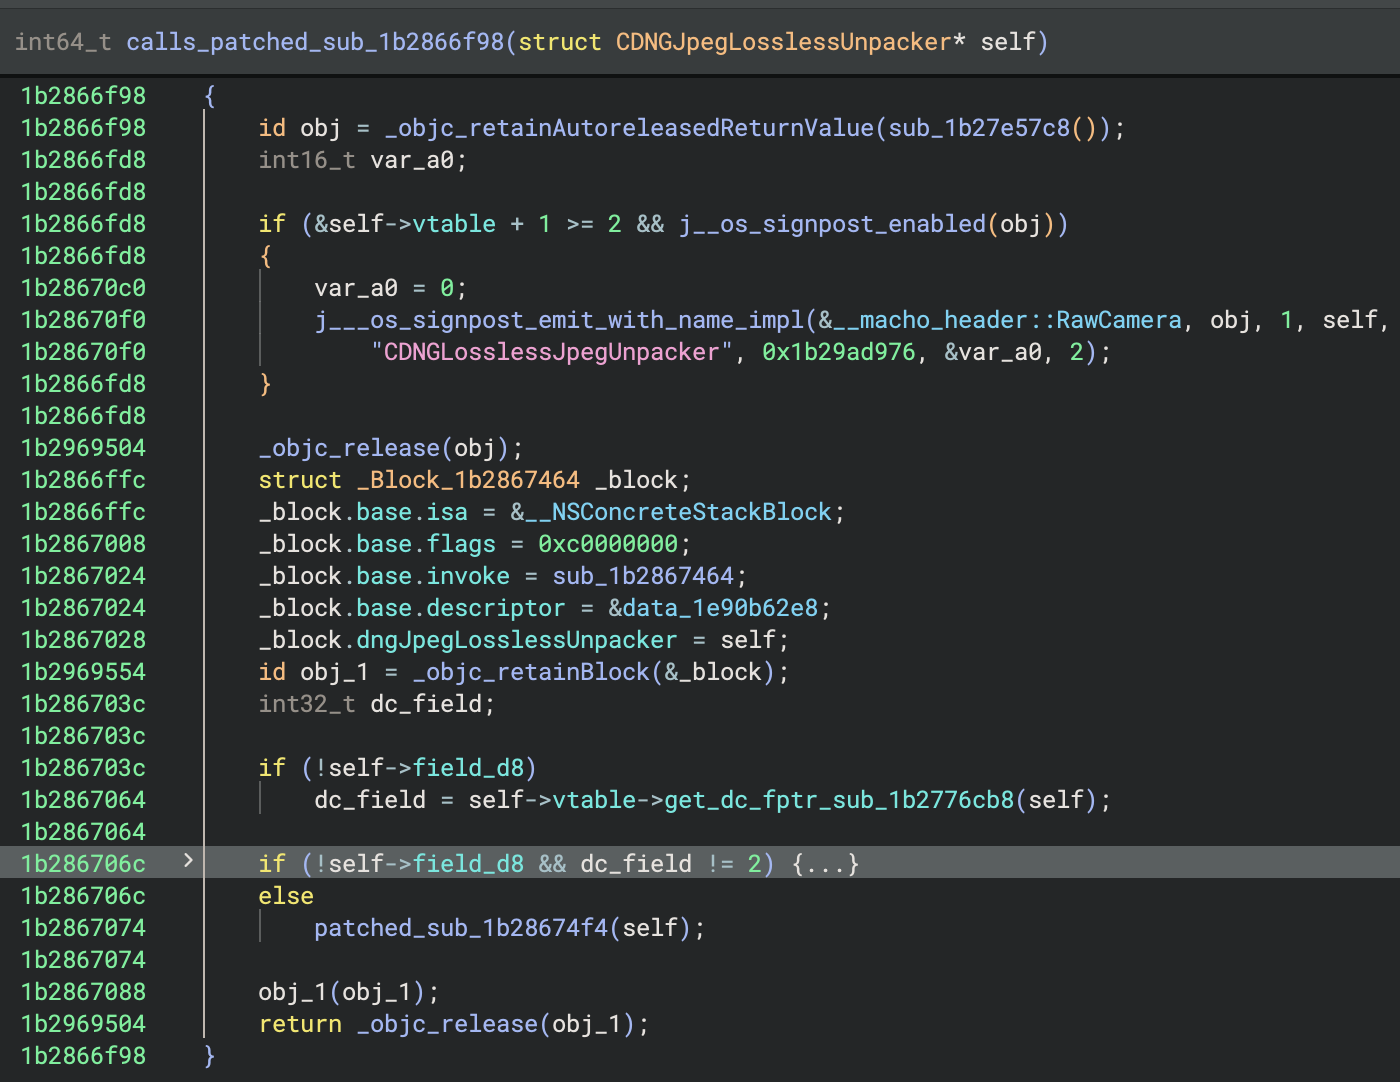
Check that must satisfied to reach the patched function.
The field at offset 0xd8 of our CDNGLosslessJpegUnpacker must be null and field_dc must be equal to 2.
This means that the final checks rely on field_d8 and field_dc. But if field_d8 is not null to satisfy sub_1b2868e24 it won't be able to reach the patched function (if we suppose it cannot change along the way).
The only path, again according to our stack trace, is to have field_d8 set to 0 and field_dc set to 2.
Finally, the top level function sub_1b2868e24 creates a queue called Lossless DNG Tile Unpacker Queue.
To understand the checked values and what that queue name means, let's introduce or remind some key notions. Time to dive into image compression.
Aparté: Pixels, RAW, DNG and JPEG compression
Pixels, channels, samples, and bit depth
An image is made of pixels. Each pixel represents the smallest unit of the image, but a pixel is not just a single number — it is usually described by multiple channels.
A channel (sometimes called a sample in TIFF terminology) is a single numeric value that describes one aspect of the pixel.
In an RGB image, a pixel has 3 channels: red, green, and blue.
In a CMYK image, a pixel has 4 channels: cyan, magenta, yellow, and black (key).
Other formats exist too (e.g. grayscale = 1 channel, RGB + alpha = 4 channels).
So: Samples per pixel (often written SamplesPerPixel) = the number of channels in each pixel:
- RGB = 3
- CMYK = 4
- Grayscale = 1
Each channel stores a number. How precisely that number can represent variations depends on the bit depth (also called bits per sample):
- Bits per sample = how many bits are used to store a single channel value.
- 1 bit => only 2 values (on/off, black/white).
- 8 bits => 256 possible values (common in most images).
- 16 bits => 65,536 values (used in high-quality imaging).
Examples:
A grayscale image with 1 channel and 8 bits per sample:
- SamplesPerPixel = 1
- BitsPerSample = 8
- Each pixel is stored as 1 byte.
An RGB image with 3 channels and 8 bits per sample:
- SamplesPerPixel = 3
- BitsPerSample = 8
- Each pixel is stored as 3 bytes (one per channel).
An RGBA image (RGB + alpha) with 4 channels, 16 bits per sample:
- SamplesPerPixel = 4
- BitsPerSample = 16
- Each pixel is stored as 8 bytes.
In short:
- Pixels are the smallest image unit.
- Samples (channels) are the individual numeric components of a pixel.
- SamplesPerPixel = number of channels in a pixel.
- BitsPerSample = precision of each channel.
Image formats
This vulnerability is triggered by a DNG image, stored in TIFF format using JPEG lossless compression. So, let's look into what it means.
Fortunately, we do not need to dig into all the gory details of each of these formats.
DNG (Digital Negative) is built on the TIFF/EP standard, meaning its internal structure is essentially an extension of TIFF.
TIFF (Tagged Image File Format) is a flexible, tag-based raster image format commonly used for storing high-quality graphics, images, and scans. It supports lossless compression, multiple color spaces, and layers, making it popular in photography, publishing, and archiving.
In TIFF, the actual image data can be organized in two main ways:
- Strips: The image is divided into horizontal bands (rows of pixels grouped together). Each strip is stored as a contiguous block, making it efficient for sequential reading (e.g., scanning line by line).
- Tiles: The image is divided into fixed-size rectangular blocks. This layout allows faster random access to specific regions of an image, useful for very large images or zooming into parts without loading the whole file.
Both strips and tiles can be compressed (e.g., LZW, JPEG) or decompressed, and the choice depends on the application’s need for sequential vs. random access.
Few variables are used to describe these structures:
RowsPerStrip(size in pixels of each strip) orTileLengthandTileWidth.StripOffsets(offsets containing the start of each strip of the image) orTileOffsets.- and
StripByteCounts(size in bytes of each strip) orTileByteCounts.
RAW formats and compression
To preserve the highest standard of quality and get the maximum flexibility for editing, it is possible to keep the image unprocessed. It means that all the actual data captured by the sensor will be stored directly, without any processing. This is commonly known as RAW images.
Those kind of images don't have a common layout nor format. DNG is the Adobe standard for handling RAW images.
However, data in RAW files are huge. There is generally a single channel per pixel but of a high order of bits (generally bigger than 12 bits). Therefore, data inside DNG files are often stored compressed. The DNG format allows the following compression methods:
| ID | Description |
|---|---|
| 1 | Uncompressed data |
| 7 | JPEG compressed data, either baseline DCT JPEG, or lossless JPEG compression |
| 8 | Deflate / Zip |
| 34892 | Baseline DCT (lossy) JPEG |
A lossless JPEG unpacker is needed when working with compressed RAW/DNG files to restore the original pixel data without quality loss.
Woosh, finally done with this.
Let's start a VM, find a proper DNG image and try to reach that code.
The only specific characteristic of that image is related to how data is compressed. We want JPEG Lossless as the compression tag, which is written in the TIFF structure.
Searching for the call stack with a debugger
We now know what are DNG files. We know that the code we look at is specific to the lossless JPEG compression (value 7). Our goal is now to try to reach the vulnerable code.
We took a simple, stupid, straightforward path to do so: debugging Preview, the app in charge of visualizing pretty much everything on macOS, including images. However, Preview is a system app. By setting breakpoints on the functions of the call stack we recreated we can assess if we can reach the patched function.
This method is quick and enables us to get started upfront.
Disabling System Integrity Protection (SIP) is mandatory
Preview is a system app, and as all system applications, they are signed and tamperproof. This is implemented through SIP. Debuggers need to have specific entitlements to debug these processes which can't be provided when that countermeasure is enabled.
First we grabbed a .RW2 file on dpreview.com and converted it with Adobe DNG Converter (losslessy).
We succeeded in triggering the first two breakpoints, but the target function was never reached. It is not easy to understand why, without debugging the target across the various function calls. Nonetheless, this quick first step gave us call stacks, enabling us to better understand which API calls were involved into accessing the RawCamera functions.
Gathering clues with instrumentation
To quickly understand what is executed and what is not, instrumentation is very convenient. We recorded the full execution trace in a file.
We used TinyInst's litecov to perform that. It is able to instrument modules independently and record its coverage in a basic format (module_name+offset) which can be easily interpreted by disassemblers' plugins. In our case we feed the traces to bncov.
Unfortunately, litecov struggled with Preview, and it was not worth the effort.
But now that we have a better idea of what to look at, it is time to write specific code. We developed a small and simple application to display an image, relying on ImageIO framework. That way, we will focus on the code we want to reach the vulnerable function.
The Objective-C application takes a file path, interprets it as a RAW/DNG image, and displays it in a macOS window:
- It converts the input file path (
argv[1]) into anNSURLand uses Core Image’sCIRawFilterto load the RAW image. - The filter produces a
CIImage, which is rendered into aCGImagevia aCIContext. - That
CGImageis wrapped into anNSImage; - The code then initializes an
NSApplication, creates anNSWindowsized to the image, and prepares to show the image inside the window.
#import <Foundation/Foundation.h>
#import <CoreImage/CoreImage.h>
#import <AppKit/AppKit.h>

int main(int argc, const char * argv[]) {
    @autoreleasepool {
        if (argc < 2) {
            NSLog(@"Usage: %s <input.dng>", argv[0]);
            return 1;
        }

        NSString *inputPath = [NSString stringWithUTF8String:argv[1]];
        NSURL *inputURL = [NSURL fileURLWithPath:inputPath];

        // Create CIRawFilter with the DNG file
        CIFilter *rawFilter = [CIFilter filterWithImageURL:inputURL
                                                   options:@{ (NSString *)kCIImageApplyOrientationProperty: @NO }];
        if (!rawFilter) {
            NSLog(@"Failed to create CIRawFilter for file: %@", inputPath);
            return 1;
        }

        // Get output CIImage
        CIImage *ciImage = [rawFilter valueForKey:kCIOutputImageKey];
        if (!ciImage) {
            NSLog(@"Failed to process image.");
            return 1;
        }

        // Create CIContext and generate CGImage
        CIContext *context = [CIContext contextWithOptions:nil];
        CGRect extent = [ciImage extent];
        CGImageRef cgImage = [context createCGImage:ciImage fromRect:extent];
        if (!cgImage) {
            NSLog(@"Failed to create CGImage.");
            return 1;
        }

        // Create NSImage from CGImage
        NSImage *nsImage = [[NSImage alloc] initWithCGImage:cgImage size:NSZeroSize];
        CGImageRelease(cgImage);

        // Set up the application and run loop
        [NSApplication sharedApplication];

        // Create a window to display the image
        NSRect frame = NSMakeRect(0, 0, nsImage.size.width, nsImage.size.height);
        NSWindow *window = [[NSWindow alloc] initWithContentRect:frame
                                                       styleMask:(NSWindowStyleMaskTitled |
                                                                  NSWindowStyleMaskClosable |
                                                                  NSWindowStyleMaskResizable)
                                                         backing:NSBackingStoreBuffered
                                                           defer:NO];
        [window setTitle:@"DNG Image Viewer"];

        // Create an image view and add it to the window
        NSImageView *imageView = [[NSImageView alloc] initWithFrame:frame];
        [imageView setImage:nsImage];
        [imageView setImageScaling:NSImageScaleProportionallyUpOrDown];
        [window.contentView addSubview:imageView];

        // Center and show the window
        [window center];
        [window makeKeyAndOrderFront:nil];
    }

    return 0;
}
And then compile it with:
clang -framework Foundation -framework AppKit -framework CoreImage -o DNGViewer main.m
Collection and analysis of traces
By default, we cannot satisfy the first three checks, thus we are stuck in the first function.
Initial code coverage
According to @b1n4r1b01, the field_dc matches the value of tag SamplesPerPixel. And indeed, by changing that value, we are able to validate the check.
Triggering the vulnerability
Bypassing the checks to reach the vulnerable function is simple compared to understanding what the patched function does, and why it ends up going wrong.
The function is lengthy and does all sorts of decoding and Huffman-related computations. We obviously won't cover every detail performed by the function, but we will go over every important aspects of it and explain how we can finally end up reaching the vulnerable code.
The patched function is in charge of reading and parsing the actual JPEG compressed data, as saved in the file on disk.
It starts by performing tests on important data: StripByteCounts, StripOffsets, etc.
A buffer is allocated in order to store the data, which are read one strip after the other:
while i != stripOffsets:
    buffer_compressed_data = operator_new(self.StripByteCounts + 0x40)
    bzero(buffer_compressed_data, self.StripByteCounts)
    read_compressed_data(buffer_compressed_data, self.StripByteCounts)

    # decoded the data...

    i += 1
It then processes the subsequent JPEG markers one after the other, but only SOF3, DHT, TEM, SOI and SOS.
Markers parsing
SOF3 markers parsing
The SOF3 marker indicates the presence of Lossless Huffman JPEG data. Its structure is as follows:
| Field | Size (bytes) |
|---|---|
| Marker | 2 |
| Length | 2 |
| Precision | 1 |
| ImageHeight | 2 |
| ImageWidth | 2 |
| NumComponents | 1 |
| Components | varies |
The parser ignores nearly every field in the structure except Precision, which is the equivalent of BitsPerSample,
and NumComponents. That latter field gives the number of channels in the encoded data. We'll refer to that field as the components count or number of components.
DHT markers
DHT stands for Define Huffman Table. It indicates the presence of a coded Huffman table (HT). HTs are used to encode pixel differences. They are directly embedded into the file and are required to decode data successfully.
The code iterates on the different DHT present in the file and decodes them. These decoded tables are stored on the stack, ready to be used during the next stage.
The code expects the files to have as many Huffman tables as the declared number of components (one table per channel).
do {
    if (*ptr_huffman_table_decoded_ptr == 0)
        // RaiseException

    // Move to the next table - 64 bits pointer
    ptr_huffman_table_decoded_ptr += 8;
} while (NumComponents-- != 1);
SOS
This is the last marker the parser expects to find in the data. SOS stands for Start of Scan.
This marker indicates the beginning of the compressed data, thus the start of the decompression.
Data decompression
We will skim over most parts of these operations. What really matters is that the code path leading us to the patched code requires:
- The presence of a
SOF3marker. - The number of DHT to match the number of components (
NumComponents). - The
SamplesPerPixelto be 2. - The
NumComponentsto be 1.
That's where the parsing begins. The code takes bytes from the source buffer and performs all sorts of shifts and operations on each byte, using the Huffman table(s). The code is iterating over each row, and for each of them, decompresses it.
Here is the corresponding pseudo-code:
/*
  * WARNING: this is pseudo code to explain the logic in the bug
  * Not the exact code
  */

// For the vuln:
//   - SamplesPerPixel = 2
//   - numComponents = 1

uncompressed = malloc(width * height * SamplesPerPixel);  [1]
output = uncompressed;

for (int h = 0; h < height; h++) [2]
{
    // Uncompress the 1st pixel of the row
    for (int i = 0; i < numComponents; i++) [3]
    {
        /*
         * decompress() extracts one channel (component) only per pixel
         * ptr_compressed_data: the compressed data
         * i: points to the channel
         * n: size of uncompressed data
         */
        n = decompress(output, ptr_compressed_data, i)
        output += n;
    }
    // SamplesPerPixel is 2, and the code assumes numComponent is at least 2
    // But the overflow happens because numComponents == 1
    if (numComponent != 2)  [4]
    {
        // Jump from one pixel to the next
        // Vuln: width*2; <- Should have been width * numComponents
        for (int i = numComponents; i < width*2; i += numComponents) [6]
        {
            // Run through each channel (component) for a given pixel
            for (int j = 0; j < numComponents; j++) [7]
            {
                // BitsPerSample = 16 (2 bytes), so output moves 2 by 2
                n = decompress(output, ptr_compressed_data, i+j)  [8]
                output += n;
            }
        }
    }
    else [5]
    {
        // 2 components exactly
        ...
    }
}
A buffer uncompressed is allocated to get the decompressed image data [1]: the needed memory is considering the number of samples (or components) per pixel. output points where the current decompressed data are written.
A first loop iterates over the height of the image. [2]
Inside, it decompresses each row. It starts with the 1st pixel [3] because an image has at least one pixel.
At the if [4], the code assumes numComponents is at least 2, but should never be smaller.
The else [5] corresponds to exactly 2 numComponents. The code, not written here for simplicity, only calls twice decompress() to get each of the 2 components of the pixel.
Going back to the if [4], this block assumes there are more than 2 components, so it calls a double loop to continue decompressing the row:
- The first loop [6] iterates from pixel to pixel.
- The second loop [7] iterates over the components of the pixel.
And this is the problem as illustrated in the image below. Or actually several problems:
- The condition of the loop [6] over the pixels is wrong:
i < width*2assumes there are only 2 components. We suspect it relies on theSamplesPerPixelvalue. decompress()[8] returns alsoSamplesPerPixel(=2) instead of only 1 (numComponent).
The consequence is that for each loop on the height we write the double of what is expected ... leading to the write OOB.
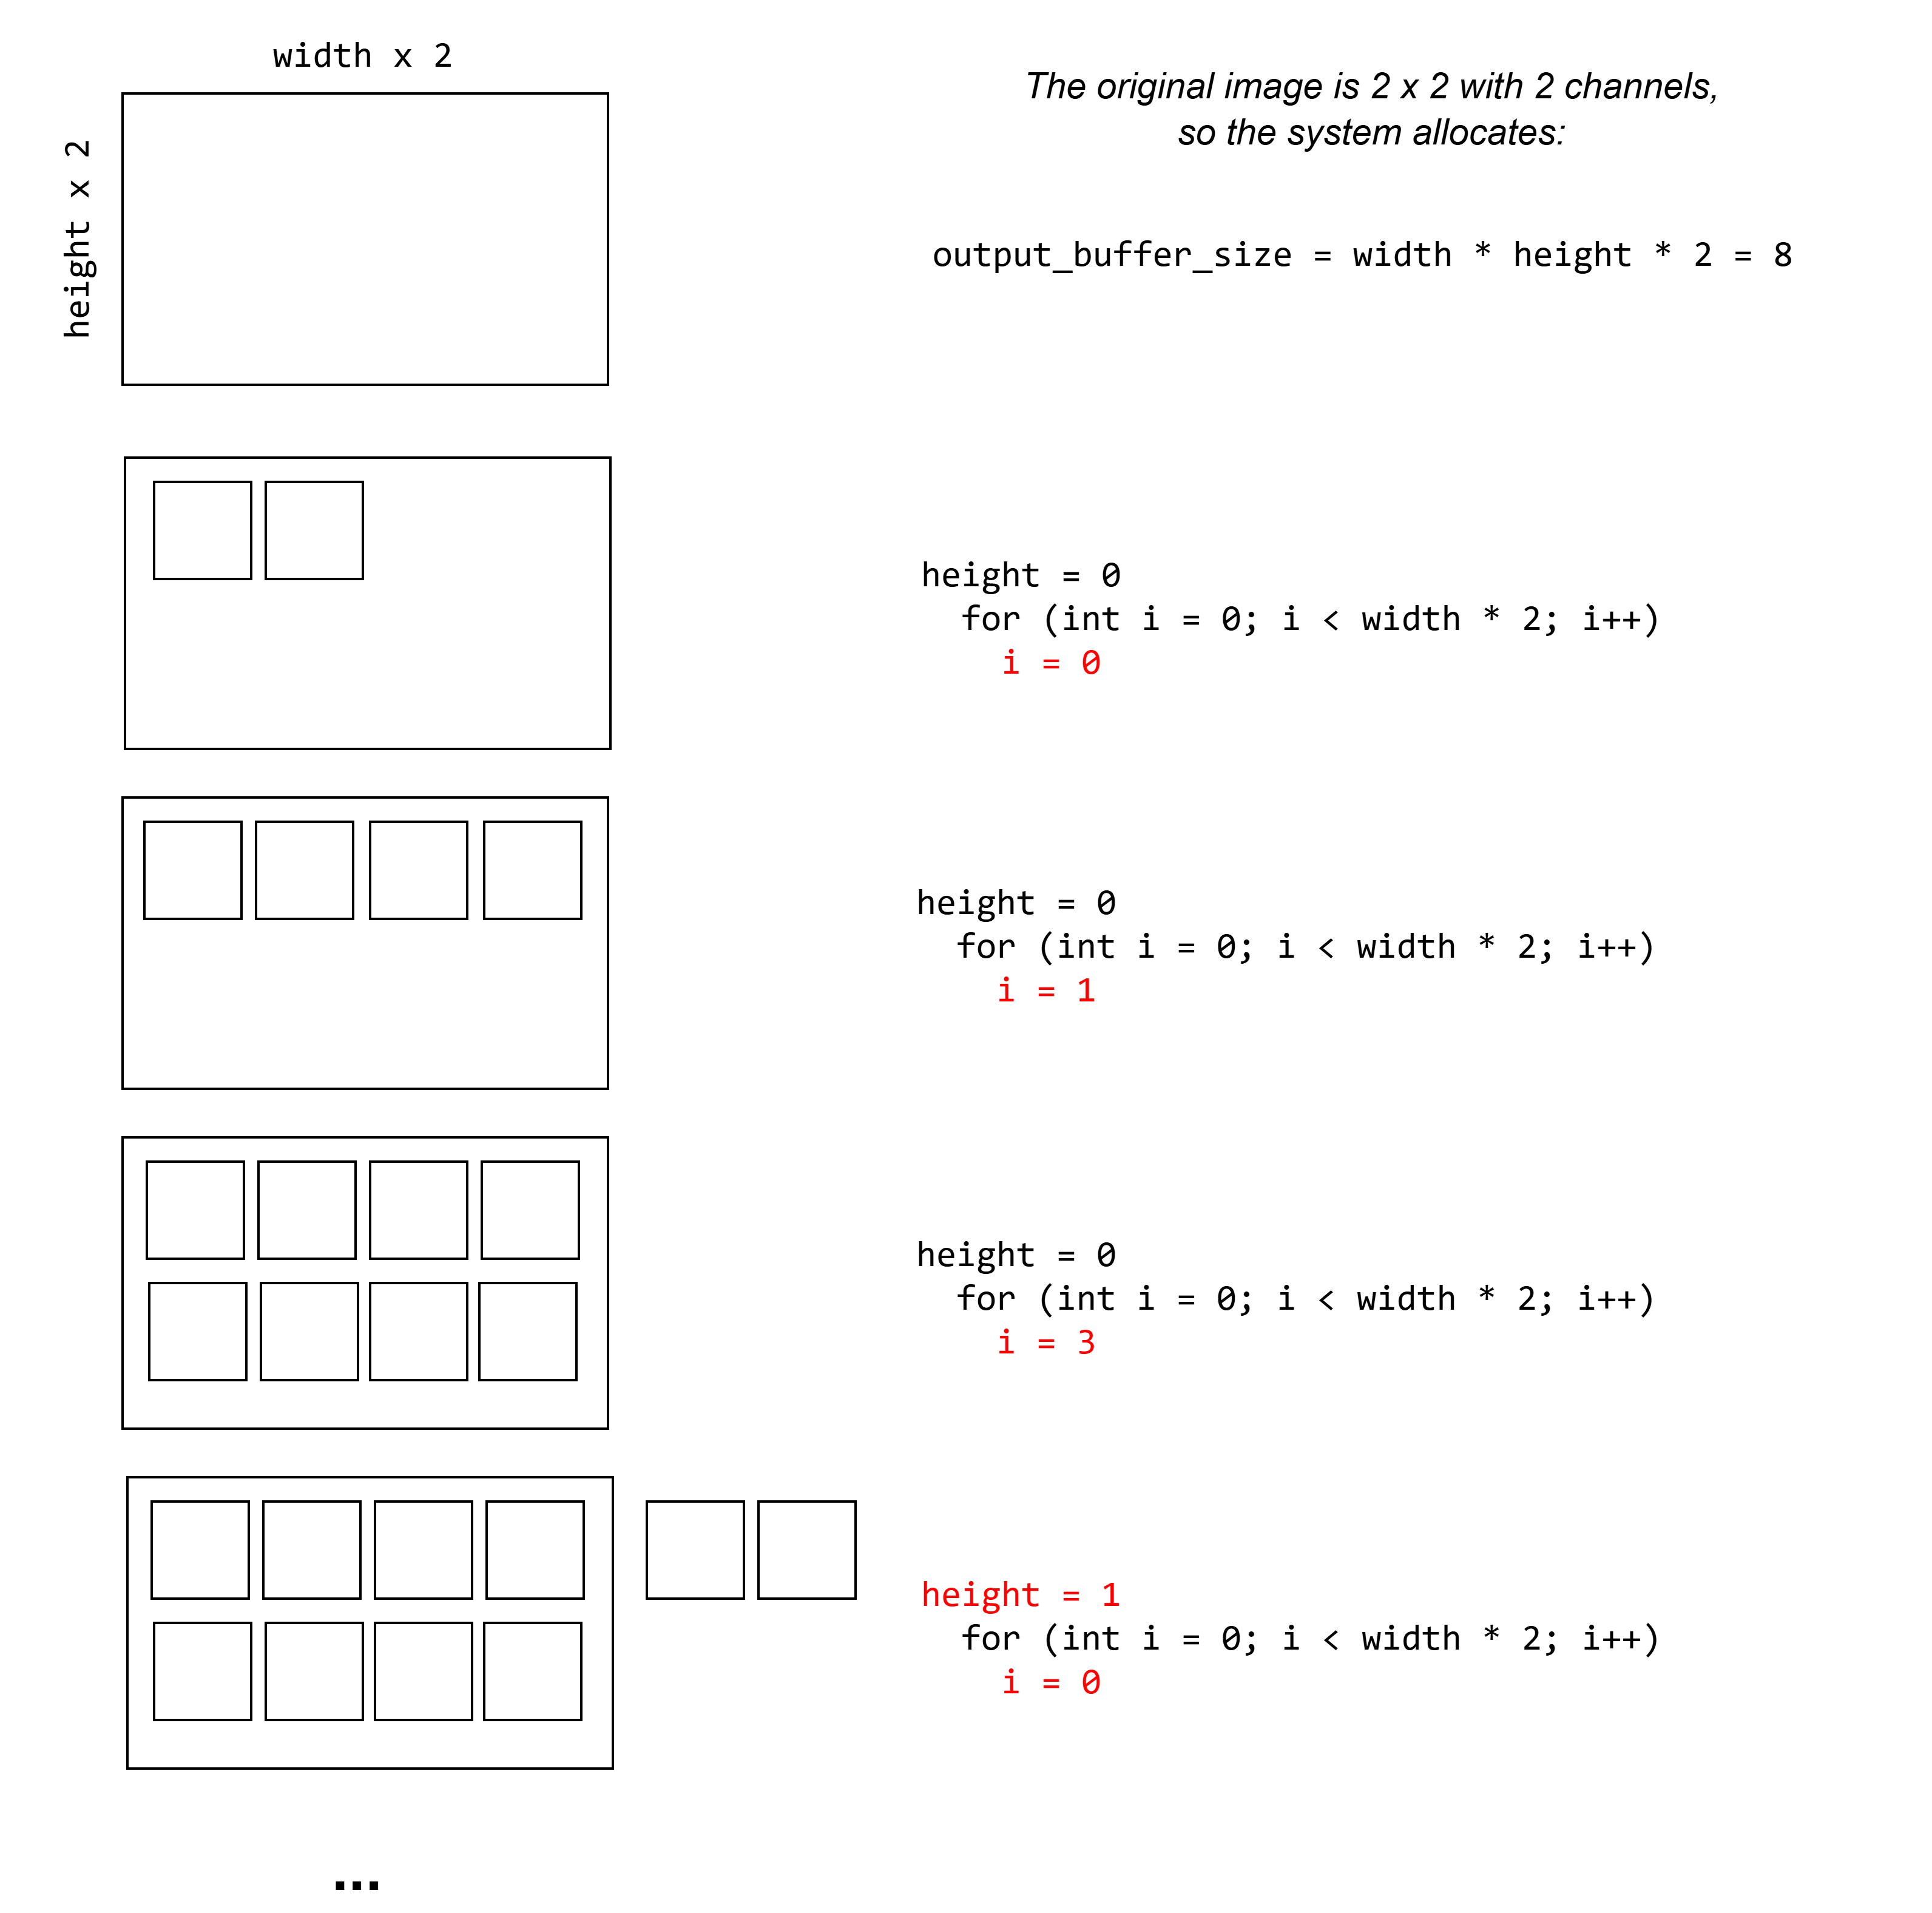
Decompressing channels and pixels leading to write OOB
Apple's patch
To fix this issue, two new functions are called: one allocates a buffer, the other retrieves its size. The buffer size is verified in a new check each time the code writes to the output buffer. An exception is raised when the buffer exceeds its bounds.
Conclusion
Image formats are tricky. Vulnerabilities in parsers are not so uncommon, and when they happen, they usually are very valuable.
Here, the image is processed when received, no user interaction needed. It can be sent by SMS, iMessage, Whatsapp, the delivery method does not really matter... except that some of them might modify the image (for its quality, to remove / add some metadata...)
Diving into the image processing on an operating system opens a world of complex mechanisms, from how the rendering is triggered to compression and parsers.
Once we understand the logic behind the bug, it seems obvious considering the size allocated and the component variable. Finding that by reading the code, or the assembly, is sure tricky. We strongly assume it was found with a fuzzer.
Acknowledgements
Many thanks to pappy for the guidance, for the advices and for the time he dedicated to proofread this article.