This post deals with the new features in IRMA 1.3.0 released earlier this month, from both a user and a contributor point of view.
Intro
For those still wondering what is IRMA, let me introduce it. IRMA is an open-source malware analysis framework focusing on privacy so that submitted files are not shared with any 3rd party, but instead stay under your control. Each tool (e.g. antivirus, sandbox) able to perform a file analysis can be turned into an IRMA plugin (named probe). When a file is submitted to IRMA, it is sent to all running probes. Then, probe results are sent back and stored in a database and available through a WEB API. Every virtual machine running making IRMA runs on your hardware, and all files are kept locally.
IRMA is built to be customized: adding a new probe, changing results view or displaying results content should be done quickly (for more information visit IRMA website).
What's new in IRMA 1.3.0
New standalone Python command line module named irma-cli
File tagging
Automatic probe selection based on file MIME type using a Scheduler
Possibility to generate files from probes. These new files are also scanned
Setup
Before starting with the new features list, take a moment to download the virtual appliance (801 Mb) which will allow you to try these new features.
Each feature is described from a user point of view (section User PoV) but also explained with more details in case you want to use them as a contributor (section Contributor PoV).
Standalone Command line tool
User PoV
Since v1.0, irma is shipped with a Python module to interact with the API. But all the API routes were not supported and there was no object deserialization nor documentation.
A new repository, named irma-cli has been created to host our new command line module. The version numbering follows the API version supported. The table below provides a quick overview of the different IRMA releases with their respective versions for both API and irma-cli.
| Irma Version | API version | irma-cli version |
|---|---|---|
| <1.2.0 | Not versionned | NA |
| 1.2.0 | 1.0 | 1.0 |
| 1.2.1 | 1.0 | 1.0 |
| 1.3.0 | 1.1 and 1.0 | 1.1 or 1.0 |
As you noticed version 1.3.0 introduced a new API version but we have kept backward compatibility with the older version. Both API versions are available simultaneously.
Install it directly with pip:
$ pip install git+https://github.com/quarkslab/irma-cli.git
Then create a configuration file irma.conf with the following content:
[Server]
address=172.16.1.30
max_tries=1
pause=3
You could use an interactive Python session to play with IRMA:
>>> from irma.helpers import *
>>> probe_list()
[u'StaticAnalyzer', u'Unarchive', u'VirusBlokAda', u'VirusTotal']

>>>  scan_files(["./irma/tests/samples/eicar.com"], force=True, blocking=True)
Scanid: ca2e8af4-0f5b-4a55-a1b8-2b8dc9ead068
Status: finished
Options: Force [True] Mimetype [True] Resubmit [True]
Probes finished: 2
Probes Total: 2
Date: 2015-11-24 15:43:03
Results: [<irma.apiclient.IrmaResults object at 0x7f3f250df890>]

>>> scan = _
>>> print scan.results[0]
Status: 1
Probes finished: 2
Probes Total: 2
[...]
Resultid: 572f9418-ca3c-4fdf-bb35-50c11629a7e7
[...]

>>> print scan_proberesults("572f9418-ca3c-4fdf-bb35-50c11629a7e7")
Status: 1
Probes finished: 2
Probes Total: 2
Scanid: ca2e8af4-0f5b-4a55-a1b8-2b8dc9ead068
Scan Date: 2015-12-22 14:36:21
Filename: eicar.com
Filepath: ./irma/tests/samples
ParentFile SHA256: None
Resultid: 572f9418-ca3c-4fdf-bb35-50c11629a7e7
FileInfo:
Size: 68
Sha1: 3395856ce81f2b7382dee72602f798b642f14140
Sha256: 275a021bbfb6489e54d471899f7db9d1663fc695ec2fe2a2c4538aabf651fd0f
Md5: 44d88612fea8a8f36de82e1278abb02fs
First Scan: 2015-11-24 14:54:12
Last Scan: 2015-12-22 14:36:21
Id: 3
Mimetype: EICAR virus test files
Tags: []

Results: [<irma.apiclient.IrmaProbeResult object at 0x7f3f250b9dd0>, <irma.apiclient.IrmaProbeResult object at 0x7f3f250b9850>]

>>> scan_result = _
>>> print scan_result.probe_results[0]
Status: 1
Name: VirusBlokAda (Console Scanner)
Category: antivirus
Version: 3.12.26.4
Duration: 1.91s
Results: EICAR-Test-File
For more information on deserialized objects and fields meaning see the doc.
Contributor PoV
As a contributor you can also use irma-cli to test your modifications. Clone the irma-cli repository and launch the tests:
$ git clone https://github.com/quarkslab/irma-cli.git
$ cd irma-cli
$ virtualenv venv
$ ./venv/bin/python setup test
test_file_search_hash (irma.tests.test_api.IrmaAPIFileTests) ... ok
test_file_search_hash_name (irma.tests.test_api.IrmaAPIFileTests) ... ok
test_file_search_limit (irma.tests.test_api.IrmaAPIFileTests) ... ok
test_file_search_name (irma.tests.test_api.IrmaAPIFileTests) ... ok
test_file_results_formatted (irma.tests.test_api.IrmaAPIScanTests) ... ok
[...]
Tags
Tags are a convenient way to easily classify files. Tagging a file is now possible in IRMA thanks to deloittem.
Creating a tag
User PoV
You can create tags by using the command line tools
>>> from irma.helpers import *
>>> tag_list()
[]

>>> tag_new("archive")
{u'text': u'archive', u'id': 1}

>>> tag_list()
[Tag archive [1]]
or directly from your terminal by using curl and posting a JSON with 'text' key:
$ curl -H "Content-Type: application/json; charset=UTF-8" -X POST -d '{"text":"<your tag>"}' http://172.16.1.30/api/v1.1/tags
Note: Creating a tag directly from the web IHM is not supported.
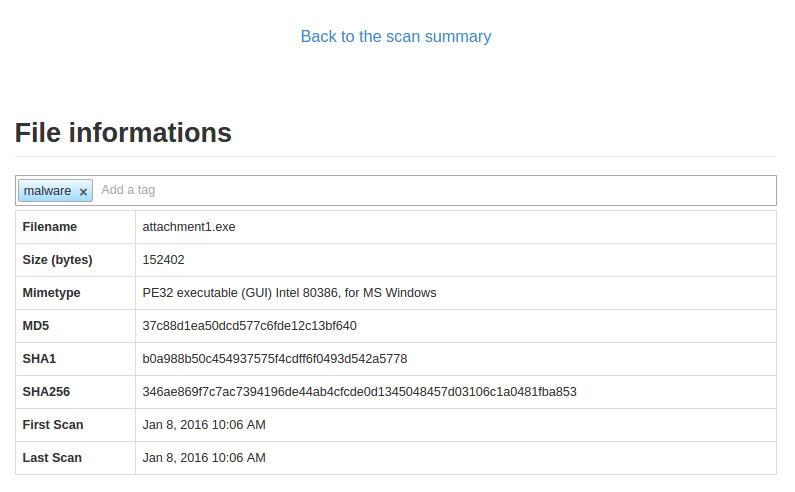
Tagging a File
Directly in the web IHM, once you are on a file details page:

Just click the tag bar and you will see all available tags. You could add multiple tags per file.
It is also possible to add a tag through command line tools:
>>> from irma.helpers import *
>>> file_tag_add?
Signature: file_tag_add(sha256, tagid, verbose=False)
Docstring:
Add a tag to a File

:param sha256: file sha256 hash
:type sha256: str of (64 chars)
:param tagid: tag id
:type tagid: int
:return: No return

>>> file_tag_add("346ae869f7c7ac7394196de44ab4cfcde0d1345048457d03106c1a0481fba853",1)
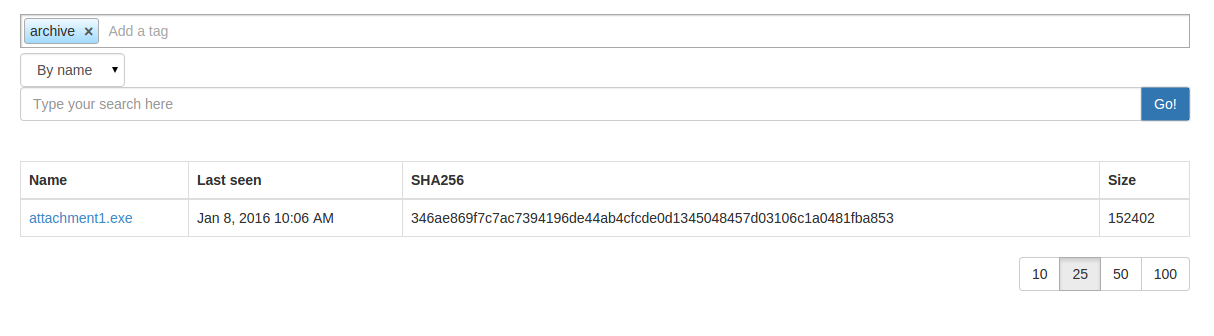
Searching by tag
You can specify one or more tags while searching for files too:
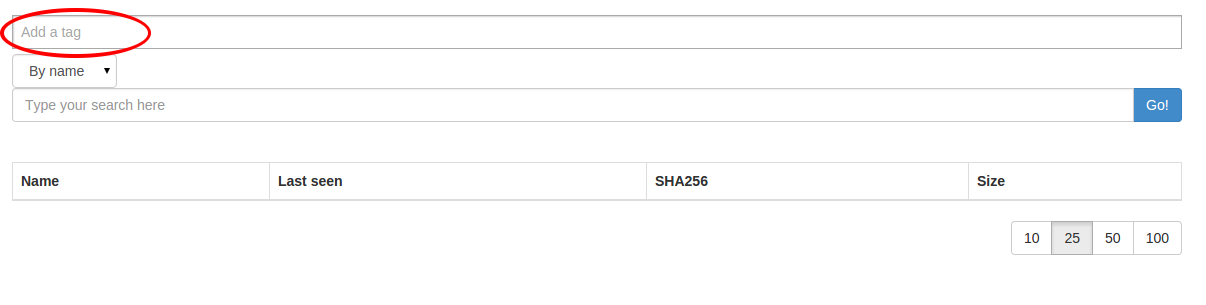
choose your tag list then hit the search button:
or by command line:
>>> from irma.helpers import *
>>> file_search(tags=[1])
(1, [<irma.apiclient.IrmaResults at 0x7f079ca23890>])
Scheduler Part.1
One of the most important new feature in version 1.3.0 is called the scheduler. It makes it possible to schedule the analysis based on the files mime type. When a file is submitted to the frontend, its mime type is extracted with python-magic. Before the scan launch, each mime type is sent to the brain to receive the corresponding probe list that supports this mime type to avoid format error. No need to submit a PDF file to a PE Static analysis probe for example.
User PoV
This behavior is enabled by default through the WebUI and could be disabled only in command line mode for the time being.
>>> from irma.helpers import *
>>> scan_launch??
Signature: scan_launch(scan_id, force, probe=None, mimetype_filtering=None, resubmit_files=None, verbose=False)
Source:
def scan_launch(scan_id, force, probe=None,
                mimetype_filtering=None, resubmit_files=None, verbose=False):
    """Launch an existing scan

    [...]
    :param mimetype_filtering: enable probe selection based on mimetype
        (optional default:True)
    :type mimetype_filtering: bool
    [...]
    """
Contributor PoV
If you are interested in developing your own probe, the complete guide written by kamino is still working. The only thing to add is a regular expression to define the mime type that your probe supports.
Example: (extract from PE static analyzer)
class PEAnalyzerPlugin(PluginBase):

    [...]
    _plugin_mimetype_regexp = 'PE32'
The regular expression is then sent to the brain when the probe registers itself. And used like this on brain: (cf. brain task code)
if regexp is None or \
          re.search(regexp, mimetype, re.IGNORECASE) is not None:
     probe_list.append(probe_name)
Scheduler Part.2
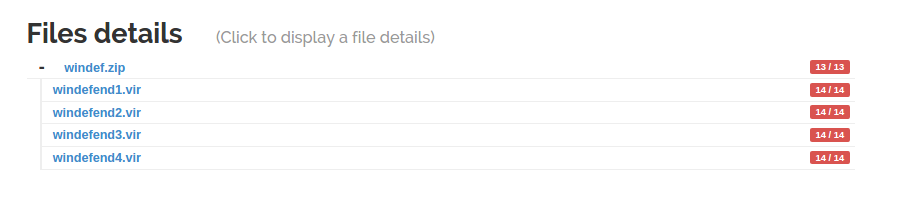
The second feature introduced by Scheduler is the ability for a probe to output files and send them for analysis to the frontend. To illustrate this new feature, irma 1.3.0 is now shipped with an unarchiver probe. All files inside an archive are extracted and submitted to the frontend for analysis.
User PoV
Let's submit an archive through the WebUI.

As soon as the unarchiver probe finishes, the children files are linked to the archive and their analysis starts.
Contributor PoV
If you are planning to develop a probe that outputs files, just add these two extra keys to your result dictionary:
extract from unarchiver plugin
results.output_files = {}
results.output_files['output_dir'] = output_dir
results.output_files['file_list'] = file_list
the code running in the main celery task file uploads them and adds an extra key to alert the frontend of new files available.
Conclusion
We hope this new feature tour of version 1.3.0 has convinced you to give it a try as a user or as a contributor. In any case if you need help, you could reach us on IRC #qb_irma @freenode, see you there!