IRMA (Incident Response & Malware Analysis) is a multi-scanner framework for identifying and analyzing suspicious files. In this article, we describe, step by step, how one can contribute to this open-source project by integrating his own analyzer.
Introduction
Even nowadays, many of the sophisticated attacks still manage to penetrate computers with antivirus programs installed. This single product has become insufficient to keep your computer safe against increasingly savvy attackers. To counter new threats, security software companies are providing a central platform where suspicious files can be analyzed on multiple file analysis engines such as antivirus programs, sandboxes, etc. IRMA (Incident Response & Malware analysis) is such a platform, with the difference that, compared to online solutions, you keep control over where your files go and who gets your data. Indeed, as a valuable company, you may not want your documents being submitted to external analysis platforms for obvious confidentiality matters. IRMA is an open-source piece of software: anyone can modify it as her will to fit perfectly to her needs, choose who can have access to it and once installed on your network, your data stays on your network.
IRMA can be simply defined as a framework. Probes are modules that give it analytical capabilities. This article describes step by step how to add a new probe to the existing framework and contribute to the community. As a toy example, you will add a module for Marco Pontello's TrID tool, an utility designed to identify file types from their binary signatures. For those of the readers who attended to our workshop at HITB KUL and Hack.lu, materials presented here are not quite new but we never managed to fully cover what we wanted during the workshops nor had time to clean up the TrID module for a merge into the mainline.
Setting-Up a Development Environment
We had a hard time to make the installation of IRMA user-friendly with Debian packages because of the numerous configuration files that are generated from user inputs at post install time. As of version 1.1.0, we decided to drop the support for Debian packages, even if there are still some residues in the source code. The installation and the configuration of the whole platform is now automated using Vagrant and Ansible. In this section, we cover how to set-up the development environment.
Prerequisites
To benefit from the automated installation of IRMA, a few tools have to be installed first. We assume that the reader is running a 64-bit Debian, in stable version.
Vagrant
Vagrant is a wrapper tool around virtualization software such as KVM, VirtualBox, VMware. It creates and configures lightweight, reproducible, and portable development environments. With few commands, it pulls a template from a specific location (locally, from vagrantcloud.com or from a specified URL), creates an instance of this template and configures it according to the provided Vagrantfile, Vagrant's configuration file.
As the version provided in the Debian repositories is rather old (1.0.3 at the time of writing), we recommend to install Vagrant from the packages provided on Vagrant's download page:
$ curl -L https://dl.bintray.com/mitchellh/vagrant/vagrant_1.7.2_x86_64.deb -O
$ sudo dpkg -i vagrant_1.7.2_x86_64.deb
$ vagrant --version
Vagrant 1.7.1
Ansible
Ansible is an automation tool (similar to Chef, Puppet or SaltStack) that handles server provisioning, configuration management and application deployment. Tasks are specified in playbooks written in YAML.
Debian backport repository holds a version of Ansible (1.7.2) compatible with IRMA's playbooks. However, one may prefer to install the latest version via the Python package manager pip:
$ sudo apt-get update
$ sudo apt-get install python-pip
$ sudo pip install ansible
$ ansible --version
ansible 1.8.2
  configured module search path = /usr/share/ansible
VirtualBox
From the beginning, Vagrant comes with the support for VirtualBox (version 4.0.x and upwards), the free and cross-platform virtualization product. Support for providers for other virtualization software are available as plugins.
VirtualBox 4.1.18 is provided in the Debian stable repositories whereas VirtualBox 4.3.14 is available in the backports repositories. If you do not have Debian's backports as package source, let us add it first:
$ cat << EOF | sudo tee -a /etc/apt/sources.list.d/wheezy-backports.list
deb http://ftp.debian.org/debian/ wheezy-backports main contrib
EOF
$ sudo apt-get update
Then, you can install VirtualBox with the following commands:
$ sudo apt-get -t wheezy-backports install virtualbox
$ vboxmanage --version
4.3.14_Debianr95030
Getting the Source Code
IRMA has been designed as a 3 part system, with a frontend, a broker referred to as brain, and multiple analysis engines called probes. Each subsystem has its own dedicated source code repository.
Overview of the Source Code Repositories
As the reader will modify several parts of IRMA along this article, let us describe the main repositories you will be dealing with:
irma-frontend: holds the web and the CLI frontend, used to submit files and to display their analysis results.
irma-brain: holds the broker application that dispatches frontend-initiated analysis requests to the analysis engines.
irma-probe: holds the analysis modules.
irma-ansible: holds the Vagrant and Ansible automation scripts.
We have a few more repositories that are worth mentioning only for the record:
irma: holds the documentation for IRMA's subsystems. An online version is available at irma.rftd.org.
debian-vm: holds the scripts to generate the virtual machine template used for IRMA.
Preparing the Environment
To keep things organized, you can create a workspace dedicated to IRMA first:
$ mkdir irma-dev
$ cd irma-dev
Then, clone the automation scripts available in the irma-ansible repository and download the required Ansible roles. Ansible roles allows to break up server configuration into more modular steps: it is a group of tasks meant to be shared with other users (e.g., installation and configuration of web servers, user handling, etc.). Ansible Galaxy references roles that are shared to the Ansible community. One can download them via the ansible-galaxy tool:
$ git clone --recursive https://github.com/quarkslab/irma-ansible
$ pushd irma-ansible
$ ansible-galaxy install -r ansible-requirements.yml
$ popd  # you are back to irma-dev folder
As you are setting up a development environment for IRMA, the source code for the 3 subsystems will be synchronized from our workspace to the virtual machine instead of being cloned from the repositories hosted on github.com, thus enabling us to quickly push some code into the virtual machine. From irma-ansible/environments/allinone_dev.yml, you can see that ../irma-brain, ../irma-probe and ../irma-frontend are rsync-ed to /opt/irma/.
Currently, these folders are not available in our workspace yet. To make them available, you need to clone the repositories and get a minimal environment to spawn the allinone_dev environment:
$ git clone --recursive https://github.com/quarkslab/irma-frontend
$ git clone --recursive https://github.com/quarkslab/irma-brain
$ git clone --recursive https://github.com/quarkslab/irma-probe
Please note that several environments are provided with irma-ansible scripts:
prod.yml: production-ready environment that creates 7 virtual machines: a brain, a frontend and multiple probes. The source code is fetched from github.com repositories.
allinone_prod.yml: production-ready environment that installs the frontend, the brain and the probes in a single virtual machine named brain.irma. The source code is fetched from github.com repositories.
dev.yml: development-ready environment that creates 7 virtual machines: a brain, a frontend and multiple probes. The source code is synchronized from our workspace.
allinone_dev.yml: development-ready environment that installs the frontend, the brain and the probes in a single virtual machine named brain.irma. The source code is synchronized from our workspace.
For the purpose of this article, we choose to set up the lightest development environment (allinone_dev).
Automatic Installation of the Platform
Create the development environment and run the automation scripts:
$ pushd irma-ansible
$ export VM_ENV=allinone_dev  # you tell Vagrant to choose the allinone_dev environment
$ vagrant up
$ popd
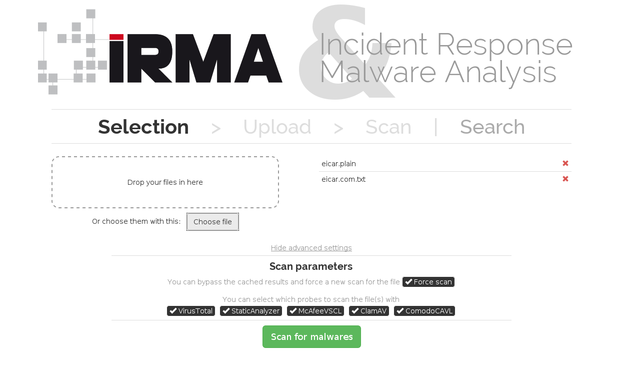
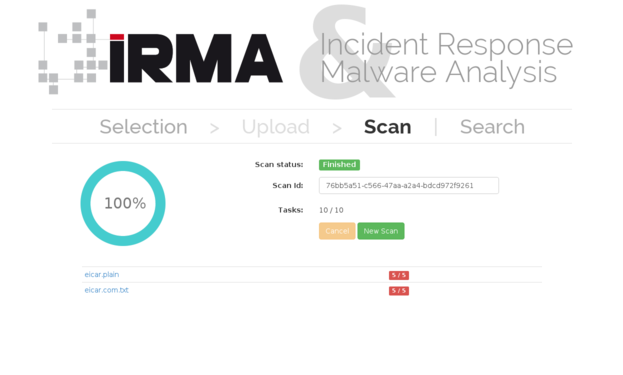
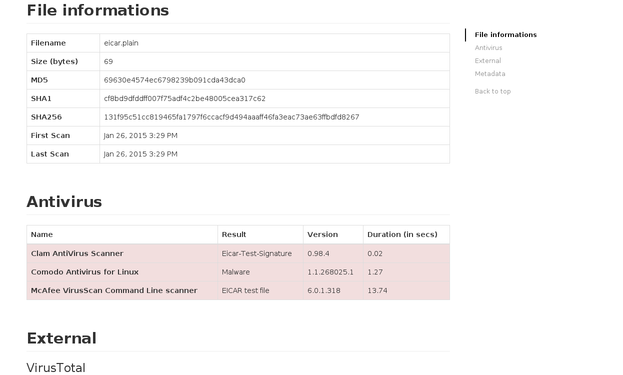
Once the installation is finished, you should be able to submit files to be analyzed to your freshly installed IRMA platform. The following screenshots displays (1) files submission, (2) analysis overview, and (3) detailed results on the web frontend, reachable on the 172.16.1.30 IP address. Here are some screenshots of the web frontend:
You have now a working environment in which you can can develop and test new modules. Let us note that we also provide a command line frontend. By default, the latter assumes that the API on the frontend is reachable at http://localhost/_api.
To illustrate the workflow to push code modifications to the virtual machine, let us modify the ADDRESS variable with the frontend's real IP address:
$ grep "ADDRESS = " irma-frontend/frontend/cli/irma.py
ADDRESS = "http://localhost/_api"

# Let us modify the ADDRESS variable
$ sed -i -e 's,ADDRESS = .*,ADDRESS = "http://172.16.1.30/_api",g' irma-frontend/frontend/cli/irma.py
$ grep "ADDRESS = " irma-frontend/frontend/cli/irma.py
ADDRESS = "http://172.16.1.30/_api"
When modifications are done, you can synchronize them to the virtual machine and ensure that they are actually pushed:
$ pushd irma-ansible
$ vagrant rsync
$ vagrant ssh brain.irma
$ sudo su deploy
$ grep "ADDRESS = " /opt/irma/irma-frontend/current/frontend/cli/irma.py
ADDRESS = "http://172.16.1.30/_api"
$ exit
$ popd
Writing a Module for the TrID Utility
Probes are modules that give IRMA's framework its analytical capabilities. These are automatically discovered at the startup of the application, by crawling the irma-probe/modules folder.
One may have noticed that IRMA comes already with several modules, mostly wrapper for antiviruses CLI. However, only a few of them appear in the list of probes that can be selected on the web frontend. As probes are self-enabled and self-registered to the probe directory service on the broker, the remaining modules are likely not satisfying all conditions required for their activation. Indeed, IRMA verifies at load time whether a module should be enabled by looking for the libraries it uses on the system, by ensuring that external configuration setting is provided, or by examining a required resource. Please, have a look at the documentation to enable more modules.
All the magic underneath the modules will be revealed in the following ;).
IRMA Probe Module - 101
To make writing modules for IRMA easier, we provide a skeleton plugin. It simply returns the string "Main analysis call here" as processing result. However, the latter is never activated as a PluginLoadError exception is raised immediately after the module is loaded (see irma-probe/modules/custom/skeleton/plugin.py). We introduce concepts to write modules with this minimal, but complete enough, example.
Directory Structure
For organizational reasons, we recommend to put a module in a dedicated folder. The folder for the skeleton plugin is organized as follows:
$ pushd irma-probe
$ tree modules/custom/skeleton/
modules/custom/skeleton/
+-- __init__.py
+-- plugin.py
+-- requirements.txt
Let us highlight a few elements on its structure:
To enable IRMA probe modules to be discovered and loaded, they must be written as if they were Python packages. Thus, the __init__.py file at the root of the directory is mandatory, as well as in all parent directories crossed to reach this package.
Like Python packages, modules can contain files written in Python. To enable code reuse, it is generally recommended to break the logic of your module into, at least, two files: one with the main processing logic for your module and another one which interfaces your processing module to the API of IRMA's modules. By convention, the latter is generally named plugin.py but it can have an arbitrary name. As we detail in the next section, the plugin has to derive from a specific metaclass to register itself.
Additional resources can be added to the module's folder (for instance, configuration files, binaries, etc.). For instance, an requirements.txt helps the user determine which Python libraries must be installed on the system to activate this module.
Self-Activation with PluginBase
Let us understand how the plugin framework in IRMA enables modules to be discovered and activated at runtime. The whole magic resides in the PluginBaseMetaClass and the PluginBase class in lib/plugins/plugin.py. Each time a class that inherits from PluginBase is created, it is registered with the PluginManager (ref, metaclass constructor):
$ cat lib/plugins/plugin.py
[... snip ...]
def __init__(cls, name, bases, attrs):
    # small hack to skip PluginBase class when initializing
    if not len(attrs):
        return
    # perform some verifications
    [... snip ...]
    # try to register plugin
    PluginManager().register_plugin(cls)
Testing satisfaction of the module's dependencies is performed by register_plugin(), based on metadata provided by the plugin_dependencies property (for simple dependencies) or by executing successfully the verify() class method for verification that needs a more complex logic. If all dependencies are met, no PluginLoadError exception is raised and the module is appended to the plugin list:
$ cat lib/plugins/plugin.py
[... snip ...]
def register_plugin(cls, plugin):
    [... snip ...]
    # check for dependencies
    for dependency in plugin.plugin_dependencies:
        try:
            dependency.check()
        except DependencyMissing as error:
            [... snip ...]
            raise PluginLoadError( ... )
    # if required, run additionnal verifications on the plugin
    if hasattr(plugin, 'verify'):
        try:
            plugin.verify()
        except Exception as error:
            raise PluginLoadError(error)
    # add plugin to internal list
    [... snip ...]
        cls.__plugins_cls[plugin.plugin_canonical_name] = plugin
        # mark plugin as active
        if plugin.plugin_active is None:
            plugin.plugin_active = True
With these elements, you should be able to understand the self-discovery of the skeleton plugin, and particularly why the latter is never activated at load time.
Returning Results with PluginResult
As specified in irma-probe/probes/tasks.py, the broker performs an analysis on a file by invoking the run(self, paths) method. The latter takes a filename to be analyzed as a parameter and must be overridden by each module in order to implement the expected logic. For instance, the skeleton plugin simply fills the fields of a PluginResult object with a fixed string "Main analysis call here":
$ cat modules/custom/skeleton/plugin.py
[... snip ...]
def run(self, paths):
    response = PluginResult(name=type(self).plugin_name,
                            type=type(self).plugin_category,
                            version=None)
    try:
        started = timestamp(datetime.utcnow())
        response.results = "Main analysis call here"
        stopped = timestamp(datetime.utcnow())
        response.duration = stopped - started
        response.status = self.SkeletonResult.SUCCESS
    except Exception as e:
        response.status = self.SkeletonResult.ERROR
        response.results = str(e)
    return response
$ popd # you return back to irma-dev
A PluginResult object is a data structure that enables the probe and the frontend to respectively pass and display results. In its implementation, this object is simply a dictionary with some mandatory fields:
name: the name of the probe
type: the category of the probe
version: the version of the probe
platform: the platform on which the probe is executed (Windows, Linux, etc.)
duration: duration in seconds
status: return code (< 0 is error, >= 0 is context specific)
error: None if no error else the error
results: results of the file analysis done by the probe
Module for TrID
Writing a module for IRMA in one go is generally a bad idea as each subsystem outputs in a specific log files and one have to search over all these files to understand where and when it went wrong. Here is the workflow we came with to write new modules:
provision the development virtual machine with required tools;
write a standalone module or helper for the file processing logic. A good practice is to keep in mind that this file should be reusable in other projects than IRMA;
test the standalone module and check that expected results are returned;
wrap the module and interface it to IRMA API;
test the plugin with tools provided with irma-probe;
integrate the new module with IRMA platform.
Let us apply this workflow to write a module to run the TrID utility in IRMA.
Provisioning the Development Environment
TrID is an utility designed to identify file types from their binary signatures. It can be downloaded from Marco Pontello's website and runs on 32 bit Windows or Linux systems. We assume that you are going to run it on Linux.
First, install the packages required to run 32 bit programs:
$ pushd irma-ansible
$ vagrant ssh brain.irma
$ sudo dpkg --add-architecture i386
$ sudo apt-get update
$ sudo apt-get install libc6-i386 libncurses5:i386
Then, install the TrID utility with its signature database in /opt/trid:
# following commands should be executed in the VM
$ curl http://mark0.net/download/trid_linux.zip -O
$ sudo mkdir /opt/trid/
$ sudo unzip trid_linux.zip -d /opt/trid
$ sudo chmod a+x /opt/trid/trid

$ curl http://mark0.net/download/tridupdate.zip -O
$ sudo unzip tridupdate.zip -d /opt/trid
$ pushd /opt/trid
$ sudo python tridupdate.py
$ popd
Before going further, let us ensure that the binary is working:
$ /opt/trid/trid /bin/bash

TrID/32 - File Identifier v2.11 - (C) 2003-11 By M.Pontello
Definitions found:  5391
Analyzing...

Collecting data from file: /bin/bash
 49.7% (.) ELF Executable and Linkable format (Linux) (4025/14)
 49.4% (.O) ELF Executable and Linkable format (generic) (4000/1)
  0.7% (.CEL) Lumena CEL bitmap (63/63)

$ exit # you quit the virtual machine
Writing a Wrapper for TrID
The wrapper around TrID in itself is not complicated. We spawn a process, run the command with the filename as argument and parse the results. As it is not interesting to detail this module here (yeah, there is no fancy tricks in it), we leave the reader browse the code of the module we wrote, which is available here. Let us put it temporarily in irma-probe and have it tested.
$ pushd irma-probe
$ curl -L https://raw.githubusercontent.com/quarkslab/irma-probe/1d7dbc513060f6953e50e65f0fadac67d118745c/modules/metadata/trid/trid.py -O
$ popd
Please note that nothing ties this wrapper to IRMA yet. Thus, it can be reused in any other project.
$ pushd irma-ansible
$ vagrant rsync
$ vagrant ssh brain.irma
$ sudo su deploy
$ cd /opt/irma/irma-probe/current
$ venv/bin/pip install ipython
$ venv/bin/ipython
Python 2.7.3 (default, Mar 13 2014, 11:03:55)
Type "copyright", "credits" or "license" for more information.

IPython 2.3.1 -- An enhanced Interactive Python.
?         -> Introduction and overview of IPython's features.
%quickref -> Quick reference.
help      -> Python's own help system.
object?   -> Details about 'object', use 'object??' for extra details.

In [1]: from trid import *
In [2]: module = TrID()
In [3]: module.analyze('/bin/bash')
Out[3]:
(0,
 [{'desc': 'ELF Executable and Linkable format (Linux) (4025/14)',
   'ext': '.',
   'ratio': '49.7'},
  {'desc': 'ELF Executable and Linkable format (generic) (4000/1)',
   'ext': '.O',
   'ratio': '49.4'},
  {'desc': 'Lumena CEL bitmap (63/63)', 'ext': '.CEL', 'ratio': '0.7'}])
In [4]: exit
$ exit  # you quit the virtual machine
$ popd  # you are back to irma-dev
The analyze(self, paths) method in TrID class returns a 2-elements tuple. The first element of the tuple is the command's return code (0 means, in the Unix philosophy, that everything went well) whereas the second entry is a dictionary with information (description, probable file extension and confidence ratio) extracted from TrID's output.
Writing a Plugin for TrID
To be a valid probe module, IRMA expects it to have a predefined structure. To save time, one can get a minimal working structure from the skeleton plugin. The new plugin is stored at irma-probe/modules/metadata/trid:
$ pushd irma-probe
$ cp -r modules/custom/skeleton modules/metadata/trid
You need to create a module for TrID in irma-probe/modules/metadata/trid, clean up its directory and update the plugin's metadata:
$ cp trid.py modules/metadata/trid
$ rm -r modules/metadata/trid/requirements.txt
$ vi modules/metadata/trid/plugin.py
[... snip ...]
from lib.plugins import FileDependency
from lib.plugins import PlatformDependency

[... snip ...]
class TrIDPlugin(PluginBase):

    _plugin_name_ = "TrID"
    _plugin_author_ = "IRMA (c) Quarkslab"
    _plugin_version_ = "1.0.0"
    _plugin_category_ = "metadata"
    _plugin_description_ = "Plugin to determine file type"

    _plugin_dependencies_ = [
        PlatformDependency('linux'),
        FileDependency(
            os.path.join('/opt/trid/', 'trid'),
            help='Make sure you have downloaded trid binary'
        ),
        FileDependency(
            os.path.join('/opt/trid/', 'triddefs.trd'),
            help='Make sure to have downloaded trid definitions'
        ),
    ]
We have removed the requirements.txt file as the package does not depend on any Python library except the standard library and IRMA itself. Please note here that you have declared 3 constraints to be met before the plugin gets activated:
it must run on a Linux platform (PlatformDependency),
the trid must be installed in /opt/trid/,
the triddefs.trd, correponding to TrID's database, must also be installed in /opt/trid/.
There is an important subtlety that is worth mentioning here concerning Python files embedded in your probe. They are automatically imported in the global namespace. Thus, one have to use sys.module to get a reference to it. In this example, you get the TrID class as follows:
$ vi modules/metadata/trid/plugin.py
[... snip ...]
def __init__(self):
    trid_module = sys.modules['modules.metadata.trid.trid']
    trid_class = trid_module.TrID
    self.module = trid_class()
Overriding run(self, paths) method is the only missing piece to the puzzle to make this module functional and ready to be tested. Compared to the skeleton plugin, only values affected to results.results and results.status have been changed to get results from TrID.
$ vi modules/metadata/trid/plugin.py
[... snip ...]
def run(self, paths):
    [... snip ...]
    # launch file analysis
    try:
        started = timestamp(datetime.utcnow())
        results.status, results.results = self.module.analyze(paths)
        stopped = timestamp(datetime.utcnow())
        results.duration = stopped - started
    except Exception as e:
        results.status = -1
        results.error = str(e)
    return results
We synchronize the code with the virtual machine to be able to test it in the development environment:
$ cd irma-ansible
$ vagrant rsync  # you push our modification to the VM
$ vagrant ssh brain.irma
$ sudo su deploy
$ cd /opt/irma/irma-probe/current
To make it easier to test your module before integrating it to IRMA, we provide a tool that will output the PluginResult generated by your module. This tool irma-probe/tools/run_module.py should be run as follows:
$ venv/bin/python -m tools.run_module
usage: run_module.py [-h] [-v]
                     {ComodoCAVL,StaticAnalyzer,ClamAV,VirusTotal,McAfeeVSCL,TrID}
                     filename [filename...]
run_module.py: error: too few arguments
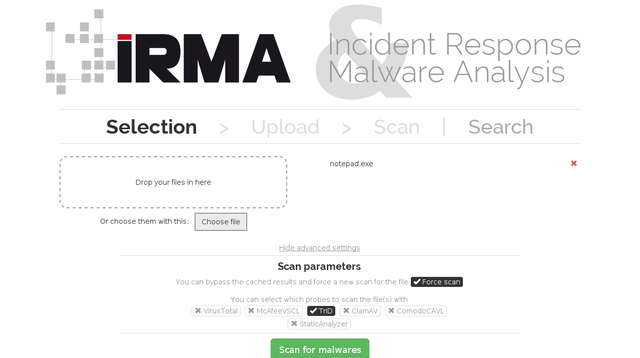
One may have noticed that this tool also outputs the name of the probes that can be activated on the development environment (ClamAV, VirusTotal, StaticAnalyzer, McAfeeVSCL, TrID, ComodoCAVL). We run this tool with the TrID IRMA module taking /bin/bash as the file to be analyzed:
$ venv/bin/python -m tools.run_modules TrID /bin/bash
{ 'duration': 0.26468396186828613 ,
  'error': None ,
  'name': 'TrID' ,
  'platform': 'linux2' ,
  'results': [{ 'desc': 'ELF Executable and Linkable format (Linux) (4025/14)',
                'ext': '.' ,
                'ratio': '49.7'},
              { 'desc': ' ELF Executable and Linkable format (generic) (4000/1)',
                'ext': '.O',
                'ratio': '49.4'},
              { 'desc': 'Lumena CEL bitmap (63/63)',
                'ext': '. CEL',
                'ratio': '0.7'}],
  'status': 0,
  'type': 'metadata',
  'version': None }
We are now ready to integrate our module to the whole IRMA platform.
Integrating the Module to IRMA
Since version 1.1.1, we prefer using supervisord instead of init.d to handle services related to IRMA because it allows us to have a unique tool to manage those services, regardless of the Linux distribution used. We restart the application for probes, so modules, in particular the one you have just added, can be discovered and activated again.
$ sudo supervisorctl restart probe_app
$ sudo supervisorctl
probe_app         RUNNING    pid 2732 , uptime 0:06:07
supervisor > help
default commands ( type help < topic >) :
=====================================
add    clear    fg       open quit
avail  exit     maintail pid  reload
remove restart  start    stop update
reread shutdown status   tail version
supervisor > tail -f probe_app
After a few seconds, you should be able to select the TrID module on the web frontend, schedule a file analysis and get analysis results:
Adding a View on the Web Frontend
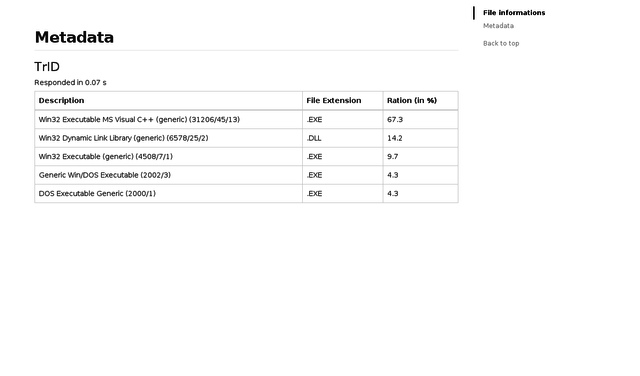
By default, when the web frontend does not know how to display analysis results, it simply shows it as raw data. This is the case with the static analyzer module for instance, whose results are displayed as raw JSON. We are not really excited by the way the TrID module's results are shown in the detailed view. Let us change that.
AngularJS Primer
The whole frontend is build upon AngularJS. AngularJS is a web application framework aimed at creating rich web applications. The library works by first reading the HTML page, which contains additional custom tag attributes. Those attributes are interpreted as native directives telling AngularJS to bind the model that is represented by standard JavaScript variables to the display. JavaScript variables can be defined directly in the code but are generally retrieved from static or dynamic JSON resources.
Adding a View for TrID module
The view for detailed results is based on the irma-frontend/web/app/views/details.html template. In the following, parts of the template have been commented to help you understand the logic of AngularJS without any prior knowledge.
<!-- we display results for probes in the 'metadata' category -->
<div ng-show="probesMetadata.length">
  <h2 id="metadata">Metadata</h2>
  <h3 ng-repeat-start="output in probesMetadata = (vm.results.probe_results | filter:{type:'metadata'})" id="{{output.name | lowercase}}">{{output.name}} <small>{{output.version}}</small></h3>
  <h5>Responded in {{output.duration}} s</h5>

  <div ng-switch on="output.status" ng-repeat-end>
    <!-- output.status equals to '1' apply a specific view or fallback to <pre></pre> -->
    <div ng-switch-when="1">
      <div ng-switch on="output.name">
        <pre ng-switch-when="StaticAnalyzer"><json-formatter json="output.results" open="1"></json-formatter></pre>
        <pre ng-switch-default>{{output.results}}</pre>
      </div>
    </div>

    <!-- display the warning message when output.status equals to '0' -->
    <div ng-switch-when="0" class="bs-callout bs-callout-warning">
      <h4>Warning:</h4>
      <samp>"{{output.results}}"</samp>
    </div>

    <!-- display the error message when output.status equals to '-1' -->
    <div ng-switch-when="-1" class="bs-callout bs-callout-danger">
      <h4>Error:</h4>
      <samp>"{{output.error}}"</samp>
    </div>
  </div>
</div>
We would like to display a table with 3 columns (description, extension and ratio) when the output.name is "TrID" and to display a pre-formatted JSON file for other probes in the metadata category. For that purpose, modify the template in irma-frontend as follows (see [details.html]):
<div ng-switch on="output.status" ng-repeat-end>
  <!-- output.status equals to '1' apply a specific view or fallback to <pre></pre> -->
  <div ng-switch-when="1">
    <div ng-switch on="output.name">
      <pre ng-switch-when="StaticAnalyzer"><json-formatter json="output.results" open="1"></json-formatter></pre>
      <table class="table table-bordered" ng-switch-when="TrID">
        <thead>
          <tr>
            <th>Description</th>
            <th>File Extension</th>
            <th>Ration (in %)</th>
          </tr>
        </thead>
        <tbody>
          <tr ng-repeat="(id, output) in output.results">
            <td>{{output.desc}}</td>
            <td>{{output.ext}}</td>
            <td>{{output.ratio}}</td>
          </tr>
        </tbody>
      </table>
    </div>
  </div>

  [...]

</div>
Rebuilding the Static Website
We are now ready to test our modifications. Synchronize the irma-frontend local repository with the development virtual machine:
$ cd ../irma-ansible  # you were in irma-frontend, you go to irma-ansible
$ vagrant rsync
We have to generate back the static web site on the development virtual machine. Please, do not stay focused [24] hours on Bower (web development package management system) and Gulp (build tool or Makefiles for the JavaScript world).
$ vagrant ssh brain.irma
$ sudo su deploy
$ cd /opt/irma/irma-frontend/current/web
$ ./node_modules/.bin/bower install --config.interactive=false
$ ./node_modules/.bin/gulp dist
$ exit  # you are logged as vagrant
$ exit  # you leave the virtual machine
$ cd .. # you go back to irma-dev
If everything went well, results for the TrID module should be displayed as follows:
| [24] | Humoristic break, to keep your attention. That was a easy one, Jack ;) |
Automating the Installation of the TrID Utility
So far, you have installed the TrID tool manually in the virtual machine. In this section, you are going to automate its installation with an Ansible playbook role.
Ansible Role Primer
Fully understanding all the subtleties of Ansible roles deserves an entire article and is not mandatory to begin to write ansible roles. Let us introduce some concepts by understanding the irma-ansible/roles/quarkslab.comodo_cavl/ role. The advanced Ansible user can probably learn one or two tricks by reading Ansible Galaxy documentation or the page dedicated to Ansible Roles.
A role's directory structure consists of multiple folders within defaults, vars, files, handlers, meta, tasks, and templates. These folders are not all mandatory. We should only have to write tasks and default for the TrID role. Let us have a closer look at irma-ansible/roles/quarkslab.comodo_cavl/ to understand how a role is written. The latter is structured as follows:
$ cd irma-ansible
$ tree roles/quarkslab.comodo_cavl/
roles/quarkslab.comodo_cavl/
+-- defaults
|   +-- main.yml
+-- tasks
    +-- main.yml
main.yml is the default entry point for a role containing Ansible tasks, variables or handlers. For instance, roles/quarkslab.comodo_cavl/defaults/main.yml stores default variables (comodo_cavl_deb_url and comodo_cavl_update_url) for this role:
$ cat roles/quarkslab.comodo_cavl/defaults/main.yml
---

comodo_cavl_deb_url: http://download.comodo.com/cavmgl/download/installs/1000/standalone/cav-linux_1.1.268025-1_amd64.deb
comodo_cavl_update_url: http://download.comodo.com/av/updates58/sigs/bases/bases.cav
These variables are used in tasks defined in roles/quarkslab.comodo_cavl/tasks/main.yml. Tasks are calls to a series of Ansible modules (apt, get_url, shell and command in this example) to install, configure, and run software. Do not hesitate to have a look at the examples accompanying the modules' documentation to understand what each argument is meant for. One may have noticed that Ansible allows you to reference variables in your playbooks using the Jinja2 templating system.
Ansible Playbook Role for TrID
Now that you have been introduced to Ansible playbooks, you can focus on writing a role to automate the installation of the TrID utility. Basically, you have to translate all the actions you previously performed manually into a sequence of calls to Ansible modules.
Defining a Skeleton
Let us create first the placeholders for the role that is being defined:
$ pushd irma-ansible
$ mkdir -p roles/quarkslab.trid/defaults roles/quarkslab.trid/tasks
$ touch roles/quarkslab.trid/defaults/main.yml
$ touch roles/quarkslab.trid/tasks/main.yml
Defining Variables
It is a good practice to define variables for URLs as they may change over time:
$ cat << EOF > roles/quarkslab.trid/defaults/main.yml
---

trid_install_dir: "/opt/trid/"
trid_temp_dir: "/tmp/trid/"

trid_zip_url: "http://mark0.net/download/trid_linux.zip"
tridupdate_zip_url: "http://mark0.net/download/tridupdate.zip"
EOF
Defining Tasks
Finally, here is how you automate the installation of the TrID module. The following tasks are equivalent to commands for installing TrID in the virtual machine. The Ansible modules used are self-explanatory, thus we will not detail these tasks further. Please note that tasks are split over main.yml and install.yml. The latter is included and thus executed only if the TrID utility was not found, deduced from the trid_present.
$ cat << EOF > roles/quarkslab.trid/tasks/main.yml
---

- name: TrID | Check if present
  command: "{{ trid_install_dir }}/trid -v"
  ignore_errors: yes
  register: trid_present

- include: install.yml
  when: trid_present | failed

- name: TrID | Update
  command: python tridupdate.py
  args:
    chdir: "{{ trid_install_dir }}"
  sudo: yes
EOF

$ cat << EOF > roles/quarkslab.trid/tasks/install.yml

- name: TrID | Adding i386 repositories
  shell: dpkg --add-architecture i386
  sudo: yes

- name: TrID | Install dependencies
  apt: name="{{ item }}" state="latest" update_cache="yes"
  with_items:
    - libc6-i386
    - libstdc++6
    - libncurses5:i386
  sudo: yes

- name: TrID | Creating temp directory
  file: path="{{ trid_temp_dir }}" state="directory"

- name: TrID | Download Packages
  get_url: url="{{ item.url }}" dest="{{ item.dest }}"
  with_items:
    - url: "{{ trid_zip_url }}"
      dest: "{{ trid_temp_dir }}/trid_linux.zip"
    - url: "{{ tridupdate_zip_url }}"
      dest: "{{ trid_temp_dir }}/tridupdate.zip"

- name: TrID | Creating Install Directory
  file: path="{{ trid_install_dir }}" state="directory" mode=0755
  sudo: yes

- name: TrID | Extracting packages
  unarchive: src="{{ item.src }}" dest="{{ item.dest }}" copy=no mode=0755
  with_items:
    - src: "{{ trid_temp_dir }}/trid_linux.zip"
      dest: "{{ trid_install_dir}}"
    - src: "{{ trid_temp_dir }}/tridupdate.zip"
      dest: "{{ trid_install_dir }}"
  sudo: yes

- name: TrID | Ensure binary is executable
  file: path="{{ trid_install_dir }}/trid" mode=0755
  sudo: yes

- name: TrID | Removing temp directory
  file:
    path: "{{ trid_temp_dir }}"
    state: absent
EOF
Invoking the TrID Role in IRMA's Scripts
So far, you have only defined a role but it is not linked to IRMA automation scripts yet.
Invoking the Role in Playbooks
To integrate this new Ansible playbook role, it have to be invoked from one of the Ansible playbooks executed by Vagrant. By default, as specified in the irma-ansible/Vagrantfile, Vagrant uses irma-ansible/playbooks/playbook.yml as master playbook. The latter simply executes both irma-ansible/playbooks/provisioning.yml and irma-ansible/playbooks/deployment.yml, respectively for provisioning-related and deployment-related tasks.
Basically, provisioning is a set of actions to prepare a server with appropriate systems, data and software, and make it ready for network operations and it is done once in a while whereas deployment is related to a version of an application and may evolve according to the application's needs. TrID is supposed to be installed once and to be regularly updated with the latest signatures. For that reason, it would better fit in the provisioning tasks than in the deployment ones:
$ cat << EOF >> playbooks/provisioning.yml
- name: TrID provisioning
  hosts: trid
  roles:
    - { role: quarkslab.trid, tags: 'trid' }
EOF
This playbook excerpt executes the tasks defined by the roles/quarkslab.trid/ only for hosts that belongs to the trid group. Please note that he have not defined this group and its members yet.
Defining Hosts
One can declare and associate a host to a group using the environment files at irma-ansible/environments/. Environment files are used to make Vagrant generate inventories for Ansible. If you want to have a look to the inventory that have been generated, you should be able to find it in irma-ansible/.vagrant/provisioners/ansible/inventory/.
For the sake of this example, let us modify irma-ansible/environments/allinone_dev.yml:
$ cat environments/allinone_dev.yml
[ ... snip ... ]
    virustotal:
      - brain.irma
    trid:
      - brain.irma
    "probe:children":
      - clamav
      - comodo
      - mcafee
      - static-analyzer
      - virustotal
      - trid
Modifications above add a new group trid, which inherits from the group probe as specified in the probe:children list. A single host, brain.irma, belongs to the trid group.
Provisioning with the New Module
We are now ready to provision a new machine with this new module:
$ vagrant provision
# or, using Ansible (if you have adapted the vagrant_ansible_inventory file)
$ ansible-playbook -i .vagrant/provisioners/ansible/inventory/vagrant_ansible_inventory \
                   -u vagrant --private-key=~/.vagrant/insecure_private_key --tags=trid,deployment_probe \
                   playbooks/playbook.yml
Conclusion
IRMA is an open-source platform designed to help identifying and analyzing malicious files. Above all else, IRMA is a framework one can extend with modules to give it more analytical capabilities. We illustrated the steps to develop your own probe through the TrID utility example. You should find the source code for this article on the project repositories.
Through this article, and most importantly in this project, we want to stimulate code sharing between malware analysts. There are clearly ways for improvements to make writing modules for IRMA's framework even easier. If you are interested by this project, do not hesitate to pay us a visit on our IRC channel #qb_irma. Come by simply for a "Hi!", discuss with us about the roadmap, share your experience as a simple user or a malware analyst. Your help is highly appreciated.