Author Eric Le Guevel
Category Android
Tags android, attestation, keystore, TEE, StrongBox, Frida, instrumentation, reverse-engineering, tool, 2026
Hardware key attestation lets an Android app prove to its backend that a key lives in secure hardware on a locked, verified device. It is also the wall that stops a security analyst working on a rooted phone. This article opens the mechanism from the analyst's chair, from the certificate chain and the attestation extension down to the root of trust, then shows a simple bypass that never touches the secure hardware. We relay the attestation to a clean device and splice a genuine chain back into the target app with a Frida hook. A companion repository ships the validation backend, the demo apps and the instrumentation, so the whole setup can be run and inspected rather than taken on faith.
Introduction
More and more Android apps want to know one thing before they let us in: is this device trustworthy? Banking apps, payment wallets, identity SDKs and a growing crowd of others now ask the operating system to prove that the phone is a genuine device running an untampered boot chain. When the answer is no, the app degrades, refuses a feature, or simply shuts the door.
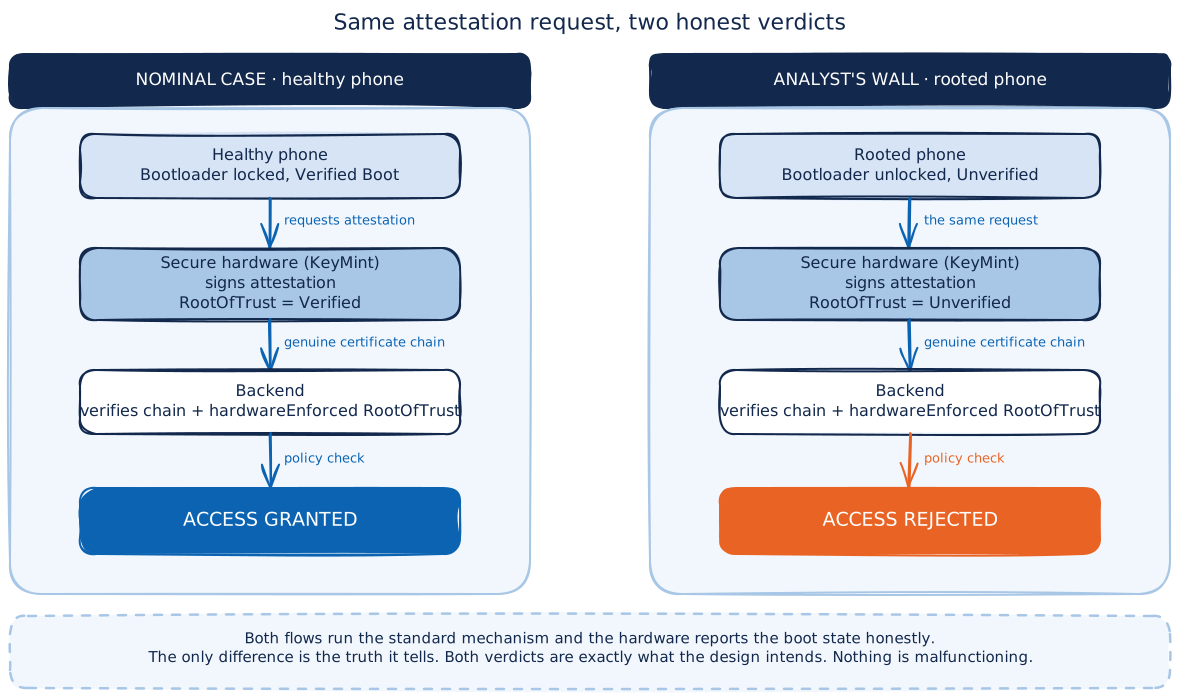
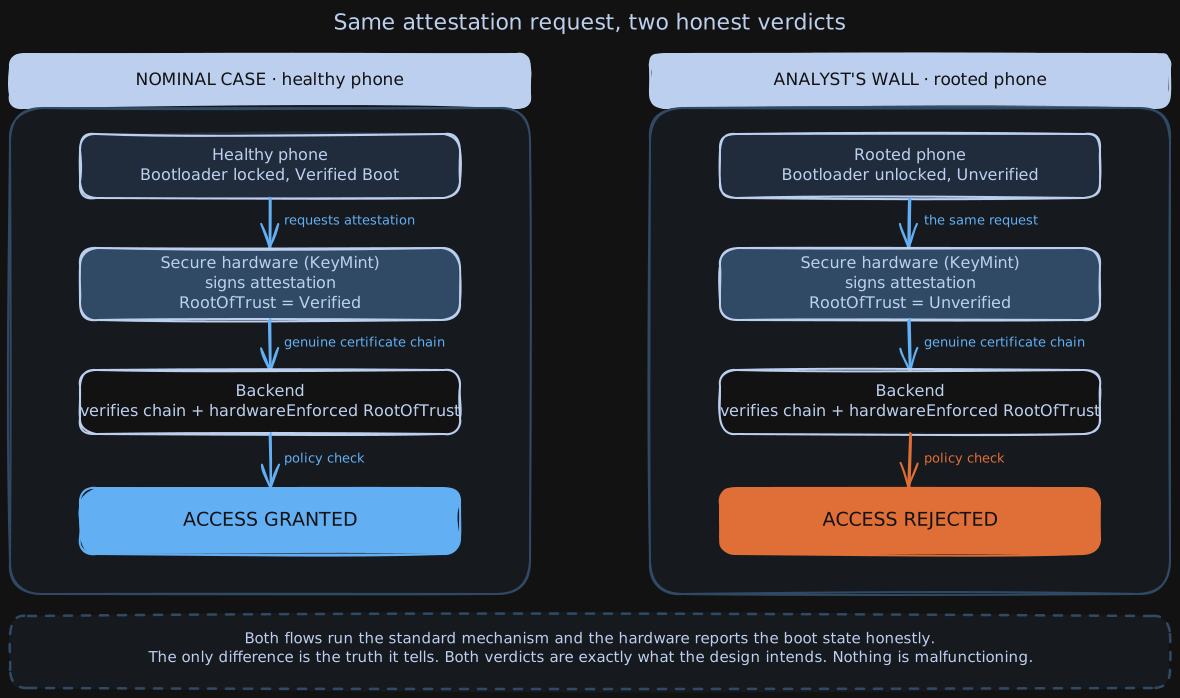
For a security analyst, this is a familiar wall. Our mission phone is usually rooted. That is not an accident, it is the job. Root is what lets us hook, trace, dump and read the app while it runs. The moment the target app leans on hardware attestation, that same rooted state becomes the reason we get locked out. The app asks the hardware for a signed statement about the device, the hardware honestly reports a broken root of trust, and the backend rejects us. Nothing is misbehaving. The system is working exactly as designed, and that is precisely the problem for us.
This article has two goals, in order.
First, we explain Android hardware attestation end to end. What problem it solves, where the trust actually comes from, and what the device really signs and sends. We open the certificate chain, walk through the attestation extension, and look at the fields that a backend inspects to make its decision.
Second, we present a simple bypass built on instrumentation. We stay away from the hard problem. We do not attack the secure hardware, we do not extract keys, and we do not need a leaked keybox. Instead we sit where an analyst already sits, inside the running process, and we redirect the attestation request. A clean, unmodified phone answers it with its own healthy hardware, and its signed statement is relayed back to unblock the analysis on the rooted device. The trick is not breaking the crypto. The trick is deciding who gets asked.
The whole setup is reproducible. A companion repository ships the validation backend, the demo apps, and the Frida instrumentation used for the relay.
https://github.com/quarkslab/android-hardware-attestation-demo
A note on scope. Attestation on Android has moved a lot over the years, and it is still moving. We target modern devices, Android 13 and later, and we call out per-version behavior wherever it diverges. StrongBox appears where it changes the picture, but it is not our main axis.
The milestones, at a glance 29:
| Android | Secure component | Milestone |
|---|---|---|
| 7.0 | Keymaster 2 | Key attestation introduced |
| 8.0 | Keymaster 3 | ID attestation added |
| 12 | KeyMint, renamed from Keymaster | RKP lands in AOSP |
| 14 | KeyMint | RKP becomes an updatable module |
| 16 | KeyMint | RKP only, factory keys phased out |
RKP here is Remote Key Provisioning, the shift from attestation keys injected at the factory to short-lived keys issued per device by a Google backend. We come back to it in detail in the provisioning section.
With the frame set, we start where the app starts, by asking the hardware to vouch for the phone.
Android hardware attestation mechanism
Our starting point is simple. We run an application on a rooted device, and at some point the analysis stops. A request fails, a feature refuses to load, a login never completes. Somewhere in the app there is a check that decides our device is not trustworthy, and it is right. Before we can defeat that check we need to understand what it actually measures. This part answers that question. By the end of it the reader should know what hardware attestation proves, how the proof is built and carried, and where its guarantees stop.
We keep the analyst's eye on it: we want to see what the service sees when it looks at our device, so that later we can decide what to change and what it costs us.
What does attestation actually prove?
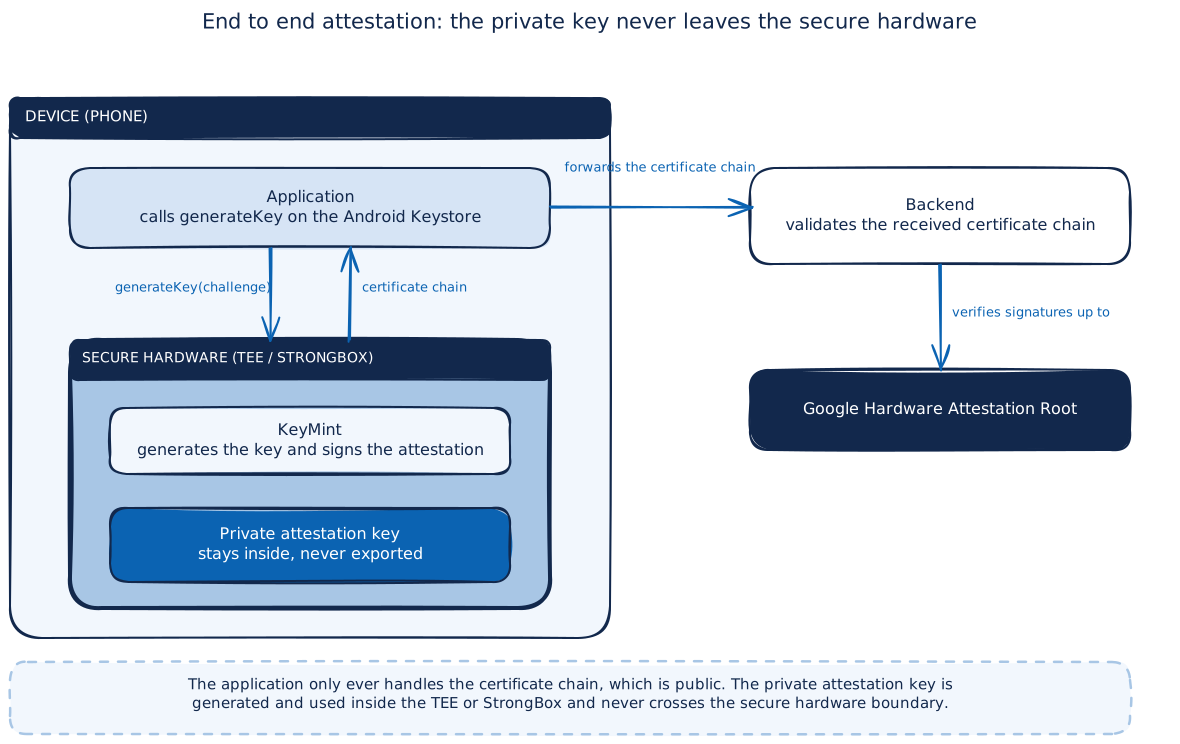
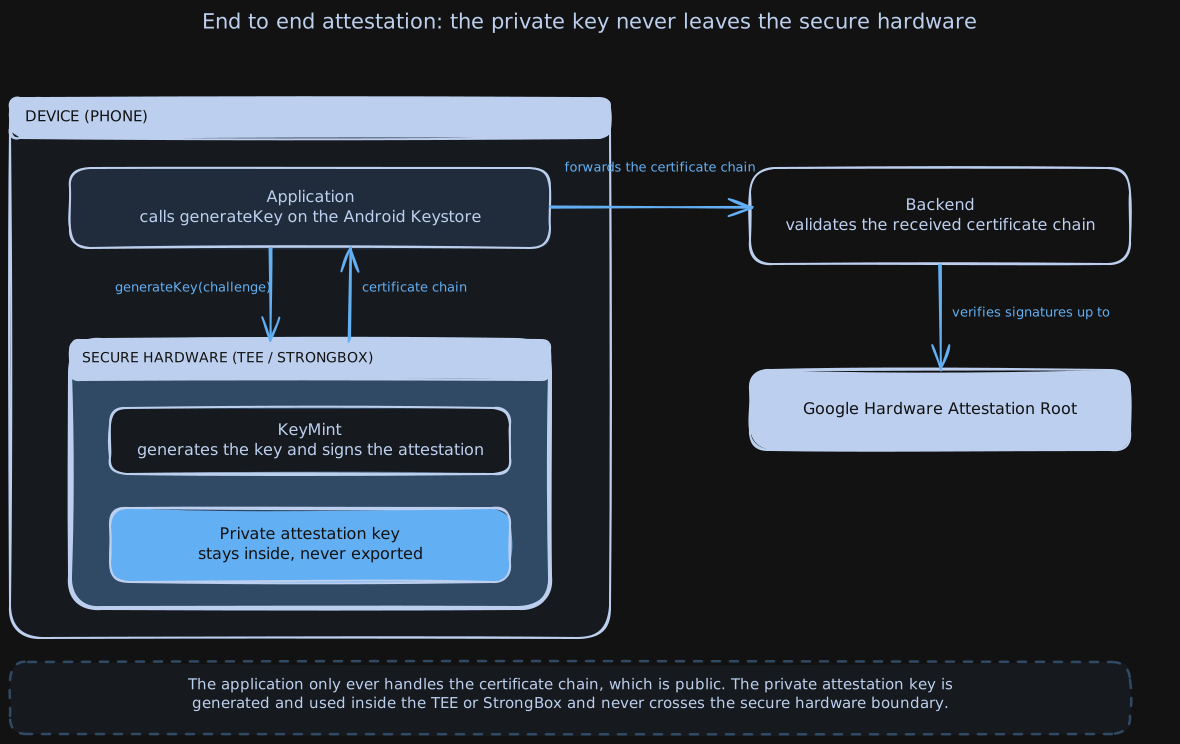
Android Keystore lets an app create and use cryptographic keys without ever touching the raw key material. On a device with hardware backing, the key lives inside secure hardware and the platform only ever sends it commands. The problem is trust. Before attestation, an app or a remote server had no reliable way to know whether a given Keystore key was really hardware-backed or just a software key pretending to be one. The Keystore daemon loaded whatever Keymaster HAL was present, the vendor hardware abstraction layer that talks to the secure component, and believed what the HAL claimed about hardware backing 2.
Key attestation was introduced to close that gap. It was added in Android 7.0 with Keymaster 2, and ID attestation followed in Android 8.0 with Keymaster 3. Its goal is to let a remote party reliably determine three things about a key pair:
- The private key really lives in hardware-backed storage.
- The key has known properties, such as its algorithm, size, and purpose.
- Known constraints govern how the key can be used.
Keymaster and KeyMint. Keymaster is the historical name of the secure component that guards Keystore keys. It was renamed KeyMint in Android 12. We use KeyMint for current behavior and Keymaster only when talking about older devices.
The output of attestation is an X.509 certificate that describes the attested key and the state of the device at key generation time, signed by a key the device did not choose and cannot forge. The rest of this part is about the content of that certificate and the chain that carries it.
Where do the keys live: TEE and StrongBox
Attestation only means something if we know where the attested key is stored and how well that location resists attack. The certificate states this explicitly through a SecurityLevel value 2:
SecurityLevel ::= ENUMERATED {
    Software                     (0),
    TrustedEnvironment           (1),
    StrongBox                    (2),
}
ASN.1 and DER. The structures in this article are written in ASN.1, a notation for describing typed data such as sequences, enumerations and octet strings. DER is the byte encoding of that data as it actually sits inside the certificate. When we say a field is DER-encoded, we mean it is packed into bytes that a parser walks one field at a time.
The three levels describe how resilient the key and its attestation are to attack:
Software. Secure only as long as the Android system itself is intact, meaning the bootloader is locked and Verified Boot reports a verified state. There is no hardware guarantee here.TrustedEnvironment. Enforced by the device Trusted Execution Environment. Secure as long as the TEE is not compromised. The isolation requirements are set out in the Compatibility Definition Document, section 9.11 3. A TEE is highly resistant to remote compromise and moderately resistant to a direct hardware attack 2.StrongBox. Enforced by a dedicated secure element, similar to a hardware security module, with its own CPU and storage 4. Requirements are in CDD section 9.11.2 3. StrongBox is highly resistant both to remote compromise and to direct hardware attack such as physical tampering and side channel analysis 2.
TEE and StrongBox. A TEE is a secure world that runs beside Android on the same application processor, isolated by hardware (for example ARM TrustZone). A StrongBox is a physically separate chip. The practical difference for us is the cost of an attack. A TEE shares silicon with the main OS, a StrongBox does not.
A check that only requires Software level is weak and often defeated without touching hardware at all. A check that requires TrustedEnvironment or StrongBox is the interesting case, and the one this article addresses.
The attestation certificate chain
When an app generates a key with an attestation challenge, KeyMint returns not a single certificate but a chain. The app reads it with KeyStore.getCertificateChain() and, in a correct design, forwards it to a server it trusts rather than validating it locally 5. The reason is direct. If the device OS is compromised, an on-device check can be made to trust anything.
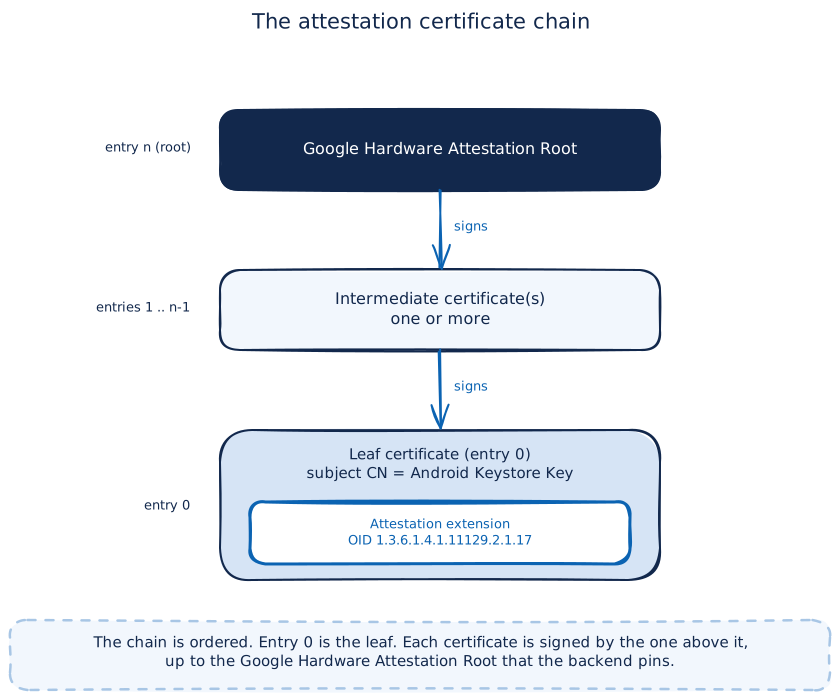
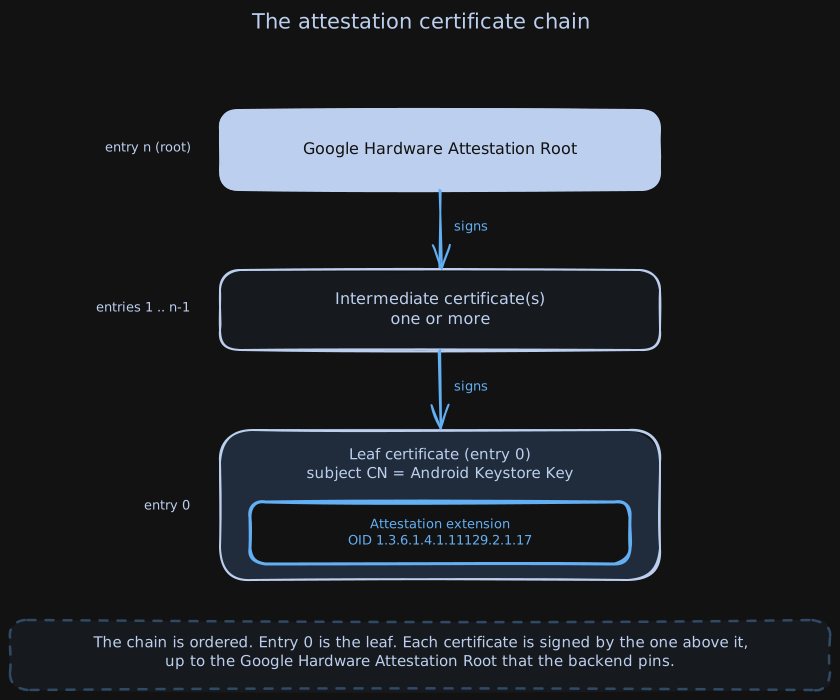
The chain is ordered. Entry 0 is the leaf, the attestation certificate itself. It certifies the attested public key and carries the attestation extension. Each following certificate signs the previous one, up to a root. On devices that shipped with Google Play and launched on Android 7.0 or later, that root is the Google Hardware Attestation Root, and the set of valid roots is published as a JSON array so a backend can pin them 5.
The leaf is a standard X.509 v3 certificate, but several of its fields are fixed and checked exactly by the Compatibility Test Suite (CTS) 2:
| Field | Value |
|---|---|
serialNumber |
INTEGER 1, identical on every attestation certificate |
subject |
CN = "Android Keystore Key", identical on every certificate |
validity |
Derived from the key ACTIVE_DATETIME and USAGE_EXPIRE_DATETIME tags |
extensions |
Contains the attestation extension, OID 1.3.6.1.4.1.11129.2.1.17 |
The fixed serial number and subject are a common trap. They are not identifiers. Every attestation leaf on every device carries the same two values. The identity and the state of the device are not in these fields. They are inside the attestation extension.
Inside the attestation extension: KeyDescription
The attestation extension has OID 1.3.6.1.4.1.11129.2.1.17, an object identifier whose 1.3.6.1.4.1.11129 arc is reserved to Google. Its content is a DER-encoded KeyDescription structure that holds everything the verifier cares about. Here is the current schema, version 500, as shipped with KeyMint 5 2:
KeyDescription ::= SEQUENCE {
    attestationVersion           INTEGER, # Value 500
    attestationSecurityLevel     SecurityLevel,
    keyMintVersion               INTEGER, # Value 500
    keyMintSecurityLevel         SecurityLevel,
    attestationChallenge         OCTET_STRING,
    uniqueId                     OCTET_STRING,
    softwareEnforced             AuthorizationList,
    hardwareEnforced             AuthorizationList,
}
Two fields deserve attention right away.
The attestationChallenge is the nonce. It carries back the exact challenge the caller passed at key generation time. A backend generates a fresh random challenge, sends it to the client, and later checks that the same bytes appear here. This is what makes the attestation fresh and binds it to one verification exchange, not a replayed capture.
The attestationVersion tells the parser which schema to expect, and by extension which KeyMint or Keymaster generation produced the certificate 2:
| Value | KeyMint or Keymaster version |
|---|---|
| 1 | Keymaster 2.0 |
| 2 | Keymaster 3.0 |
| 3 | Keymaster 4.0 |
| 4 | Keymaster 4.1 |
| 100 | KeyMint 1.0 |
| 200 | KeyMint 2.0 |
| 300 | KeyMint 3.0 |
| 400 | KeyMint 4.0 |
| 500 | KeyMint 5.0 |
The two AuthorizationList fields are the heart of the description, and the split between them is the whole point of hardware attestation 2:
softwareEnforcedholds properties enforced by the Android platform code. They can be trusted only as long as the OS complies with the Android Platform Security Model, that is bootloader locked and Verified Boot in a verified state.hardwareEnforcedholds properties enforced by the TEE or StrongBox. They are collected inside the secure hardware and are not controlled by the platform.
Anything a backend really relies on should be read from hardwareEnforced, because a rooted platform can shape softwareEnforced freely. When we later look for what to attack, we look at what the backend trusts, and a well written backend trusts the hardware-enforced side.
The root of trust
The single most important entry in hardwareEnforced is the root of trust, carried under tag [704] 2:
RootOfTrust ::= SEQUENCE {
    verifiedBootKey            OCTET_STRING,
    deviceLocked               BOOLEAN,
    verifiedBootState          VerifiedBootState,
    verifiedBootHash           OCTET_STRING,
}

VerifiedBootState ::= ENUMERATED {
    Verified                   (0),
    SelfSigned                 (1),
    Unverified                 (2),
    Failed                     (3),
}
These four fields are populated by the secure hardware from measurements taken during Verified Boot, before Android runs. They describe the boot chain, not the running system.
verifiedBootKeyis the hash of the key used to verify the boot image.deviceLockedis true when the bootloader is locked.verifiedBootHashis a digest of the verified boot state.verifiedBootStateis the summary the app is really after.
The four VerifiedBootState values map to the four Verified Boot device states that the bootloader can set 67:
| VerifiedBootState | Verified Boot color | Meaning |
|---|---|---|
Verified |
Green | Device locked, full chain of trust from a hardware root, stock OS |
SelfSigned |
Yellow | Device locked, but boot verified against a user-supplied root of trust |
Unverified |
Orange | Device unlocked, no boot verification enforced |
Failed |
Red | Verification failed, no valid OS found |
This is the field that blocks us on the mission device. A rooted phone almost always reports Unverified because unlocking the bootloader is what root usually requires. A backend that demands Verified and reads it from the hardware-enforced root of trust will reject that device, and no amount of software patching on the same device changes the four bytes, because they come from below Android.
Verified Boot. Verified Boot checks each stage of boot against a key before running it, from the bootloader up to the system image. The result is frozen into the root of trust that KeyMint later signs. This is why the state cannot be edited after the fact from userspace. It was measured before userspace existed.
How does the server verify all this?
A correct verification is a chain of independent checks, done off device 5:
- Parse the certificate chain and verify each signature up to the root.
- Confirm the root is a trusted Google Hardware Attestation Root from the published set.
- Check the certificate validity dates.
- Extract the attestation extension and confirm
attestationChallengeequals the nonce the server issued. - Read
securityLevel, the key properties and the root of trust from the extension, from thehardwareEnforcedlist, and apply the policy the service wants. - Check that no certificate in the chain has been revoked.
The last step relies on a revocation list that Google publishes at a single URL, https://android.googleapis.com/attestation/status, as JSON 8. Only keys with a non-valid status appear, so it is not a full list of issued keys. An entry carries a status, REVOKED for a permanent removal or SUSPENDED for a temporary one, and a reason such as KEY_COMPROMISE, CA_COMPROMISE, SUPERSEDED or SOFTWARE_FLAW.
If any step fails, the attestation is not trusted. Note that every one of these checks runs on the server. The device only produces the evidence.
Where do attestation keys come from: factory keys and RKP
The whole chain rests on the private key that signs the leaf. Two provisioning models exist, and the difference matters for the limits we discuss next.
The older model is factory provisioning, also called batch keys. An attestation key and its certificate are injected at manufacturing time and shared across a batch of devices. In that model the leaf issuer matches the subject of the batch attestation key. One private key covers many devices, which is efficient but fragile. If that key leaks, every device in the batch can be impersonated, and the only response is to revoke it through the status list 8.
The newer model is Remote Key Provisioning, RKP, part of AOSP since Android 12 9. Here the factory does not program long-lived signing keys onto the device. Instead the device proves the health of its own key generation to a Google backend, which issues short-lived certificates per device. Two properties follow directly:
- Revocation can target a single device rather than a whole batch.
- Certificates are short-lived, so the validity period must be checked, which shortens the window a compromise stays useful.
Android 14 introduced RKP as an updatable module so the service can be improved without a full OS update 9. For devices that launch on Android 16, the system supports only RKP, and factory keys are phased out.
Factory keys and RKP. Factory keys are like one master badge shared by a thousand employees. RKP is like issuing each employee a personal badge that expires quickly. If one badge leaks, you cancel one badge, not the master.
What attestation does not prove
Attestation is strong, but its guarantees are narrow and precise. Reading them precisely is what makes a bypass possible.
First, every hardware guarantee is conditional on the secure hardware not being compromised. The SecurityLevel definitions say so in as many words. TrustedEnvironment is secure as long as the TEE is not compromised, StrongBox as long as StrongBox is not compromised. Attestation does not prove the TEE is intact, it assumes it. TEE and firmware key extraction is exactly the class of failure the revocation list exists to contain 8. It is not hypothetical. Researchers have pulled hardware-backed ECDSA keys out of Qualcomm's TrustZone through a microarchitectural side channel 18, and broken the key protection in Samsung's TrustZone Keymaster design 19.
Second, a leaked attestation private key breaks the model for as long as it takes to detect and revoke it. Batch keys make this worse because one leak covers many devices. This is a known and documented failure mode, and it is the reason RKP and revocation exist at all 89.
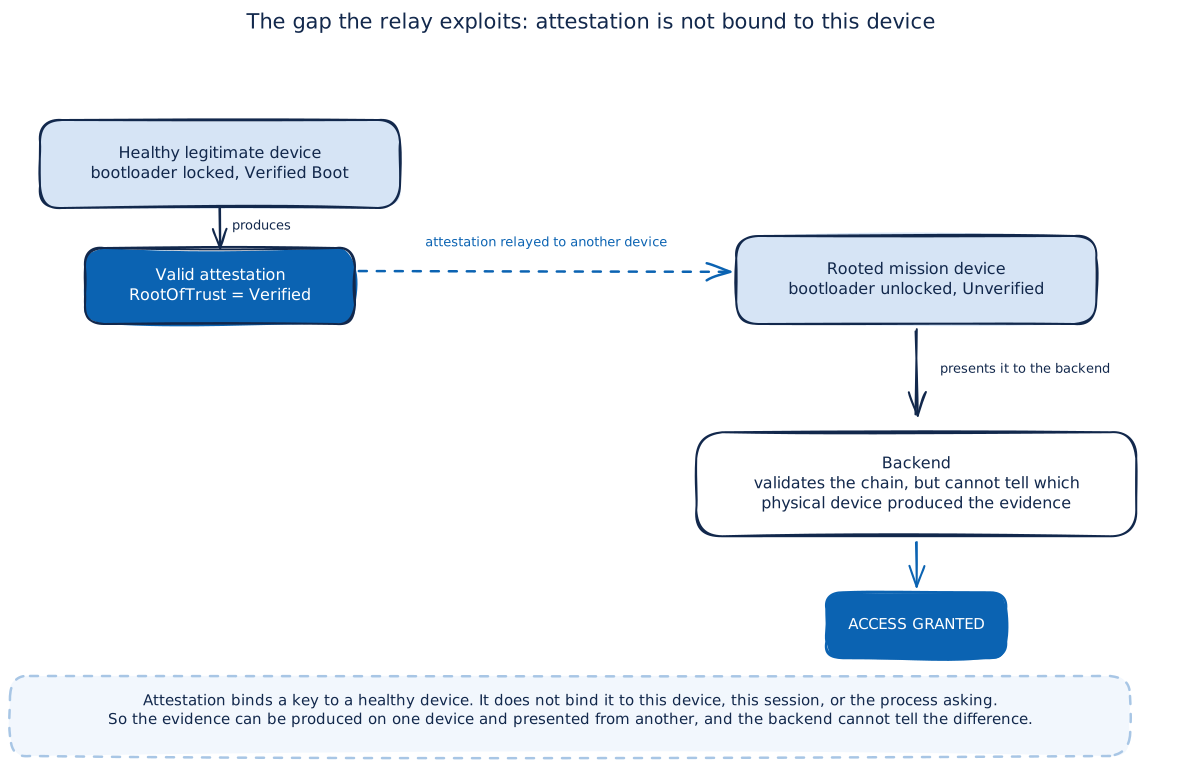
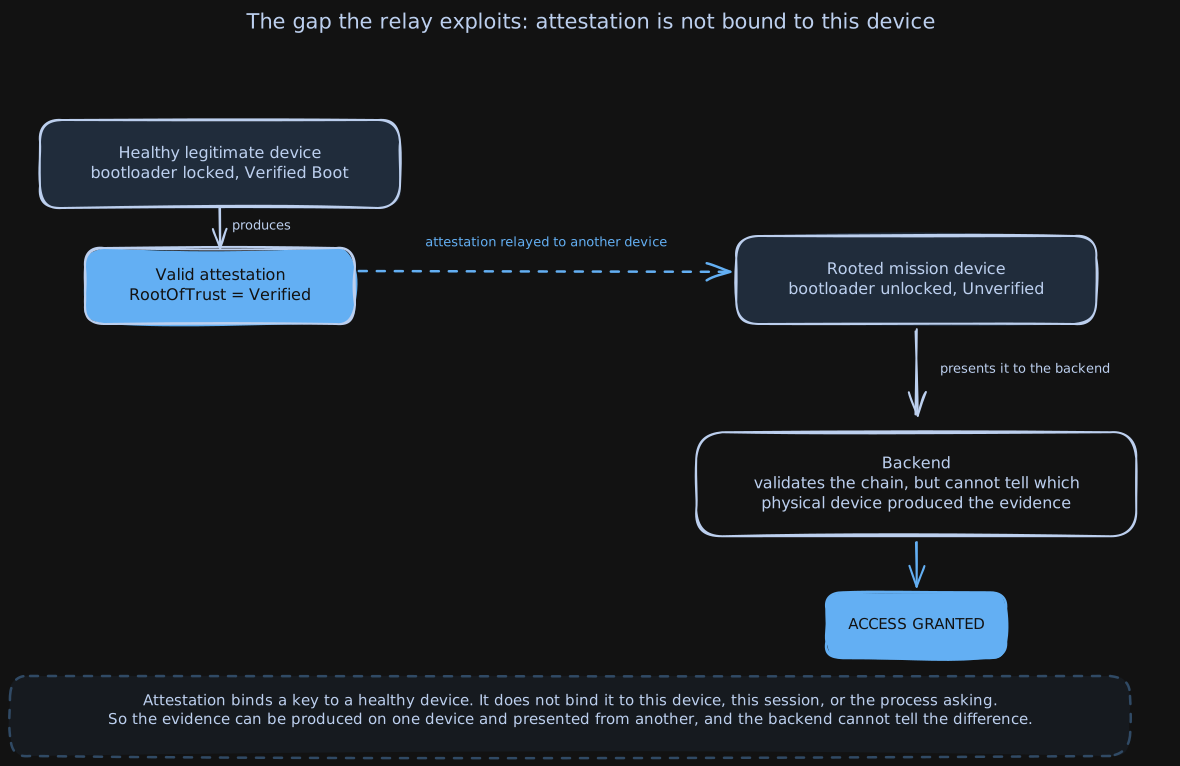
Third, and this is the point we build on, attestation binds a key to a healthy device, but it does not bind that key to this device or to the process that is asking. The certificate proves that some device with a locked bootloader and a verified boot state generated a key and signed a challenge. It says nothing about where that device is, or whether the app talking to the backend is running on the same hardware that produced the evidence. Nothing in the KeyDescription ties the attestation to a network location, a session, or a running process context.
That gap is the whole opportunity for the analyst. If our mission device cannot produce a Verified attestation, but a healthy device can, and the backend cannot tell which physical device the evidence came from, then the evidence can be generated in one place and presented from another. This is the idea behind the relay technique that the security community calls Remote Key Attestation, documented from the defensive side by Guardsquare 1. The next section takes the analyst view of the same idea and builds a reproducible setup around it.
That is the mechanism end to end. Attestation is a signed statement, produced in secure hardware, describing a key and the boot state of the device that made it, verified off device against a Google root and a revocation list. Its strength is real and its scope is exact. In the next part we stay inside that scope and use instrumentation to move a valid statement from a legitimate device to the one under analysis.
Bypass through instrumentation
In the previous section we followed a hardware attestation from key generation to backend verdict. Now we are on a rooted mission phone, bootloader unlocked, and the app we want to analyze uses hardware attestation as a gate. Before any interesting feature runs, the app asks the Android Keystore for an attested key, sends the certificate chain to its backend, and waits for a green light. On our device that light stays red.
The reason is exactly what makes attestation useful. As we saw, the RootOfTrust
structure lives in the hardwareEnforced authorization list, produced by the secure
environment and not by the platform. Our unlocked bootloader is written there in
plain sight: deviceLocked is false and verifiedBootState is not Verified. The
chain is otherwise perfectly genuine. It chains to a Google root, the signatures are
valid, the challenge matches. It just tells the truth about our device, and the truth
gets us rejected.
The demo client shows exactly this. The backend answers HTTP 400: deviceLocked false,
verifiedBootState Unverified, StrongBox-backed chain and all.
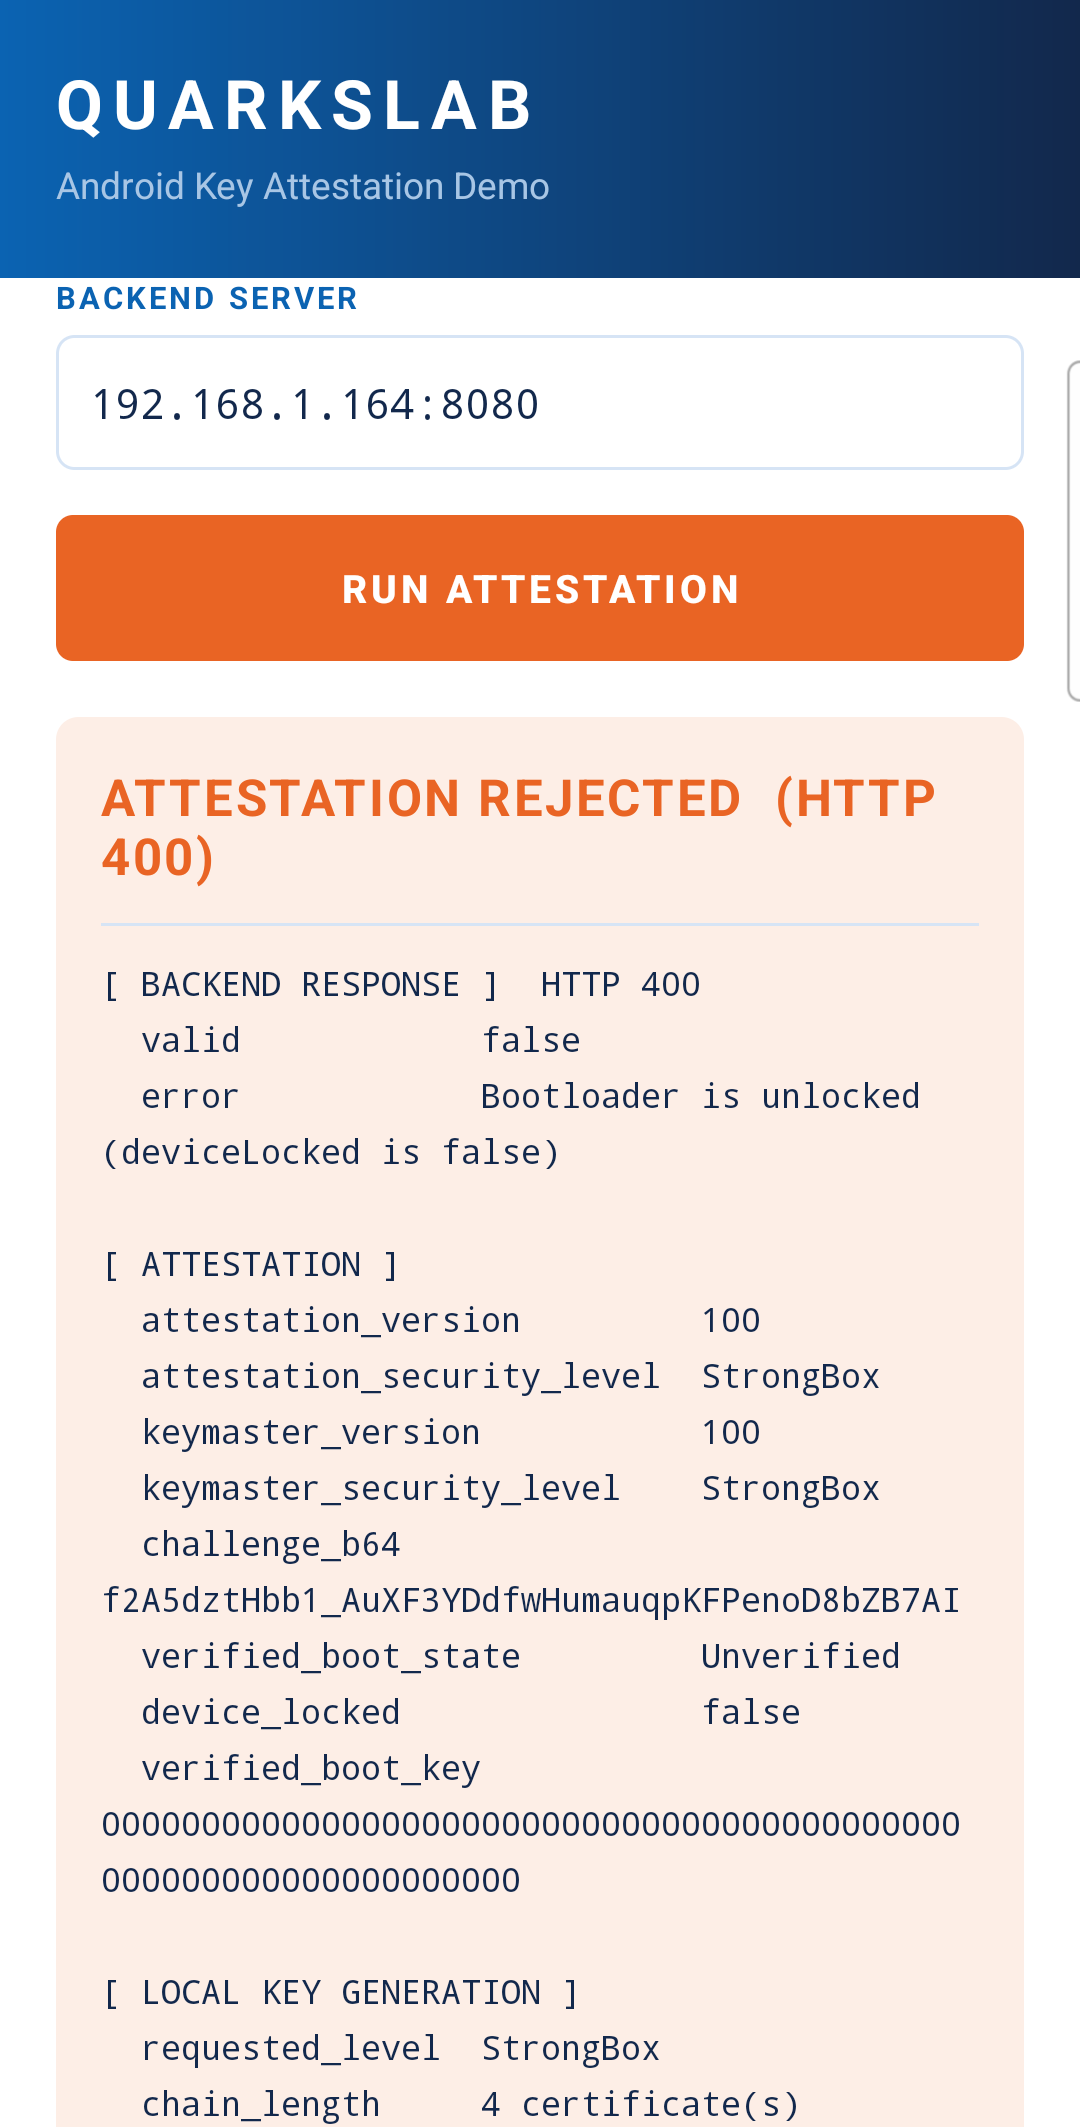
So we need the backend to receive a chain that reports a healthy device, without giving up the root access we need to do our job. Let us look at our options.
What can the analyst do?
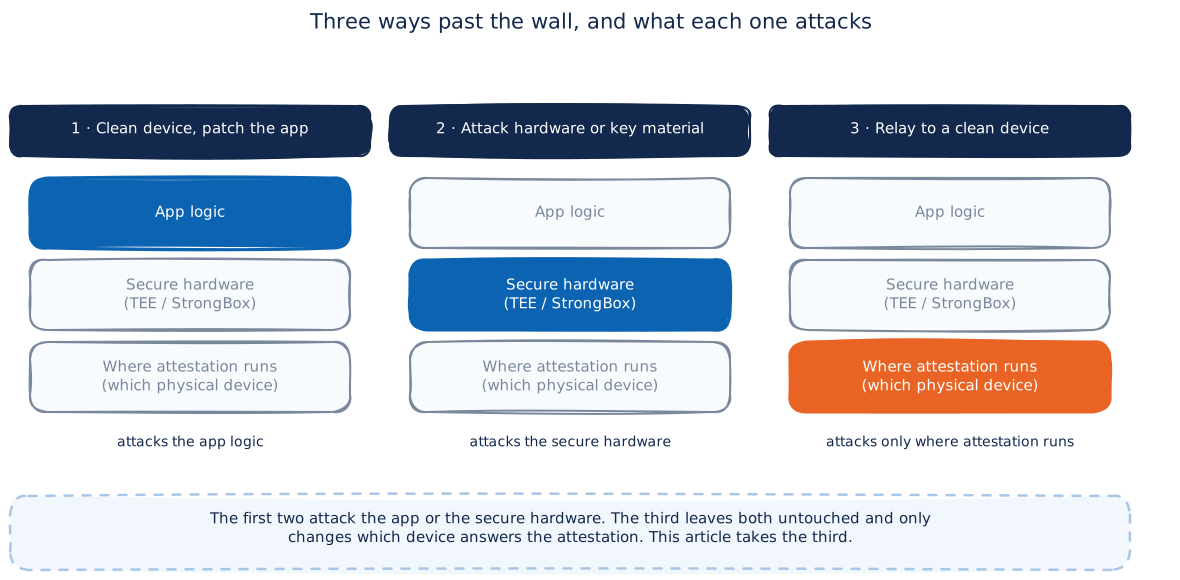
Three paths lead out of this, with very different costs.
-
Move to a clean device and neuter the app. We flash a locked, stock phone, install the target, and patch out the attestation call or its callers with instrumentation. This works, but it throws away the reason we rooted a phone in the first place. We lose the very foothold that lets us observe the app. It also means fighting whatever anti-tampering the app ships, on a device we cannot fully control.
-
Attack the hardware or the key material. This is the ground Guardsquare mapped: leaked keyboxes, tools like TrickyStore that inject an attestation key at the Keystore layer, and TEE key extraction 1. These techniques are powerful and, when they work, they defeat attestation at its root. They also depend on a leaked or extracted key that a vendor can revoke, and most of them are out of reach without a specific vulnerability or a purchased keybox.
-
Relay the attestation to a clean device. We keep our rooted phone and its root access. A second phone, clean and unmodified, produces a genuine attestation bound to the backend's challenge, and we splice that chain into the target's flow with a hook. We attack neither the crypto nor the hardware, only the location where the attestation runs.
This third path is the subject of this section. It is the cheapest of the three, it is fully reproducible with commodity phones, and it stays in the instrumentation world we are comfortable in.
| Option | Keeps root | Needs a hardware or key exploit | Main cost |
|---|---|---|---|
| Clean device, patch the app | no | no | loses the analysis foothold |
| Attack hardware or key material | yes | yes | needs a keybox or a TEE bug, revocable |
| Relay to a clean device | yes | no | needs one clean phone, one-shot gate only |
The idea in one breath
A genuinely clean phone passing attestation is not a bypass. It is attestation doing its job. The bypass begins when we take that clean phone's attestation and use it to answer for our rooted phone.
The plan is a relay. The target app, running on our rooted phone, is about to ask its local Keystore for an attested key. We intercept that request. We forward the backend's challenge to a clean phone, which runs its own attestation and hands us back a real certificate chain, signed by real secure hardware, and carrying our challenge. We return that chain to the app as if the local Keystore had produced it. The app forwards it to the backend. The backend sees a genuine chain, a matching challenge, and a locked, verified device, and it validates.
Nothing is forged. Every certificate is authentic. We simply changed the phone that produced them.
The moving parts
To make the demo self-contained, the repository ships four pieces. Three of them stand in for a real engagement, the fourth is the instrumentation itself.
https://github.com/quarkslab/android-hardware-attestation-demo
- The backend (
backend/attestation_backend.py), a Python validator. It issues challenges onPOST /nonceand verifies chains onPOST /verify. It plays the role of the target app's server. - The demo client (
apps/QuarkslabAttestationDemo), an Android app that stands in for the target. It runs the honest attestation flow so we have a clean seam to hook. In a real engagement this is the app under analysis. - The clean server (
apps/QuarkslabAttestationServer), an Android app that runs on an unmodified phone. Given a challenge, it produces an attestation chain and nothing else. It is our oracle. - The instrumentation (
instrumentation/), a Frida agent plus a Python controller. This is the analyst's tool and the heart of the bypass.
We build the technique in three steps. First we find the seam in the client. Then we stand up the clean oracle. Then we wire the two together with the hook.
Where is the seam?
Before hooking anything, we need to know what we are cutting. Let us read the honest
flow in the demo client. MainActivity runs three calls in order.
private fun attest(server: String): Report = try {
    val backend = BackendClient(server)

    val nonce = backend.requestNonce()
    // The backend encodes the nonce as unpadded base64url. The challenge is the raw value.
    val challenge = Base64.decode(nonce, Base64.URL_SAFE or Base64.NO_WRAP)

    val key = KeystoreAttestation(this).generateAttestedKey(challenge)
    val response = backend.verify(nonce, key.chainBase64)

    buildReport(nonce, key, response)
} catch (e: Exception) {
    Report(false, "LOCAL FAILURE", "${e.javaClass.simpleName}\n${e.message ?: "no message"}")
}
Step one asks the backend for a nonce. Step two turns that nonce into an attested key.
Step three sends the resulting chain back for a verdict. The interesting work happens
in step two, inside KeystoreAttestation.
fun generateAttestedKey(challenge: ByteArray): AttestedKey {
    // ...
    val spec = KeyGenParameterSpec.Builder(
        KEY_ALIAS,
        KeyProperties.PURPOSE_SIGN or KeyProperties.PURPOSE_VERIFY
    )
        .setAlgorithmParameterSpec(ECGenParameterSpec("secp256r1"))
        .setDigests(KeyProperties.DIGEST_SHA256)
        .setAttestationChallenge(challenge)
        .setIsStrongBoxBacked(strongBox)
        .build()

    KeyPairGenerator.getInstance(KeyProperties.KEY_ALGORITHM_EC, "AndroidKeyStore").apply {
        initialize(spec)
        generateKeyPair()
    }
    // ... export chain with keyStore.getCertificateChain(KEY_ALIAS)
}
This is the whole hardware interaction. The call to setAttestationChallenge
10 is what turns an ordinary key generation into an attestation request. The
bytes we pass here are copied verbatim into the attestationChallenge field of the
KeyDescription, the challenge provided at key generation time. That is the
freshness binding the backend later checks against the nonce it issued.
On a clean phone this method returns a chain that reports a locked device. On our rooted phone it returns a chain that reports an unlocked one. Same code, same key, different verdict. The method is the seam. Everything device-specific is behind it, and its signature is small.
fun generateAttestedKey(challenge: ByteArray): AttestedKey
In goes a challenge, out comes a chain wrapped in an AttestedKey. If we can answer
this call with a chain from another device, the app never knows the difference. This
is where we cut.
A note for real targets. In the demo the seam is a single tidy method. A real app rarely offers one. The generic choke points are lower down, at
KeyGenParameterSpec.Builder.setAttestationChallengeon the way in and atjava.security.KeyStore.getCertificateChainon the way out. Hooking those two reaches any app that uses the standard Keystore attestation path, at the cost of a little more plumbing to correlate the challenge with the chain.
The clean oracle
The second phone runs the server app on a stock, locked system. Its job is narrow. Given a nonce, produce an attestation chain bound to it, and return it.
private fun buildKey(alias: String, challenge: ByteArray, strongBox: Boolean) {
    val spec = KeyGenParameterSpec.Builder(alias, KeyProperties.PURPOSE_SIGN)
        .setAlgorithmParameterSpec(ECGenParameterSpec("secp256r1"))
        .setDigests(KeyProperties.DIGEST_SHA256)
        .setAttestationChallenge(challenge)
        .setIsStrongBoxBacked(strongBox)
        .build()
    KeyPairGenerator.getInstance(KeyProperties.KEY_ALGORITHM_EC, KEYSTORE).apply {
        initialize(spec)
        generateKeyPair()
    }
}
This is the same key generation as the client, on purpose. The difference is the
device it runs on. Here setAttestationChallenge produces a chain whose RootOfTrust
reports deviceLocked true and verifiedBootState Verified, because that is the
real state of this phone. The server exposes it over HTTP.
POST /attest   { "nonce": "<base64url>" }
  -> { "nonce": "<base64url>", "chain": ["<der_base64>", ...], "chain_length": <int> }
One detail makes the relay trivial. The server decodes the nonce, uses the raw bytes
as the challenge, and echoes the same nonce string back next to the chain. Its
response body is byte for byte the request body the backend expects on POST /verify.
We can forward it as is, no reshaping.
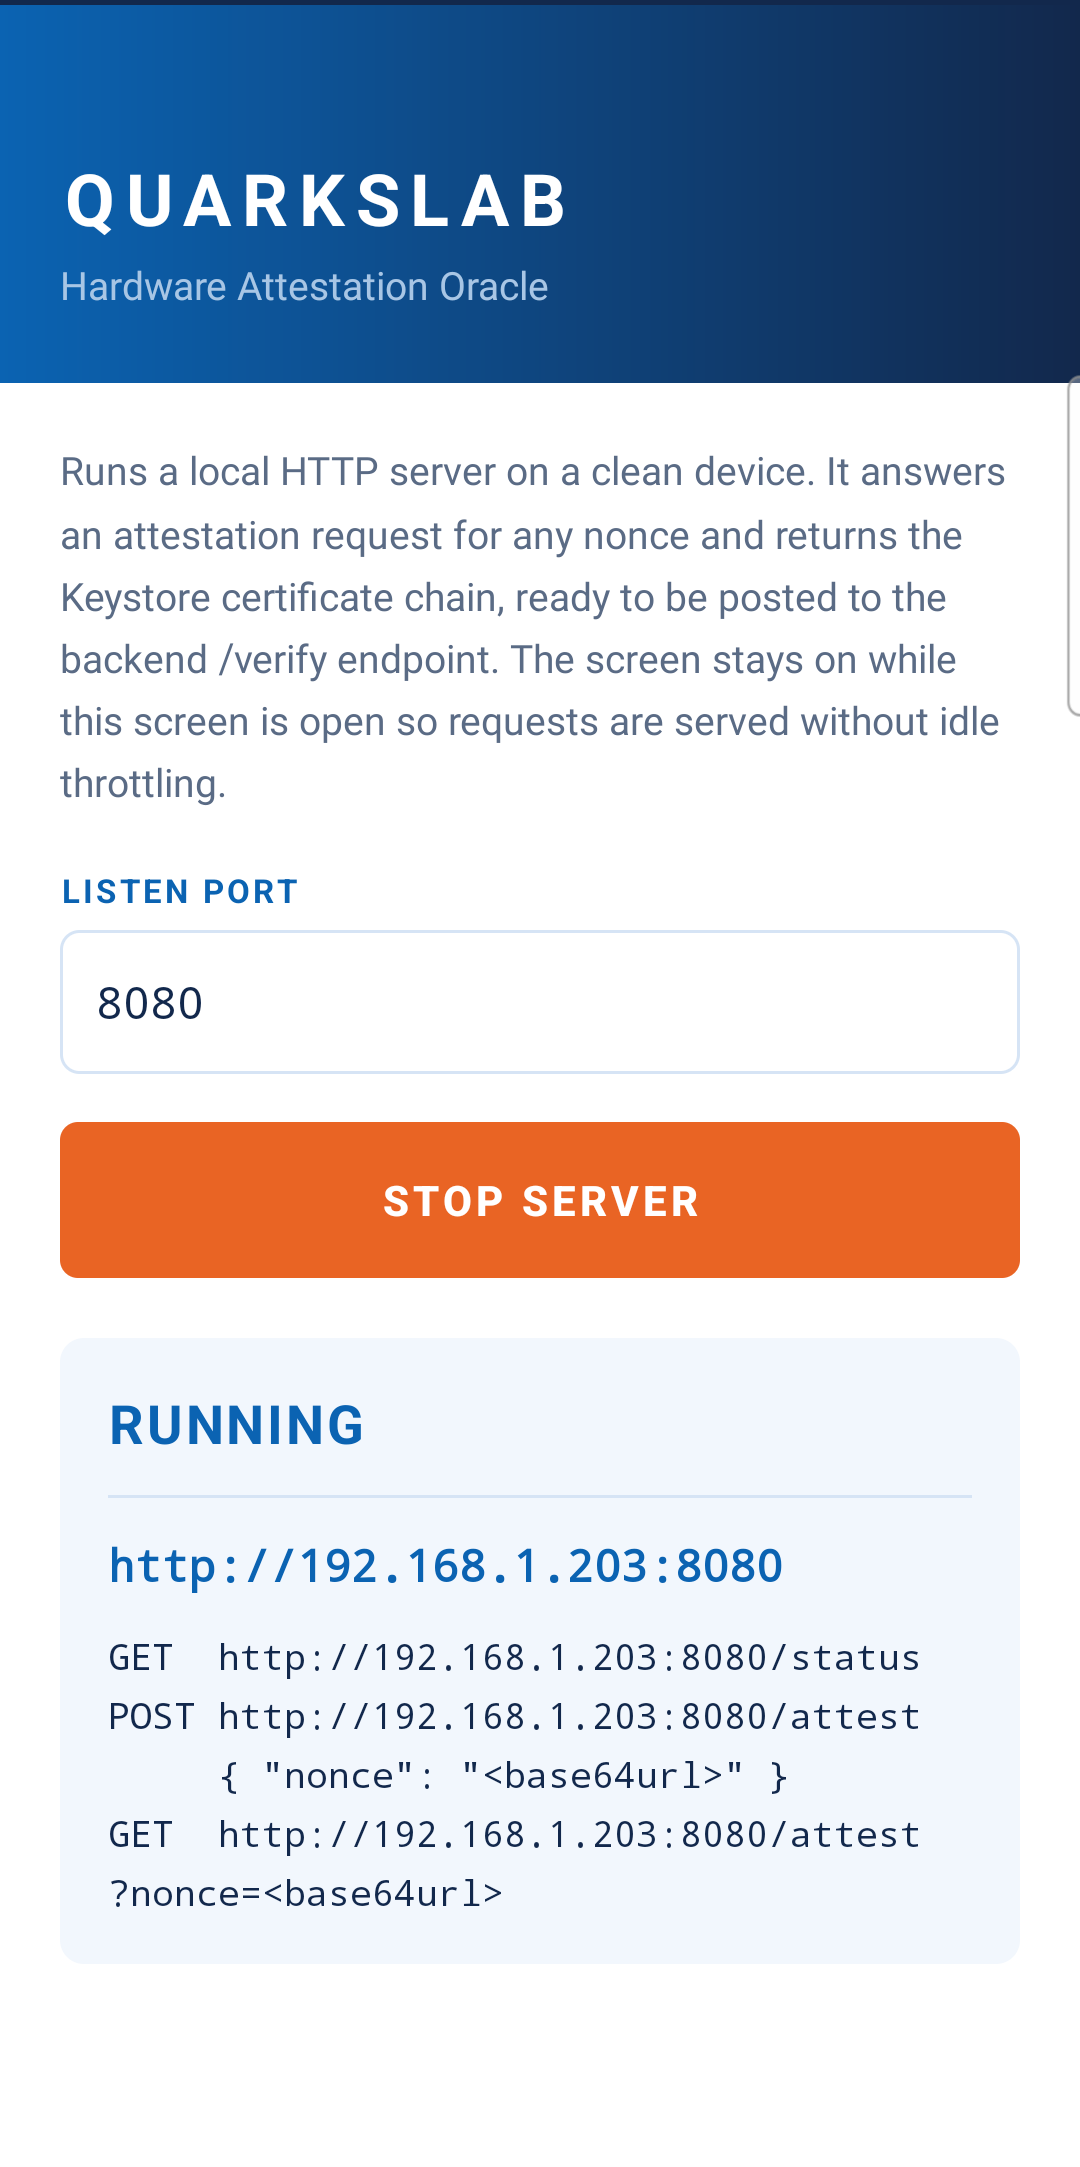
On the clean phone the oracle is a single screen. We start it, it listens on the local
network, and it is ready to answer /attest for any nonce. Nothing else happens here.
This device only lends its healthy hardware.
The hook
Now we connect the two phones. The Frida agent runs on the rooted phone and replaces the seam we found. It is short enough to read in full.
import Java from 'frida-java-bridge';

const PACKAGE = 'com.quarkslab.attestation.demo';

// android.util.Base64 flags: NO_PADDING(1) | NO_WRAP(2) | URL_SAFE(8).
// This reproduces the unpadded base64url the backend issues from POST /nonce.
const BASE64_URL = 1 | 2 | 8;

Java.perform(() => {
    const KeystoreAttestation = Java.use(`${PACKAGE}.KeystoreAttestation`);
    const AttestedKey = Java.use(`${PACKAGE}.AttestedKey`);
    const Base64 = Java.use('android.util.Base64');
    const ArrayList = Java.use('java.util.ArrayList');

    KeystoreAttestation.generateAttestedKey.implementation = function (challenge: any) {
        // challenge is the raw nonce bytes. Re-encode to the backend base64url form
        // so the clean device is queried with the exact nonce string it expects.
        const nonce = Base64.encodeToString(challenge, BASE64_URL);

        send({ event: 'attestation_request', nonce: nonce });

        let chain: string[] = [];
        const op = recv('response', (message: any) => {
            chain = (message.payload as string[]) ?? [];
        });
        op.wait();

        const remoteChain = ArrayList.$new();
        chain.forEach((cert) => remoteChain.add(cert));

        // AttestedKey(List<String> chainBase64, String requestedLevel, String? fallbackReason)
        return AttestedKey.$new(remoteChain, 'StrongBox (relayed)', null);
    };

    send({ event: 'ready', hook: `${PACKAGE}.KeystoreAttestation.generateAttestedKey` });
});
Let us read it the way Frida runs it. Java.perform gives us a callback that runs on a
thread attached to the Android runtime, which is required before touching any Java
class 13. Java.use resolves the classes we need, including the app's own
KeystoreAttestation and AttestedKey. We then assign a new function to
generateAttestedKey.implementation, which redefines the method for every future
call.
Inside the replacement we do four things.
We take the challenge bytes handed to us and re-encode them with
Base64.encodeToString using the flags NO_PADDING | NO_WRAP | URL_SAFE, that is
1 | 2 | 8 11. This rebuilds the exact nonce string the backend issued, because the
backend produces its nonce with unpadded base64url and the client decoded that same
string on the way in. The round trip is lossless.
We hand that nonce to our controller with send, then block on recv('response',...)
followed by op.wait(). send pushes a message out to the controller, recv
registers a one-shot callback for the reply, and wait blocks the hooked thread until
that reply arrives 1213. This turns an asynchronous message exchange into a
synchronous call, which is what we need. The app's thread must not return until we have
a chain to give it.
We wrap the relayed certificates in a java.util.ArrayList and build an AttestedKey
with $new. The 'StrongBox (relayed)' label is cosmetic, only the chain matters to
the backend.
The important line is the one that is not there. We never call the original
generateAttestedKey. The local Keystore is never touched, so the rooted phone never
produces its failing chain. The app receives our relayed AttestedKey and cannot tell
it apart from a local one, because the type and shape are identical.
The controller
The Python side attaches the agent and plays courier between the two phones.
def on_message(message, data):
    if message["type"] == "error":
        print(f"[!] agent error: {message.get('stack', message)}")
        return
    if message["type"] != "send":
        return

    payload = message["payload"]
    event = payload.get("event")
    # ...
    if event != "attestation_request":
        return

    nonce = payload.get("nonce")
    print(f"[*] Intercepted nonce {nonce}")

    chain = []
    try:
        response = requests.post(base_url, json={"nonce": nonce}, timeout=timeout)
        body = response.json()
        if response.ok and "chain" in body:
            chain = body["chain"]
    except Exception as exc:
        print(f"[!] Server request failed: {exc}")

    # Always answer so the hooked thread never blocks, even on failure.
    script.post({"type": "response", "payload": chain})
When the agent sends an attestation_request, the controller reads the nonce, posts it
to the clean device's /attest endpoint, and posts the returned chain back to the
agent with script.post 12. That reply is what unblocks the op.wait() on the phone.
The controller always answers, even on failure, so a network error degrades to an empty
chain and a clean rejection instead of a frozen app thread.
Attaching is a few lines with the Frida Python bindings.
device = frida.get_usb_device(timeout=5)
session = device.attach(DEMO_PACKAGE)        # or device.spawn + attach
script = session.create_script(open(AGENT_SCRIPT).read())
script.on("message", make_message_handler(script, args.host, args.port, args.timeout))
script.load()
Putting it together
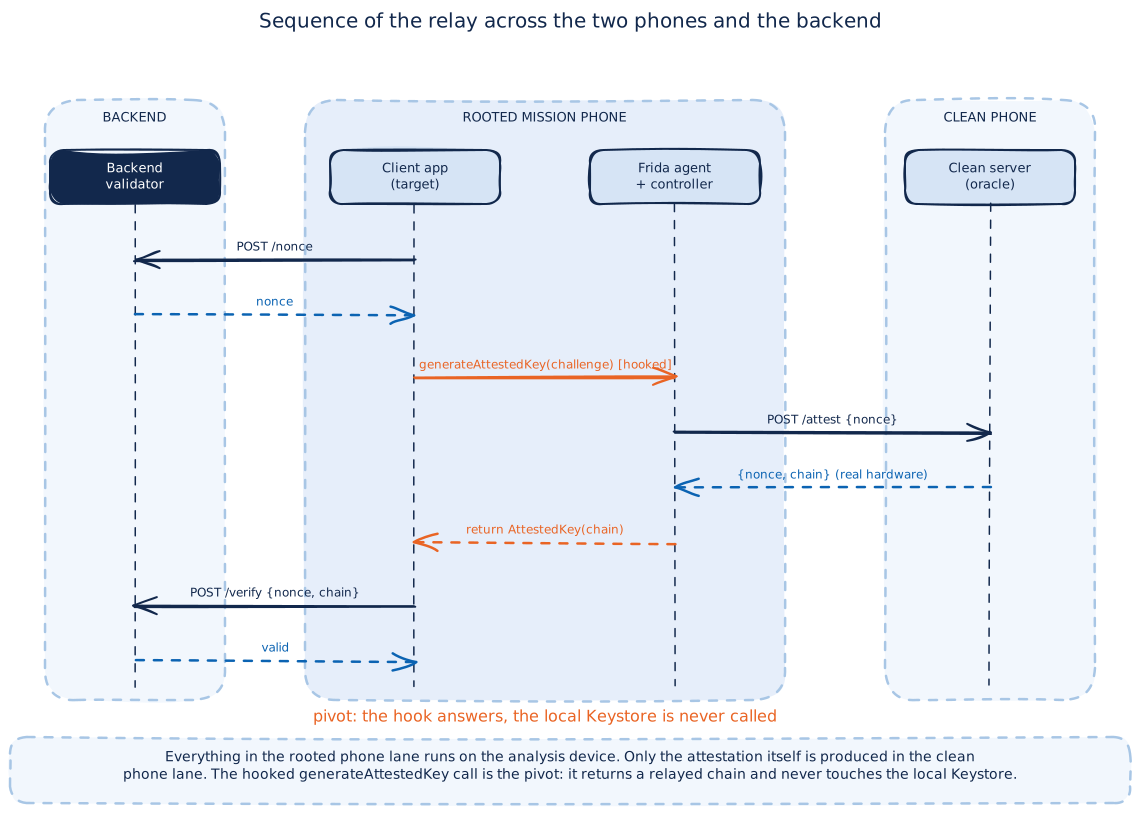
With the backend running, the clean server app open on the second phone, and the controller attached to the target, we tap the attestation button. Here is the full round trip.
backend   POST /nonce       -> nonce
client    generateAttestedKey(challenge)          [hooked]
  agent       send nonce to controller
  controller  POST http://<clean-device>/attest {nonce}
  server      { "nonce", "chain": [...] }          (clean phone, real hardware)
  controller  script.post(chain) back to the agent
  agent       return AttestedKey(chain)
client    POST /verify {nonce, chain}  -> valid
Back on the client, the same button now tells a different story. Same app, same code,
but the verdict flipped to ATTESTATION VALID. The report reads verified_boot_state
Verified and device_locked true, and the requested level is tagged StrongBox
(relayed). These values now come from the clean phone, not from ours.
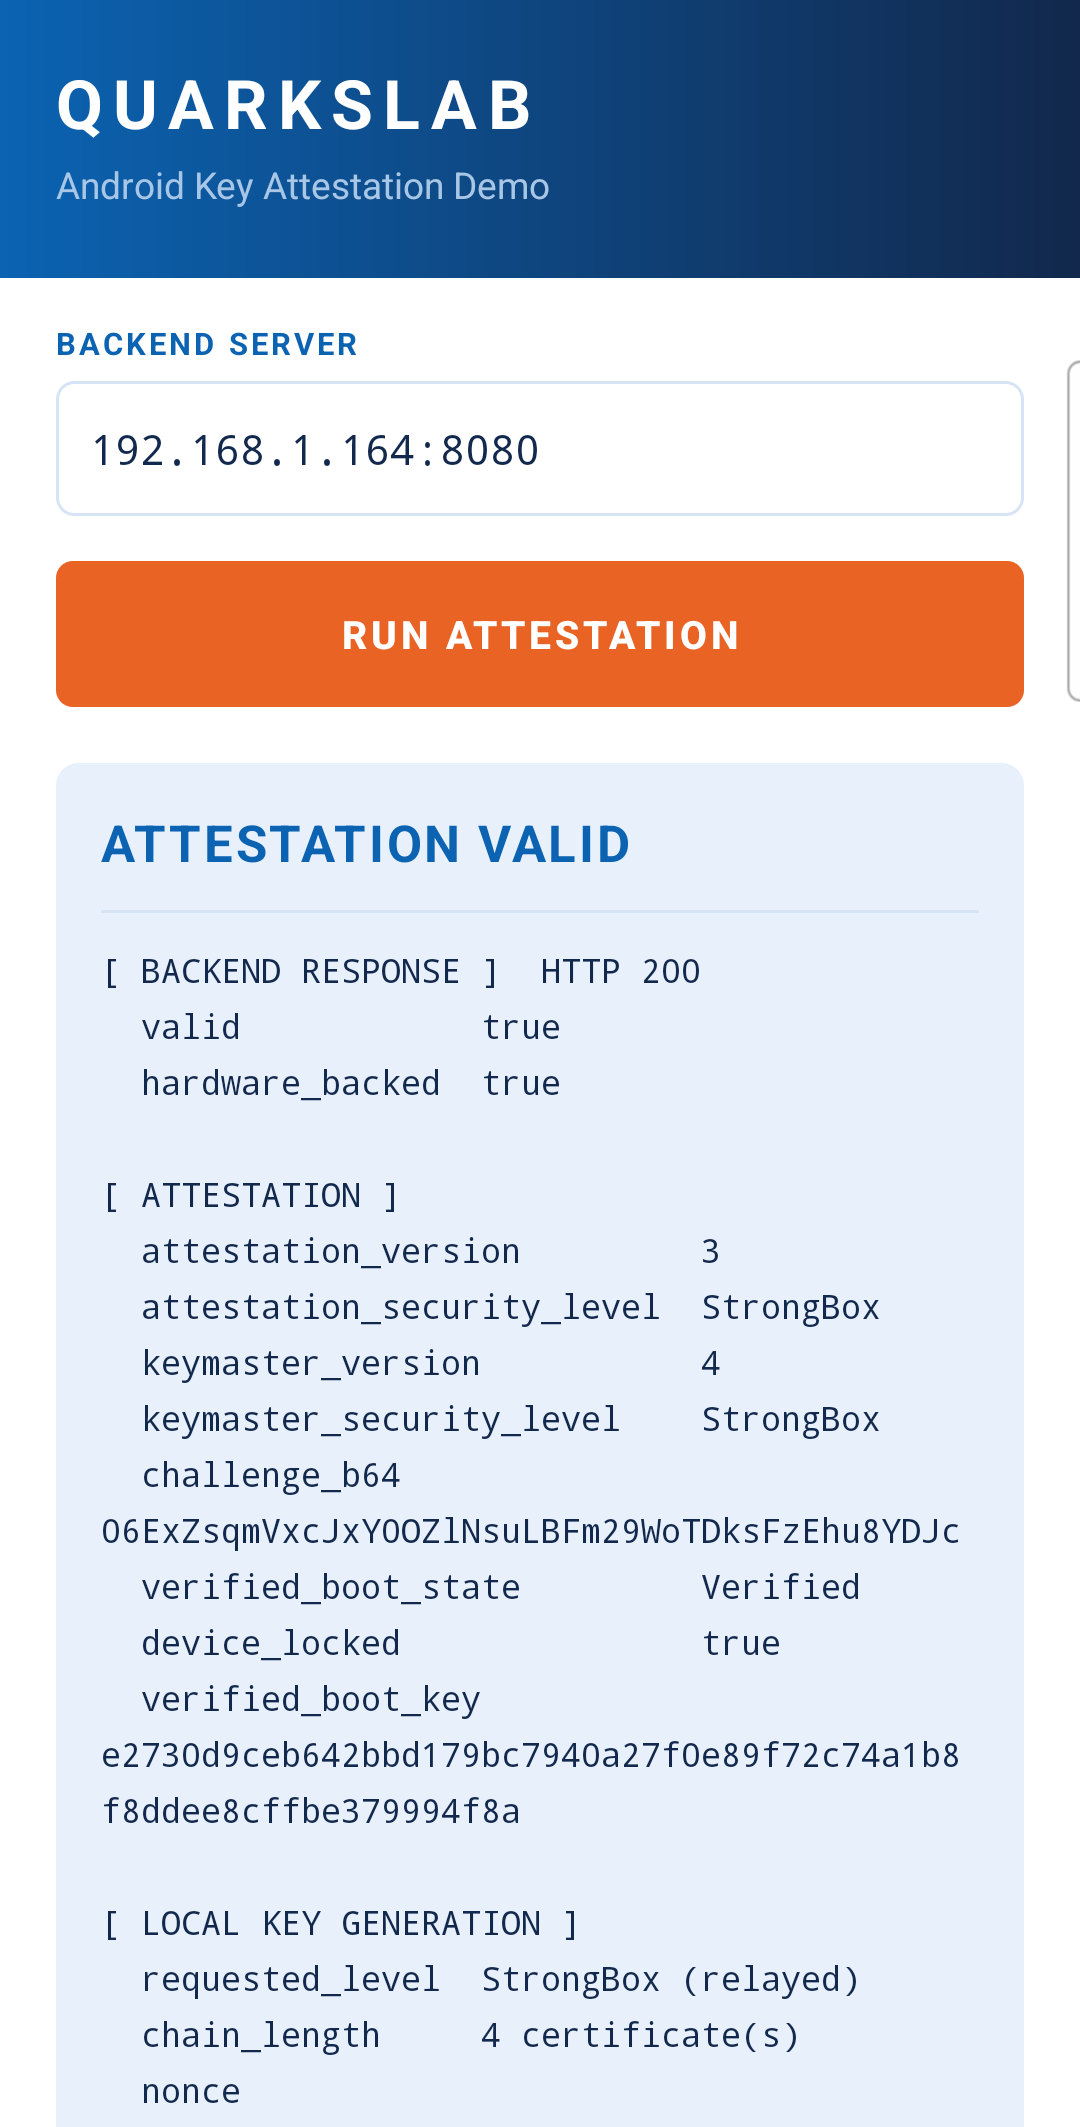
The chain that reaches the backend was produced by real secure hardware on a locked, verified phone. It carries our backend's challenge. So it passes every check the validator makes, and it is worth walking through them from the backend's own code to see why none of them fires.
The chain builds a valid path to a Google root and every signature checks out. The
challenge binding holds, because the attestationChallenge in the chain is the nonce
we relayed unchanged.
# Bind the attestation to the challenge we issued.
if attestation["challenge_b64"] != nonce:
    # ... rejected
The device policy is where our rooted phone would have died, and where the relay saves
us. The backend reads the RootOfTrust only from the hardwareEnforced list, exactly
as it should, since the software list can be written by a compromised platform.
state = attestation["verified_boot_state"]
if state == "absent":
    return "RootOfTrust missing from the tee_enforced authorization list"
if attestation["device_locked"] is not True:
    return "Bootloader is unlocked (deviceLocked is false)"
if state != "Verified":
    return f"Verified Boot state is {state}, expected Verified"
The tee_enforced in that error string is the Keymaster-era name for the
hardware-enforced list. KeyMint renamed it hardwareEnforced from attestation version
300 on, and the current AOSP schema uses that name throughout. Same field, two names.
On our own chain, device_locked would be false and this returns an error. On the
relayed chain it is true and the state is Verified, because those values come from
the clean phone's secure hardware. The hardware-backed check passes for the same
reason, the attestation security level is StrongBox or TrustedEnvironment, not
Software. The verdict is valid.
Why the backend cannot tell
What can the backend actually see? This is what makes the relay work, and what a mitigation has to change.
The certificate chain proves that a key lives in genuine secure hardware on a locked,
verified device, and that this hardware saw our challenge. It does not prove which
phone is talking to the backend right now. There is no field in the KeyDescription
that binds the attestation to the transport, the session, or the device presenting it.
The nonce is the only freshness signal, and we forwarded it faithfully. From the
backend's chair, a relayed chain and a local chain are the same bytes.
This is the same shape as the Remote Key Attestation that Guardsquare documented 1, a chain produced on one device and presented from another. Unlike the variants they describe, ours hides no keybox and patches no boot chain. It forwards a real attestation from a real clean device, bound to the real challenge, nothing more.
Where the simple relay stops
Our relay leans on two things the backend fails to do, and naming them points straight at the mitigations.
The first is decisive. The backend never checks which app the chain was issued to. Our
chain is produced on the clean phone by a different app than the target, and the
attestation says so. The app identity is written into the certificate under
attestationApplicationId. Our backend simply never reads it. The moment it does, and
compares that field to the app it expects, the chain we built is rejected. That single
check is where our relay stops, and it is the cheapest of all.
The second is deeper. The relay assumes attestation is a one-shot gate. The app attests once, at launch or during login, the backend validates the chain and the nonce, grants access, and moves on. That assumption holds surprisingly often, and when it does the relay is enough. It breaks the moment the backend asks the client to prove, later in the same session, that it holds the attested private key. The attested key lives on the clean phone, not on our rooted one. We relayed a chain, not a key. If the backend sends a fresh value to sign with that key and checks the signature, our test device cannot answer on its own. We would have to relay signing operations too, keeping the clean phone in the loop for every signed message. The one-shot courier becomes a live proxy, heavier and far more fragile, but not stopped.
Both are seams a defender can press on. We take them up in the next section, the decisive and cheap one first.
Mitigation
We now switch chairs and look at the relay from the backend side. The question is simple. What check would have stopped our own bypass? We take the mitigations cheapest first, and we keep each one honest. For every proposal we say what it forces the attacker to do, and what it does not solve.
One caveat up front. The first mitigation has been tested against our own relay. Its code, however, does not ship with this article. The companion backend leaves it out on purpose, so the relay has a gate to walk through. We ran the check separately and confirmed it rejects the relayed chain. The second is a design proposal. We reason about it and point at the standards it rests on, but we did not build it and we did not test it. We flag this again in each section and in the synthesis table, so the reader can tell a tested control from a blueprint.
It is worth being clear about what the relay exploits. It is not a weakness in the attestation mechanism. The chain we relayed is genuine, the signatures are valid, the hardware told the truth. What let us through is a backend that validated the chain without checking who it was issued to. The relay worked because of two gaps.
- The chain carries the identity of the app that requested the attestation, but the baseline backend never checks it against the app it expects to be talking to.
- It certifies a key the client is never asked to use, so a chain relayed from another device is never challenged.
The first gap is the real one, and closing it is the real mitigation. The second only raises the analyst's cost. We take them in that order.
Bind the attestation to your app
The attestation extension already carries the identity of the app that generated the
key. The attestationApplicationId field, tag [709] in the AuthorizationList,
holds the package name, the SHA-256 digests of the app's signing certificates, and the
version code 214. Our backend never reads it. Google's own issuance guidance is explicit that the package name and signature come from the holder and must be obtained and checked independently 20. That omission is what lets the relay
pass, because the chain came from a different app.
Its value is a DER-encoded structure, nested inside the extension 1514:
AttestationApplicationId ::= SEQUENCE {
    packageInfos      SET OF AttestationPackageInfo,
    signatureDigests  SET OF OCTET_STRING,
}

AttestationPackageInfo ::= SEQUENCE {
    packageName  OCTET_STRING,
    version      INTEGER,
}
It is tempting to picture the app identity as a
field the client sends next to the chain. That is not where it lives. It sits under tag [709],
inside the same attestation extension as the challenge and the root of trust, and
the backend parses it out of the certificate. packageName is the app package
name, signatureDigests are the SHA-256 digests of the app's signing
certificates. The platform fills both from the app that called generateKey, so
on a device with a healthy boot state the caller cannot choose them.
There is a catch, and it is the reason this check is placed first but not alone.
attestationApplicationId lives in the softwareEnforced list, populated by the
Android platform, not by the secure hardware. A software-enforced value can be
trusted only as long as the device that produced it runs an operating system that
complies with the Android Platform Security Model, that is, its bootloader is locked
and its verifiedBootState is Verified 2. On a directly rooted phone, with no
relay, a compromised platform could write anything here.
That caveat is exactly why the check works against the relay. Our backend already
rejects any chain whose hardware-enforced RootOfTrust does not report a locked,
verified device.
if attestation["device_locked"] is not True:
    return "Bootloader is unlocked (deviceLocked is false)"
if state != "Verified":
    return f"Verified Boot state is {state}, expected Verified"
Once that check passes, the chain was generated on a device whose OS satisfies the
security model. On such a device the softwareEnforced values are trustworthy. So
the two checks compose. The hardware-enforced boot state vouches for the platform, and
the now-trustworthy platform vouches for the app identity.
Concretely, the backend adds one comparison after parsing the extension.
# Illustrative. Not yet implemented in attestation_backend.py.
EXPECTED_PACKAGE = "com.quarkslab.attestation.demo"
EXPECTED_SIGNER_SHA256 = "…"  # SHA-256 of our release signing certificate

if attestation["application_package"] != EXPECTED_PACKAGE:
    return "Attestation was generated by a different application"
if EXPECTED_SIGNER_SHA256 not in attestation["application_signatures"]:
    return "Attestation application signature does not match"
In our relay the chain is produced by the clean oracle, which runs
com.quarkslab.attestation.server. Its honest platform writes that package and its own
signing digest into the field. The comparison fails and the chain is rejected. The
analyst cannot repackage around it either. A clean verified-boot OS will report the
true identity, and the signing certificate digest cannot be matched without the
target's private signing key. We added this check in a separate test and it rejected the
relayed chain. This single comparison kills the cross-app relay we built, even though the
shipped backend leaves it out on purpose.
It does not, on its own, prove device integrity. Treat it as a binding to your app, not as an integrity signal, and always pair it with the hardware-enforced boot state check above.
Bind the attestation to a live key
The app check closes the relay we demonstrated. Could a determined analyst still get past it? Only by producing the attestation from a clean instance of the very same app, so that the package and the signing digest match. That is harder than it sounds. It means driving the real target app, on a clean and verified device, to attest a challenge the analyst chooses and to hand back the raw chain. A clean verified device is exactly the kind you cannot instrument. There is no easy way to inject the nonce or to export the chain. Rooting that device to instrument it would break its verified boot state and fail the attestation. Short of a keybox or a TEE bug, which is the hardware path we set aside, the same-app relay stays out of reach.
Suppose the analyst gets there anyway. The deeper problem is that the backend inspects a certificate and never asks the client to use the key it certifies. The fix is proof of possession. After a valid attestation, the backend requires the client to sign a fresh server challenge with the attested private key, inside the same session, and it verifies the signature 16. This is the assertion step that mobile attestation designs place after attestation, the same attestation-then-assertion pattern used by hardware-backed authenticators 17.
This does not close the relay. The attested key lives on the clean device, so the analyst answers the proof by relaying every signing operation to it. The one-shot courier becomes a live proxy that must stay online for the whole session. That is an operational cost, latency on every signature and a device that has to stay reachable, not a barrier. It slows the analyst down, it does not lock them out.
We describe this mitigation, we do not ship it. The companion backend implements only the app binding above. Proof of possession is a design proposal here, reasoned but not implemented and not tested against our relay.
Synthesis
| Mitigation | Forces the attacker to | Residual risk | Defender cost | Status | Source |
|---|---|---|---|---|---|
Check attestationApplicationId |
attest from the same app on a clean device, which excludes instrumentation | none for the relay we built, must be paired with the boot state check | one comparison, backend only | tested against our relay, not in the shipped code | 214 |
| Proof of possession of the attested key | run a live signing proxy to the clean device for the whole session | relay still possible while the proxy stays online | one challenge-response, backend and app | design, not implemented here | 1617 |
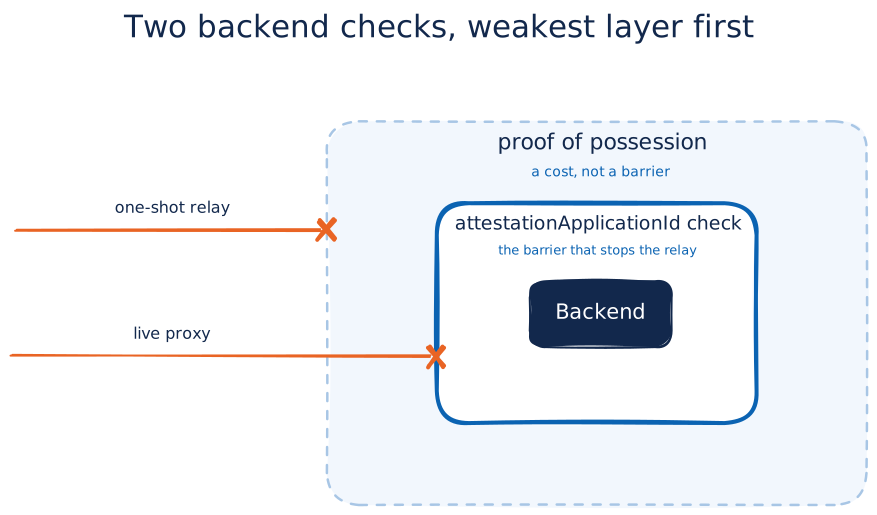
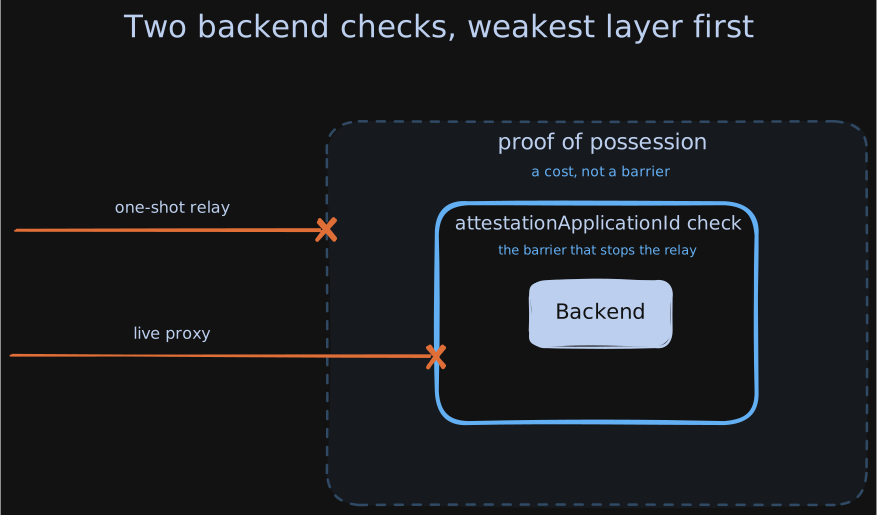
The checks
above are prevention, and they are cheap. The relay we built does not exploit a weakness
in attestation. It exploits a backend that never reads attestationApplicationId. That
is the one check that matters. Proof of possession only raises the cost for an attacker
who has somehow already cleared that bar.
Conclusion
We set out to do two things. Understand what Android hardware attestation proves, and get past it when it blocks an analysis. Both are done, and they point at the same lesson.
The mechanism itself is sound. A key generated in a TEE or a StrongBox is signed by a
key the device cannot choose or forge, the chain climbs to a Google root, and the
RootOfTrust reports the boot state without asking the platform for permission. On our
rooted phone that machinery worked exactly as designed. It told the truth, and the
truth locked us out. There was no cryptography to break, and we did not try.
What we broke was an assumption. The backend treated a signed certificate as proof that the phone in front of it was healthy. It is not. It is proof that some phone, somewhere, has healthy hardware and once saw our challenge. We supplied that phone. A clean device answered the attestation, its genuine chain traveled back through a Frida hook, and the backend validated a device it had never met. We changed neither the key nor the boot state. We changed who got asked.
That is the moral, and it is not specific to attestation. A hardware guarantee is only as strong as the protocol that consumes it. Attestation certifies a key, on a device, at a moment in time. It says nothing about which app requested it or whether that key is ever used again. A backend that reads only "valid chain, healthy device" and opens the gate has turned a hardware guarantee into a formality. Closing the gap does not call for better silicon. It calls for the backend to bind the attestation to the app that asked. That check is cheap and unglamorous, which is probably why it is so often skipped.
References
-
Sergio Castell, Bypassing Key Attestation: How Remote Devices Exploit the API, Guardsquare, 27 January 2026. ↩↩↩
-
Key and ID attestation, Android Open Source Project. ↩↩↩↩↩↩↩↩↩↩↩↩↩
-
Android Compatibility Definition Document, section 9.11, Keys and Credentials. ↩↩
-
Android Keystore system, Hardware security module, Android Developers. ↩
-
Verify hardware-backed key pairs with key attestation, Android Developers. ↩↩↩
-
Verified Boot, Android Open Source Project. ↩
-
Boot flow and device state, Verified Boot, Android Open Source Project. ↩
-
Trust but verify attestation with revocation, Google Online Security Blog, 2019. ↩↩↩↩
-
Remote Key Provisioning, Android Open Source Project. ↩↩↩↩
-
KeyGenParameterSpec.Builder, setAttestationChallenge, Android Developers. ↩
-
android.util.Base64, Android Developers. ↩
-
JavaScript API, Frida. ↩↩
-
Shawn Willden, Keystore Key Attestation, Android Developers Blog, 7 September 2017. ↩↩↩
-
AttestationApplicationId.java, google/android-key-attestation reference implementation. ↩
-
Ensuring device and app integrity and protecting service requests: LINE device attestation service, LY Corporation Tech Blog. ↩↩
-
Hardware-backed Keystore Authenticators on Android, FIDO Alliance white paper, June 2018. ↩↩
-
Hardware-Backed Heist: Extracting ECDSA Keys from Qualcomm's TrustZone, NCC Group whitepaper. ↩
-
Alon Shakevsky, Eyal Ronen, Avishai Wool, Trust Dies in Darkness: Shedding Light on Samsung's TrustZone Keymaster Design, USENIX Security 2022. ↩
-
Implement hardware-backed attestation for digital credentials, Android Developers. ↩