Process isolation is a key component for containers. One of the key underlying mechanisms are namespaces. We will explore what they are, and how they work, to build our own isolated container and better understand each piece.
What are namespaces?
Namespaces are a Linux kernel feature released in kernel version 2.6.24 in 2008. They provide processes with their own system view, thus isolating independent processes from each other. In other words, namespaces define the set of resources that a process can use (You cannot interact with something that you cannot see). At a high level, they allow fine-grain partitioning of global operating system resources such as mounting points, network stack and inter-process communication utilities. A powerful side of namespaces is that they limit access to system resources without the running process being aware of the limitations. In typical Linux fashion they are represented as files under the /proc/<pid>/ns directory.
cryptonite@cryptonite:~ $ echo $$
4622
cryptonite@cryptonite:~ $ ls /proc/$$/ns -al
total 0
dr-x--x--x 2 cryptonite cryptonite 0 Jun 29 15:00 .
dr-xr-xr-x 9 cryptonite cryptonite 0 Jun 29 13:13 ..
lrwxrwxrwx 1 cryptonite cryptonite 0 Jun 29 15:00 cgroup -> 'cgroup:[4026531835]'
lrwxrwxrwx 1 cryptonite cryptonite 0 Jun 29 15:00 ipc -> 'ipc:[4026531839]'
lrwxrwxrwx 1 cryptonite cryptonite 0 Jun 29 15:00 mnt -> 'mnt:[4026531840]'
lrwxrwxrwx 1 cryptonite cryptonite 0 Jun 29 15:00 net -> 'net:[4026532008]'
lrwxrwxrwx 1 cryptonite cryptonite 0 Jun 29 15:00 pid -> 'pid:[4026531836]'
lrwxrwxrwx 1 cryptonite cryptonite 0 Jun 29 15:00 pid_for_children -> 'pid:[4026531836]'
lrwxrwxrwx 1 cryptonite cryptonite 0 Jun 29 15:00 time -> 'time:[4026531834]'
lrwxrwxrwx 1 cryptonite cryptonite 0 Jun 29 15:00 time_for_children -> 'time:[4026531834]'
lrwxrwxrwx 1 cryptonite cryptonite 0 Jun 29 15:00 user -> 'user:[4026531837]'
lrwxrwxrwx 1 cryptonite cryptonite 0 Jun 29 15:00 uts -> 'uts:[4026531838]'
When we spawn a new process all the namespaces are inherited from its parent.
# inception
cryptonite@cryptonite:~ $ /bin/zsh
# father PID verification
╭─cryptonite@cryptonite ~
╰─$ ps -efj  | grep $$
crypton+   13560    4622   13560    4622  1 15:07 pts/1    00:00:02 /bin/zsh
╭─cryptonite@cryptonite ~
╰─$ ls /proc/$$/ns -al
total 0
dr-x--x--x 2 cryptonite cryptonite 0 Jun 29 15:10 .
dr-xr-xr-x 9 cryptonite cryptonite 0 Jun 29 15:07 ..
lrwxrwxrwx 1 cryptonite cryptonite 0 Jun 29 15:10 cgroup -> 'cgroup:[4026531835]'
lrwxrwxrwx 1 cryptonite cryptonite 0 Jun 29 15:10 ipc -> 'ipc:[4026531839]'
lrwxrwxrwx 1 cryptonite cryptonite 0 Jun 29 15:10 mnt -> 'mnt:[4026531840]'
lrwxrwxrwx 1 cryptonite cryptonite 0 Jun 29 15:10 net -> 'net:[4026532008]'
lrwxrwxrwx 1 cryptonite cryptonite 0 Jun 29 15:10 pid -> 'pid:[4026531836]'
lrwxrwxrwx 1 cryptonite cryptonite 0 Jun 29 15:10 pid_for_children -> 'pid:[4026531836]'
lrwxrwxrwx 1 cryptonite cryptonite 0 Jun 29 15:10 time -> 'time:[4026531834]'
lrwxrwxrwx 1 cryptonite cryptonite 0 Jun 29 15:10 time_for_children -> 'time:[4026531834]'
lrwxrwxrwx 1 cryptonite cryptonite 0 Jun 29 15:10 user -> 'user:[4026531837]'
lrwxrwxrwx 1 cryptonite cryptonite 0 Jun 29 15:10 uts -> 'uts:[4026531838]'
Namespaces are created with the clone syscall with one of the following arguments:
CLONE_NEWNS - create new mount namespace;
CLONE_NEWUTS - create new UTS namespace;
CLONE_NEWIPC - create new IPC namespace;
CLONE_NEWPID - create new PID namespace;
CLONE_NEWNET - create new NET namespace;
CLONE_NEWUSER - create new USR namespace;
CLONE_NEWCGROUP - create a new cgroup namespace.
Namespaces can also be created using the unshare syscall. The difference between clone and unshare is that clone spawns a new process inside a new set of namespaces, and unshare moves the current process inside a new set of namespaces (unshares the current ones).
Why use namespaces?
If we imagine namespaces as boxes for processes containing some abstracted global system resources, one good thing with these boxes is that you can add and remove stuff from one box and it will not affect the content of the other boxes. Or, if a process A in a box (set of namespaces) goes crazy and decides to delete the whole filesystem or the network stack in that box, it will not affect the abstraction of these resources provided for another process B placed in a different box. Moreover, namespaces can provide even fine-grained isolation, allowing process A and B to share some system resources (e.g. sharing a mount point or a network stack). Namespaces are often used when untrusted code has to be executed on a given machine without compromising the host OS. Programming contest platforms like Hackerrank, Codeforces, Rootme use namespaced environments in order to safely execute and verify contestants' code without putting their servers at risk. PaaS (platform as a service) providers like Google Cloud Engine use namespaced environments to run multiple user services (e.g. web servers, databases) on the same hardware without the possibility of interference of these services. So namespaces can also be seen as useful for efficient resource sharing. Other cloud technologies like Docker or LXC also use namespaces as means for process isolation. These technologies put operating system processes in isolated environments called containers. Running processes in Docker containers, for example, is like running them in virtual machines. The difference between containers and VMs is that containers share and use directly the host OS kernel, thus making them significantly lighter than virtual machines as there is no hardware emulation. This increase of overall performance is mainly due to the usage of namespaces which are directly integrated in the Linux kernel. However, there are some implementations of VMs which are extremely light.
Types of namespaces
In the current stable Linux Kernel version 5.7 there are seven different namespaces:
PID namespace: isolation of the system process tree;
NET namespace: isolation of the host network stack;
MNT namespace: isolation of host filesystem mount points;
UTS namespace: isolation of hostname;
IPC namespace: isolation for interprocess communication utilities (shared segments, semaphores);
USER namespace: isolation of system users IDs;
CGROUP namespace: isolation of the virtual cgroup filesystem of the host.
The namespaces are per-process attributes. Each process can perceive at most one namespace. In other words, at any given moment, any process P belongs to exactly one instance of each namespace. For example when a given process wants to update the route table on the system, the Kernel shows it the copy of the route table of the namespace to which it belongs at that moment. If a process asks for its ID in the system, the Kernel will respond with the ID of the process in its current namespace (in case of nested namespace). We are going to look in detail at each namespace in order to understand what are the operating system mechanisms behind them. Understanding that will help us find what is under the hood of today’s containerized technologies.
PID namespace
Historically, the Linux kernel has maintained a single process tree. The tree data structure contains a reference to every process currently running in a parent-child hierarchy. It also enumerates all running processes in the OS. This structure is maintained in the so called procfs filesystem which is a property of the live system (i.e. it’s present only when the OS is running). This structure allows processes with sufficient privileges to attach to other processes, inspect, communicate and/or kill them. It also contains information about the root directory of a process, its current working directory, the open file descriptors, virtual memory addresses, the available mounting points, etc.
# an example of the procfs structure
cryptonite@cryptonite:~ $ls /proc/1/
   arch_status     coredump_filter      gid_map     mounts          pagemap         setgroups   task
   attr            cpu_resctrl_groups   io          mountstats      patch_state     smaps       timens_offsets
   cgroup          environ              map_files   numa_maps       root            stat        uid_map
   clear_refs      exe                  maps        oom_adj         sched           statm
...
# an example of the process tree structure
cryptonite@cryptonite:~ $pstree | head -n 20
systemd-+-ModemManager---2*[{ModemManager}]
        |-NetworkManager---2*[{NetworkManager}]
        |-accounts-daemon---2*[{accounts-daemon}]
        |-acpid
        |-avahi-daemon---avahi-daemon
        |-bluetoothd
        |-boltd---2*[{boltd}]
        |-colord---2*[{colord}]
        |-containerd---17*[{containerd}]
On system boot, the first process started on most of the modern Linux OS is systemd (system daemon), which is situated on the root node of the tree. Its parent is PID=0 which is a non-existing process in the OS. This process is after that responsible for starting the other services/daemons, which are represented as its childs and are necessary for the normal functioning of the OS. These processes will have PIDs > 1 and the PIDs in the tree structure are unique.
With the introduction of the Process namespace (or PID namespace) it became possible to make nested process trees. It allows processes other than systemd (PID=1) to perceive themselves as the root process by moving on the top of a subtree, thus obtaining PID=1 in that subtree. All processes in the same subtree will also obtain IDs relative to the process namespace. This also means that some processes may end up having multiple IDs depending on the number of process namespaces that they are in. Yet, in each namespace, at most one process can have a given PID (the unique value of a node in the process tree becomes a per-namespace property). This comes from the fact that relations between the processes in the root process namespace stay intact. Or said with other words, a process in a new PID namespace is still attached to its parent, thus being part of its parent PID namespace. These relations between all processes can be seen in the root process namespace, but in a nested process namespace they are not visible. That means that a process in a nested process namespace can’t interact with its parent or any other process in an upper process namespace. That’s due to the fact that, being on the top of a new PID namespace, the process perceives its PID as 1, and there is no other process before the process with PID=1.
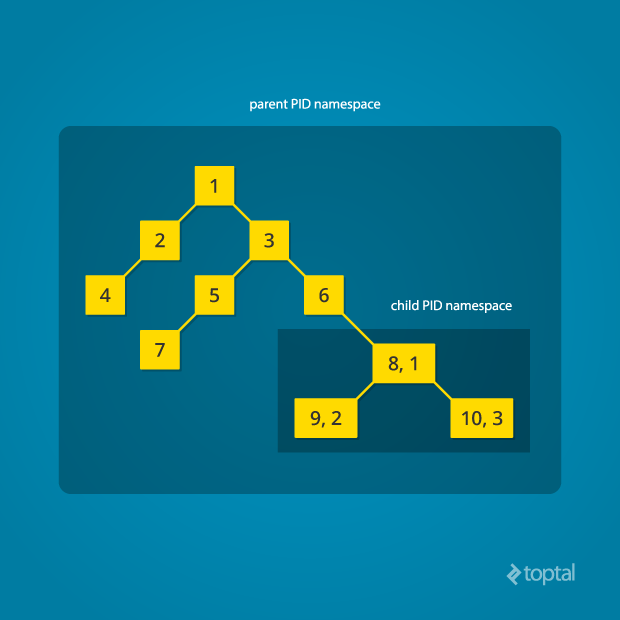
Diagram by Mahmud Ridwan from Toptal
In the Linux kernel the PID is represented as a structure. Inside we can also find the namespaces a process is part of as an array of upid struct.
struct upid {
    int nr;  /* the pid value */
    struct pid_namespace *ns;       /* the namespace this value
                                    * is visible in */
    struct hlist_node pid_chain; /* hash chain for faster search of PIDS in the given namespace*/
};

struct pid {
    atomic_t count; /* reference counter */
    struct hlist_head tasks[PIDTYPE_MAX]; /* lists of tasks */
    struct rcu_head rcu;
    int level;              // number of upids
    struct upid numbers[0];  // array of pid namespaces
};
To create a new process inside a new PID namespace, one must call the clone() system call with a special flag CLONE_NEWPID. Whereas the other namespaces discussed below can also be created using the unshare() system call, a PID namespace can only be created at the time a new process is spawned using clone() or fork() syscalls.
Let’s explore that:
# Let's start a process in a new pid namespace;
cryptonite@cryptonite:~ $sudo unshare --pid  /bin/bash
bash: fork: Cannot allocate memory     [1]
root@cryptonite:/home/cryptonite# ls
bash: fork: Cannot allocate memory     [1]
What happened? It seems like the shell is stuck between the two namespaces. This is due to the fact that unshare doesn’t enter the new namespace after being executed (execve() call). This is the desired Linux kernel behavior. The current “unshare” process calls the unshare system call, creating a new pid namespace, but the current “unshare” process is not in the new pid namespace. A process B creates a new namespace but the process B itself won’t be put into the new namespace, only the sub-processes of process B will be put into the new namespace. After the creation of the namespace the unshare program will execute /bin/bash. Then /bin/bash will fork several new sub-processes to do some jobs. These sub-processes will have a PIDs relative to the new namespace and when these processes are done they will exit leaving the namespace without PID=1. The Linux kernel doesn’t like to have PID namespaces without a process with PID=1 inside. So when the namespace is left empty the kernel will disable some mechanisms which are related to the PID allocation inside this namespace thus leading to this error. This error is well documented if you look around the Internet.
Instead, we must instruct the unshare program to fork a new process after it has created the namespace. Then this new process will have PID=1 and will execute our shell program. In that way when the sub-processes of /bin/bash exit the namespace will still have a process with PID=1.
cryptonite@cryptonite:~ $sudo unshare --pid --fork  /bin/bash
root@cryptonite:/home/cryptonite# echo $$
1
root@cryptonite:/home/cryptonite# ps
    PID TTY          TIME CMD
   7239 pts/0    00:00:00 sudo
   7240 pts/0    00:00:00 unshare
   7241 pts/0    00:00:00 bash
   7250 pts/0    00:00:00 ps
But why doesn't our shell have PID 1 when we use ps? And why do we still see the process from the root namespace ? The ps program uses the procfs virtual file system to obtain information about the current processes in the system. This filesystem is mounted in the /proc directory. However, in the new namespace this mountpoint describes the processes from the root PID namespace. There are two ways to avoid that:
# creating a new mount namespace and mounting a new procfs inside
cryptonite@cryptonite:~ $sudo unshare --pid --fork --mount /bin/bash
root@cryptonite:/home/cryptonite# mount -t proc proc /proc
root@cryptonite:/home/cryptonite# ps
    PID TTY          TIME CMD
      1 pts/2    00:00:00 bash
      9 pts/2    00:00:00 ps

# Or use the unshare wrapper with the --mount-proc flag
# which does the same
cryptonite@cryptonite:~ $sudo unshare --fork --pid --mount-proc  /bin/bash
root@cryptonite:/home/cryptonite# ps
    PID TTY          TIME CMD
      1 pts/1    00:00:00 bash
      8 pts/1    00:00:00 ps
As we mentioned before, a process can have multiple IDs depending on the number of namespaces the process is in. Let’s now inspect the different PIDs of a shell that is nested in two namespaces.
╭cryptonite@cryptonite:~ $sudo unshare --fork --pid --mount-proc  /bin/bash
# this process has PID 4700 in the root PID namespace
root@cryptonite:/home/cryptonite# unshare --fork --pid --mount-proc /bin/bash
root@cryptonite:/home/cryptonite# ps
    PID TTY          TIME CMD
      1 pts/1    00:00:00 bash
      8 pts/1    00:00:00 ps

# Let's inspect the different PIDs
cryptonite@cryptonite:~ $sudo nsenter --target 4700 --pid --mount
cryptonite# ps -aux
USER         PID %CPU %MEM    VSZ   RSS TTY      STAT START   TIME COMMAND
root           1  0.0  0.0  18476  4000 pts/0    S    21:11   0:00 /bin/bash
root           9  0.2  0.0  21152  5644 pts/1    S    21:15   0:00 -zsh # me
root          14  0.0  0.0  20972  4636 pts/0    S    21:15   0:00 sudo unshare
root          15  0.0  0.0  16720   520 pts/0    S    21:15   0:00 unshare -fp -
root          11  0.0  0.0  18476  3836 pts/0    S+   21:15   0:00 /bin/bash # nested shell
root          24  0.0  0.0  20324  3520 pts/1    R+   21:15   0:00 ps -aux
# the PID viewed from within the first PID namespace is 11

# Let's see its PID in the root PID namespace
cryptonite@cryptonite:~ $ps aux | grep /bin/bash
....
root       13512  0.0  0.0  18476  4036 pts/1    S+   14:44   0:00 /bin/bash
# believe me it's that process ;)

# All this info can be found in the procfs
cryptonite@cryptonite:~ $cat /proc/13152/status | grep -i NSpid
NSpid:  13512   11  1
# PID in the root namespace = 13512
# PID in the first nested namespace = 11
# pid in the second nested namespace = 1
Okay, after we saw the virtualization in terms of identifiers let’s see if there is real isolation in terms of interaction with other processes in the OS.
# process is run with effective UID=0 (root) and it can normally kill any other process in the OS
root@cryptonite:/home/cryptonite# kill 3
# nothing happens, because there is no process 3 in the current namespace
We can see that the process could not interact with a process outside of its current namespace (You cannot touch something you cannot see, remember?).
To sum up about the process namespace:
Processes within a namespace only see (interact with) the processes in the same PID namespace (isolation);
Each PID namespace has its own numbering starting at 1 (relative);
This numbering is unique per process namespace - If PID 1 goes away then the whole namespace is deleted;
Namespaces can be nested;
A process ends up having multiple PIDs (when namespaces are nested);
All ‘ps’-like commands use the virtual procfs file system mount to deliver their functionalities.
NET namespace
A network namespace limits the view of a process of the host network. It allows a process to have its own separation from the host network stack (set of network interfaces, routing rules, set of netfilter hooks). Let’s inspect that:
# root net namespace
cryptonite@cryptonite:~ $ip link  # network interfaces
1: lo: <LOOPBACK,UP,LOWER_UP> mtu 65536 qdisc noqueue state UNKNOWN mode DEFAULT group default qlen 1000
    link/loopback 00:00:00:00:00:00 brd 00:00:00:00:00:00
2: enp0s31f6: <NO-CARRIER,BROADCAST,MULTICAST,UP> mtu 1500 qdisc fq_codel state DOWN mode DEFAULT group default qlen 1000
    link/ether 8c:16:45:54:8b:65 brd ff:ff:ff:ff:ff:ff
.....
cryptonite@cryptonite:~ $ip route # routing rules
default via 192.168.2.1 dev wlp3s0 proto dhcp metric 600
10.0.0.0/16 via 10.0.1.230 dev tun0 proto static metric 50
....
cryptonite@cryptonite:~ $sudo iptables --list-rules # firewall rules
-P INPUT ACCEPT
-P FORWARD DROP
-P OUTPUT ACCEPT
-N DOCKER
.....
Let’s now create a fresh new network namespace and inspect the network stack.
cryptonite@cryptonite:~ $sudo unshare --net /bin/bash
root@cryptonite:/home/cryptonite# ip link
1: lo: <LOOPBACK> mtu 65536 qdisc noop state DOWN mode DEFAULT group default qlen 1000
    link/loopback 00:00:00:00:00:00 brd 00:00:00:00:00:00
root@cryptonite:/home/cryptonite# ip route
Error: ipv4: FIB table does not exist.
Dump terminated
root@cryptonite:/home/cryptonite# iptables --list-rules
-P INPUT ACCEPT
-P FORWARD ACCEPT
-P OUTPUT ACCEPT
We can see that the entire network stack of the process has changed. There is only the loopback interface which is also down. Said with other words, this process is unreachable via the network. But that’s a problem, isn’t it? Why do we need a virtually isolated network stack if we can’t communicate through it? Here is an illustration of the situation:

As normally we want to be able to communicate in some way with a given process, we have to provide a way to connect different net namespaces.
Connecting a pair of namespaces
In order to make a process inside a new network namespace reachable from another network namespace, a pair of virtual interfaces is needed. These two virtual interfaces come with a virtual cable - what comes at one of the ends goes to the other (like a Linux pipe). So if we want to connect a namespace (let’s say N1) and another one (let’s say N2) we have to put one of the virtual interfaces in the network stack of N1 and the other in the network stack of N2.
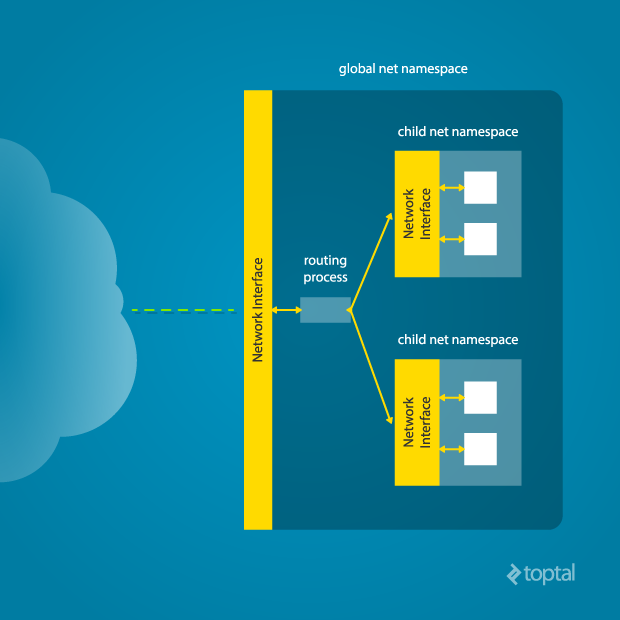
Diagram by Mahmud Ridwan from Toptal
Let’s build a functional network between the different network namespaces! It’s important to note that there are two types of network namespaces - named and anonymous. The details are not going to be discussed in this article. First we’re going to create a network namespace and then create a pair of virtual interfaces:
# create network namespace
cryptonite@cryptonite:~ $sudo ip netns add netnstest
# check if creation was successful
cryptonite@cryptonite:~ $ls /var/run/netns
netnstest
# check if we have the same configurations as before
cryptonite@cryptonite:~ $sudo nsenter --net=/var/run/netns/netnstest /bin/bash
root@cryptonite:/home/cryptonite# ip link
1: lo: <LOOPBACK> mtu 65536 qdisc noop state DOWN mode DEFAULT group default qlen 1000
    link/loopback 00:00:00:00:00:00 brd 00:00:00:00:00:00
# create the virtual network interface pair on
# the top of the network stack of the root namespace
cryptonite@cryptonite:~ $sudo ip link add veth0 type veth peer name ceth0
# check if the pair veth0-ceth0 was successfully created
cryptonite@cryptonite:~ $ip link | tail -n 4
8: ceth0@veth0: <BROADCAST,MULTICAST,M-DOWN> mtu 1500 qdisc noop state DOWN mode DEFAULT group default qlen 1000
    link/ether f6:1a:ee:9c:26:0c brd ff:ff:ff:ff:ff:ff
9: veth0@ceth0: <BROADCAST,MULTICAST,M-DOWN> mtu 1500 qdisc noop state DOWN mode DEFAULT group default qlen 1000
    link/ether ae:4d:95:44:ab:39 brd ff:ff:ff:ff:ff:ff
# put one of the interfaces in the previously created network namespace
# and keep the other end in the root network namespace
cryptonite@cryptonite:~ $sudo ip link set ceth0 netns netnstest
cryptonite@cryptonite:~ $ip link
...
9: veth0@if8: <BROADCAST,MULTICAST> mtu 1500 qdisc noop state DOWN mode DEFAULT group default qlen 1000
    link/ether ae:4d:95:44:ab:39 brd ff:ff:ff:ff:ff:ff link-netns netnstest
# one of the interfaces vanished
# turn on the interface and assign it an IP
cryptonite@cryptonite:~ $sudo ip link set veth0 up
cryptonite@cryptonite:~ $sudo ip addr add 172.12.0.11/24 dev veth0

cryptonite@cryptonite:~ $sudo nsenter --net=/var/run/netns/netnstest /bin/bash
root@cryptonite:/home/cryptonite# ip link
1: lo: <LOOPBACK> mtu 65536 qdisc noop state DOWN mode DEFAULT group default qlen 1000
    link/loopback 00:00:00:00:00:00 brd 00:00:00:00:00:00
8: ceth0@if9: <BROADCAST,MULTICAST> mtu 1500 qdisc noop state DOWN mode DEFAULT group default qlen 1000
    link/ether f6:1a:ee:9c:26:0c brd ff:ff:ff:ff:ff:ff link-netnsid 0
root@cryptonite:/home/cryptonite# ip link set lo up
root@cryptonite:/home/cryptonite# ip link set ceth0 up
root@cryptonite:/home/cryptonite# ip addr add 172.12.0.12/24 dev ceth0
root@cryptonite:/home/cryptonite# ip addr | grep ceth
8: ceth0@if9: <BROADCAST,MULTICAST,UP,LOWER_UP> mtu 1500 qdisc noqueue state UP group default qlen 1000
    inet 172.12.0.12/24 scope global ceth0
Now we have to test the connectivity of the virtual interfaces.
# inside the root namespace
cryptonite@cryptonite:~ $ping 172.12.0.12
PING 172.12.0.12 (172.12.0.12) 56(84) bytes of data.
64 bytes from 172.12.0.12: icmp_seq=1 ttl=64 time=0.125 ms
64 bytes from 172.12.0.12: icmp_seq=2 ttl=64 time=0.111 ms
...
# inside of the new net namespace
root@cryptonite:/home/cryptonite# tcpdump
17:18:17.534459 IP 172.12.0.11 > 172.12.0.12: ICMP echo request, id 2, seq 1, length 64
17:18:17.534479 IP 172.12.0.12 > 172.12.0.11: ICMP echo reply, id 2, seq 1, length 64
17:18:18.540407 IP 172.12.0.11 > 172.12.0.12: ICMP echo request, id 2, seq 2, length 64
....

# try the other way around
root@cryptonite:/home/cryptonite# ping 172.12.0.11
PING 172.12.0.11 (172.12.0.11) 56(84) bytes of data.
64 bytes from 172.12.0.11: icmp_seq=1 ttl=64 time=0.108 ms
...
# back to the root namespace
cryptonite@cryptonite:~ $sudo tcpdump -i veth0
tcpdump: verbose output suppressed, use -v or -vv for full protocol decode
listening on veth0, link-type EN10MB (Ethernet), capture size 262144 bytes
17:22:27.999342 IP 172-12-0-12.lightspeed.sgnwmi.sbcglobal.net > 172-12-0-11.lightspeed.sgnwmi.sbcglobal.net: ICMP echo request, id 18572, seq 1, length 64
17:22:27.999417 IP 172-12-0-11.lightspeed.sgnwmi.sbcglobal.net > 172-12-0-12.lightspeed.sgnwmi.sbcglobal.net: ICMP echo reply, id 18572, seq 1, length 64
17:22:29.004480 IP 172-12-0-12.lightspeed.sgnwmi.sbcglobal.net > 172-12-0-11.lightspeed.sgnwmi.sbcglobal.net: ICMP echo request, id 18572, seq 2, length 64
From the snippet above we can see how to create a new network namespace and connect it to the root namespace using a pipe-like connection. The parent namespace retained one of the interfaces, and passed the other one to the child namespace. Anything that enters one of the ends, comes out through the other end, just as a real network connection.

We saw how to isolate, virtualize, and connect Linux network stacks. Having the power of virtualization normally we would like to go further and create a virtual LAN between processes!
Connecting multiple namespaces (creating a LAN)
To create a virtual LAN another Linux virtualization utility will be used - the bridge. The Linux bridge behaves like a real level 2 (Ethernet) network switch - it forwards packets between interfaces that are connected to it using a MAC association table. Let’s create our virtual LAN.
# all previous configurations were deleted
# creating a pair of namespaces
cryptonite@cryptonite:~ $sudo ip netns add netns_0
cryptonite@cryptonite:~ $sudo ip netns add netns_1
cryptonite@cryptonite:~ $tree /var/run/netns/
/var/run/netns/
├── netns_0
└── netns_1
...
cryptonite@cryptonite:~ $sudo ip link add veth0 type veth peer name ceth0
cryptonite@cryptonite:~ $sudo ip link add veth1 type veth peer name ceth1
cryptonite@cryptonite:~ $sudo ip link set veth1 up
cryptonite@cryptonite:~ $sudo ip link set veth0 up
cryptonite@cryptonite:~ $sudo ip link set ceth0 netns netns_0
cryptonite@cryptonite:~ $sudo ip link set ceth1 netns netns_1
# setup the first connected interface -> net_namespace=netns_0
cryptonite@cryptonite:~ $sudo ip netns exec netns_0 ip link set lo up
cryptonite@cryptonite:~ $sudo ip netns exec netns_0 ip link set ceth0 up
cryptonite@cryptonite:~ $sudo ip netns exec netns_0 ip addr add 192.168.1.20/24 dev ceth0

# setup the second connected interface -> netns_1
cryptonite@cryptonite:~ $sudo ip netns exec netns_1 ip link set lo up
cryptonite@cryptonite:~ $sudo ip netns exec netns_1 ip link set ceth1 up
cryptonite@cryptonite:~ $sudo ip netns exec netns_1 ip addr add 192.168.1.21/24 dev ceth1

# create the bridge
cryptonite@cryptonite:~ $sudo ip link add name br0 type bridge
# set an ip on the bridge and turn it up
# so that processes can reach the LAN through it
cryptonite@cryptonite:~ $ip addr add 192.168.1.11/24 brd + dev br0
cryptonite@cryptonite:~ $sudo ip link set br0 up
# connect the ends of the network namespaces in the
# root namespace to the bridge
cryptonite@cryptonite:~ $sudo ip link set veth0 master br0
cryptonite@cryptonite:~ $sudo ip link set veth1 master br0
# check if the bridge is the master of the two veths
cryptonite@cryptonite:~ $bridge link show br0
10: veth0@if9: <BROADCAST,MULTICAST,UP,LOWER_UP> mtu 1500 master br0 state forwarding priority 32 cost 2
12: veth1@if11: <BROADCAST,MULTICAST,UP,LOWER_UP> mtu 1500 master br0 state forwarding priority 32 cost 2

# allow forwarding by the bridge in the root net namespace
# in order to enable the interface to forward between the namespaces
# depending on the different iptables policy this step may be skipped
cryptonite@cryptonite:~ $iptables -A FORWARD -i br0 -j ACCEPT

# check the network connection netns_test1 -> netns_test0
cryptonite@cryptonite:~ $sudo ip netns exec netns_test1 ping  192.168.1.20
PING 192.168.1.20 (192.168.1.20) 56(84) bytes of data.
64 bytes from 192.168.1.20: icmp_seq=1 ttl=64 time=0.046 ms
...

# connectivity check root_namespace -> netns_0
cryptonite@cryptonite:~ $ip route
...
192.168.1.0/24 dev br0 proto kernel scope link src 192.168.1.11
...
cryptonite@cryptonite:~ $ping 192.168.1.20
PING 192.168.1.20 (192.168.1.20) 56(84) bytes of data.
64 bytes from 192.168.1.20: icmp_seq=1 ttl=64 time=0.150 ms
...

# check the network connection netns_test0 -> netns_test1
cryptonite@cryptonite:~ $sudo ip netns exec netns_test0 ping 192.168.1.21
PING 192.168.1.21 (192.168.1.21) 56(84) bytes of data.
64 bytes from 192.168.1.21: icmp_seq=1 ttl=64 time=0.040 ms
...
It works! A really important thing is that the virtual interface has to have permissions to forward packets on the current network stack. To avoid messing up with the iptables rules, one can repeat this procedure in a separated network namespace where the rules table will be empty by default. Let’s now connect the LAN to the Internet!
Reaching the outside world
We have assigned IP to our bridge and we can ping it from the network namespaces.
# try to reach the internet
cryptonite@cryptonite:~ $sudo ip netns exec netns_1 ping 8.8.8.8
ping: connect: Network is unreachable
cryptonite@cryptonite:~ $sudo ip netns exec netns_1 ip route
192.168.1.0/24 dev veth1 proto kernel scope link src 192.168.1.21

# no route for the host interface -> bridge is on Level 2 =>
# no ARP resolution and inter-networking
# We  can make the bridge the default gateway for both namespaces
# and let it forward all traffic to the upper network namespace
cryptonite@cryptonite:~ $sudo ip -all netns exec ip route add default via 192.168.1.11

# Did everything go smoothly?
cryptonite@cryptonite:~ $sudo ip -all netns exec ip route
netns: netns_1
default via 192.168.1.11 dev ceth1
192.168.1.0/24 dev ceth1 proto kernel scope link src 192.168.1.21

netns: netns_0
default via 192.168.1.11 dev ceth0
192.168.1.0/24 dev ceth0 proto kernel scope link src 192.168.1.20

# let's try again
cryptonite@cryptonite:~ $ip netns exec netns_0 ping 8.8.8.8
PING 8.8.8.8 (8.8.8.8) 56(84) bytes of data.
^C
--- 8.8.8.8 ping statistics ---
2 packets transmitted, 0 received, 100% packet loss, ...

# One last thing -> the outside world doesn't know about our LAN nor do the host so we have to add one last rule
cryptonite@cryptonite:~ $iptables -t nat -A POSTROUTING -s 192.168.1.0/24 -j MASQUERADE

cryptonite@cryptonite:~ $sudo ip netns exec netns_0 ping 8.8.8.8
PING 8.8.8.8 (8.8.8.8) 56(84) bytes of data.
64 bytes from 8.8.8.8: icmp_seq=1 ttl=61 time=11.5 ms
64 bytes from 8.8.8.8: icmp_seq=2 ttl=61 time=12.5 ms
...
Note that the iptables rules of the host have to be well configured, because a bad configuration can lead to bad things. In addition, without masquerading, the packets would leave the host with its internal IP address which is only known from this host, the gateway on the host’s LAN has no idea how to join the local bridge network.
To sum up about the network namespace:
Processes within a given network namespace get their own private network stack, including network interfaces, routing tables, iptables rules, sockets (ss, netstat);
The connection between network namespaces can be done using two virtual interfaces;
Communication between isolated network stacks in the same namespace is done using a bridge;
The NET namespace can be used to simulate a “box” of Linux processes where only a few of them would be able to reach the outside world (by removing the host’s default gateway from the routing rules of some NET namespaces).
Take a breath
So far, we have covered several namespaces. In the next article, we will see others:
USER: to map UID/GID and hence have different root users depending on the current namespace.
MNT: to create per process filesystems.
UTS: to isolate the system hostname.
IPC: which provides isolation for semaphores, message queues, shared memory, etc.
CGROUP: by which you can control hardware resources per process.
Then, you'll know (almost) everything about namespaces thus will be able to create your own container, or rather a fully isolated environment for a given process.
Greetings
I would like to thank some key members of the team for discussions (erynian, mahé, Lo and pappy), proofreading (Francisco), and last but not least, pappy for pushing me beyond my comfort zone and helping me to grow.
References
https://www.toptal.com/linux/separation-anxiety-isolating-your-system-with-linux-namespaces
https://byteplumbing.net/2018/01/inspecting-docker-container-network-traffic/
https://opensource.com/article/19/10/namespaces-and-containers-linux
https://iximiuz.com/en/posts/container-networking-is-simple/
https://ops.tips/blog/using-network-namespaces-and-bridge-to-isolate-servers/
https://www.cloudsavvyit.com/742/what-are-linux-namespaces-and-what-are-they-used-for/